The Surgery Queue module provides a comprehensive interface for hospital staff to manage and monitor surgical patients. It centralizes information about patients scheduled for surgery, their admission status, insurance authorization, and post-operative actions like billing and discharge.
- The Surgery Queue is divided into three main tabs for better categorization of surgical workflows:

Insurance Status
- The patient having insurance is scheduled by the Counselor for Surgery.
- Insured Patients will be listed in the Insurance Status screen with Patient name, IP No., Procedure, Eye, Doctor Name, Reporting Time, Admit Date, Insurance Status (Auth Approved/Auth Pending).
- Focused view to monitor insurance-related workflows.
- Shows whether authorization is approved or pending.
- Useful for coordinating with TPA desks before patient admission.
-
Estimate Button:
- Opens an estimate generation screen for surgical costs.
- Esitimate Billing screen displays the Name, UHID, IP No., Phone No., Address, Insurance Name, Admission Date that added by the Counselor at the time of Booking.
- View/ Edit TPA (If TPA is added by the Clinic Admin while adding New Insurance, Tpa will be auto filled in this page).
- Select Bill Date from date picker.
- Enter Bed Number (Optional).
- Added Item (Procedure) will be displayed here.
- Enter HSN/SAC, Amount, Net Amount.
- You can add more items by clicking the blue '+' button to include additional services.
- Billing Summary Fields
| Field Name | Description |
|---|---|
| Total Amount | Sum of all listed charges. |
| Discount Amount (Editable) | Any applicable discount. |
| Net Amount | Total Amount - Discount. |
| Advance Amount (Editable) | Amount already collected as advance from patient. |
| Authorised Credit Amount | Amount to be covered by insurance or TPA. |
- Click i to view the Procedure details added at the time of surgery booking.
- Print Bill: Print the Estimated Invoice.
Only after printing the ESTIMATED BILL, INSURANCE NOTIFY (Insurance status) will be enabled and Confirm the Surgery Booking.
-
Update Button
This screen is used to enter, review, and manage insurance-related information for a patient undergoing surgery. It captures essential patient, admission, and insurance claim details.
- Patient & Admission Details
At the top section, key patient demographics and admission information are shown:
- Name, Age, Gender, Referral, and Contact details are auto-populated from the patient's profile.
- View/Edit the following Patient Details and Admission Details:
- Doctor: Select the consulting doctor in charge of treatment.
- Admit Date / Discharge Date: Input the admission and expected discharge dates.
- Eye: Specify whether the procedure is for the Right or Left eye.
- Lens, Systemic, Power: Optional clinical details as required for the procedure.
- Reporting Time: Reporting time of the Ptient for the Surgery.
- Room/Bed and OT Room: Choose the patient’s room type and operation theatre from dropdowns.
- Insurance Details
This section is activated when the Insurance toggle is enabled at the time of Surgery Schedule (blue).
- View/ Edit the following Details:
- Insurance Provider: Select the name of the insurance company.
- Insurance Number: Enter the policy number as provided by the patient.
- Insurance Expiry Date: Mention the validity end date of the policy.
- Alternate Number: Additional contact number if needed.
- Patient Name and DOB: Details of the insured individual.
- Gender: Select Male/Female.
- Procedure & Cost Details
- Procedure: Search and select the name of the surgery or treatment.
- Price: The standard cost of the selected procedure.
- Discount Type: Choose between a flat amount or percentage discount.
- Discount: Enter the discount value based on the selected type.
- CGST / SGST: Not Editable (Added at the time of Booking).
- The Total column will auto-calculate based on the above inputs.
- Cost Summary Section (Right Panel) This shows a detailed breakdown of the billing:
- Gross Amount: Original cost of the procedure before deductions.
- Discount Amount: Calculated deduction based on the selected type and value.
- SGST / CGST Amount
- Net Amount: The amount payable after applying discount and taxes.
- Grand Total: Final amount expected for billing or insurance purposes.
- Additional Insurance & Admission Info
- Pending Amount: Displays balance amount due from patient.
- Reason for Admit: Short description
- Comment: Add comments for internal hospital remarks.
- Camp Patient Check box: Check if the patient is part of a health camp.
- Insurance Notify: Tick to trigger internal alert to insurance cell.
- Claim and Authorization Section
This section appears when insurance is active:
- Status: Select the insurance claim status (Auth Pending/ Auth Partial Approved/ Auth Approved/ Auth Denied).
- Claim ID: Mandatory reference number for the insurance claim.
- Approval Amount: Enter the amount sanctioned by the insurance provider.
- Co-pay Section
Enabled when Co-pay is checked:
- Co-pay Type: Choose Co-pay type (Flat/%).
- Co-pay Amount: Enter the patient’s contribution
- Co-pay Payment Status:Not Paid/ Paid/ Settle from Advance.
- Settle from Advance only enabled after Advance paid by the patient.
- Copay Receipt: Click to generate a receipt for the co-pay amount collected.
- Add/View Attachments:
- Click + button to add or view attachments.
- Click Attach File button to add a file.
- Select a file.
- Add Comment if any
- Click Upload to save the file.
- Click X button to delete the Attachment.
- Notes: Provision to enter any remarks or clarifications regarding the case or claim.
-
Advance Button:
Click Advance button to make an Advance Payment.
- Billing Screen:
- Patient Information is displayed at the top-left, including Patient Name, Phone number, UHID, IP Number, Address.
- Clinic Details are shown on the right, including Clinic Name and Phone Number.
- Choose Payment Status from drop-down (Paid/Free).
- Choose Payment method (Cash / Card/ Online/ Free).
- Add comments for Cash Payment, Card No. for Card Payment, UPI ID/Transaction No. for Online Payment.
- Select Dr. Name from the drop-down.
- The Procedure (Item) added will be displayed here with Quantity, Type: Consultation/ Consumables/ Investigations/ Others/ Procedures (Editable section), Price, Discount Type (Flat/%), Discount Amount, CGST & SGST (in %), Total Amount (auto calculated based on inputs).
- Billing Summary Panel: To the right of the procedure entry table including non-editable fields such as Gross Amount, Discount amount, SGST & CGST amounts, Net Amount, Discount/Excess Amount and Grand Total.
- Payment section:
- Paid Amount: Advance Amount collected from the patient.
- Pending Amount: Unpaid Balance (Total -Advance).
- Advance Amount: Advance received.
- Patient Deposit: Total Advance Received from the patient.
- Notes: Add additional notes if any.
- Print Bill Button: Generates a printable version of the current bill.
- Cancel surgery: Cancel the Scheduled Surgery with reason for cancellation.
Schedule List
The Schedule List section of the Surgery Queue is designed t0 manage patients scheduled for surgery over a selected date range. It provide a visibility of upcoming surgical cases along with associated actions.
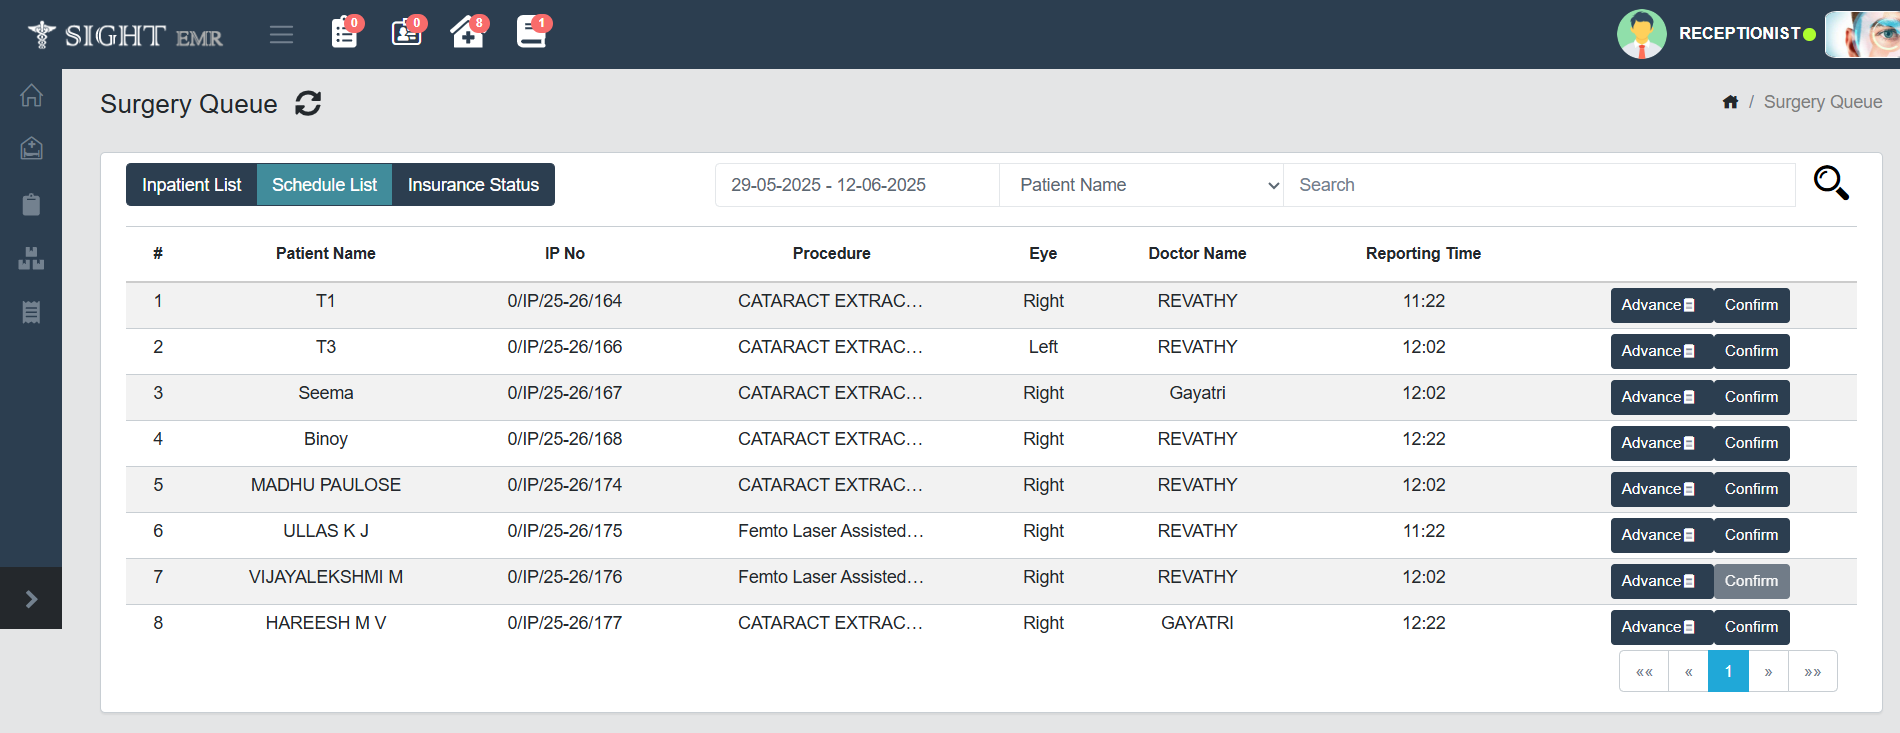
- Date Range Selector: Allows the user to filter the schedule list based on a specific range of dates.
- Search Functionality: Users can serach by Patient name, Doctor Name, UHID, Alt ID.
- Each row in the list corresponds to a scheduled patient and includes Patient Name, IP No., Procedure, Eye, Doctor Name, Reporting Time.
- Action Buttons:
- Advance Button: Opens the billing or insurance advance entry window for the selected patient.
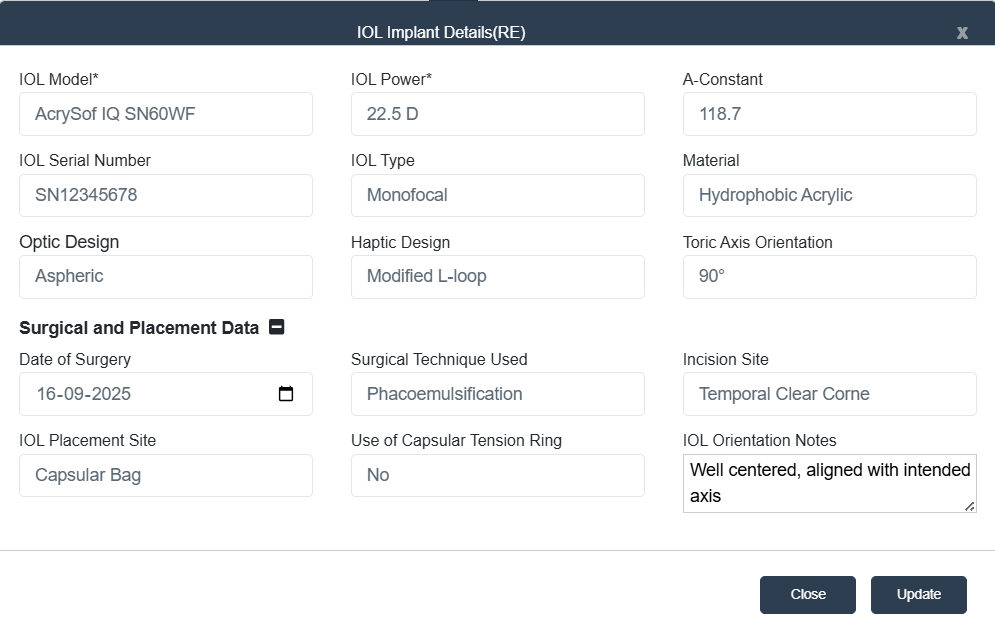
- From this screen there is an option to Add/Update the IOL Implant Details for RE and LE.
- If Data is there in any of the IOL Implant, it will be visible in black colour.
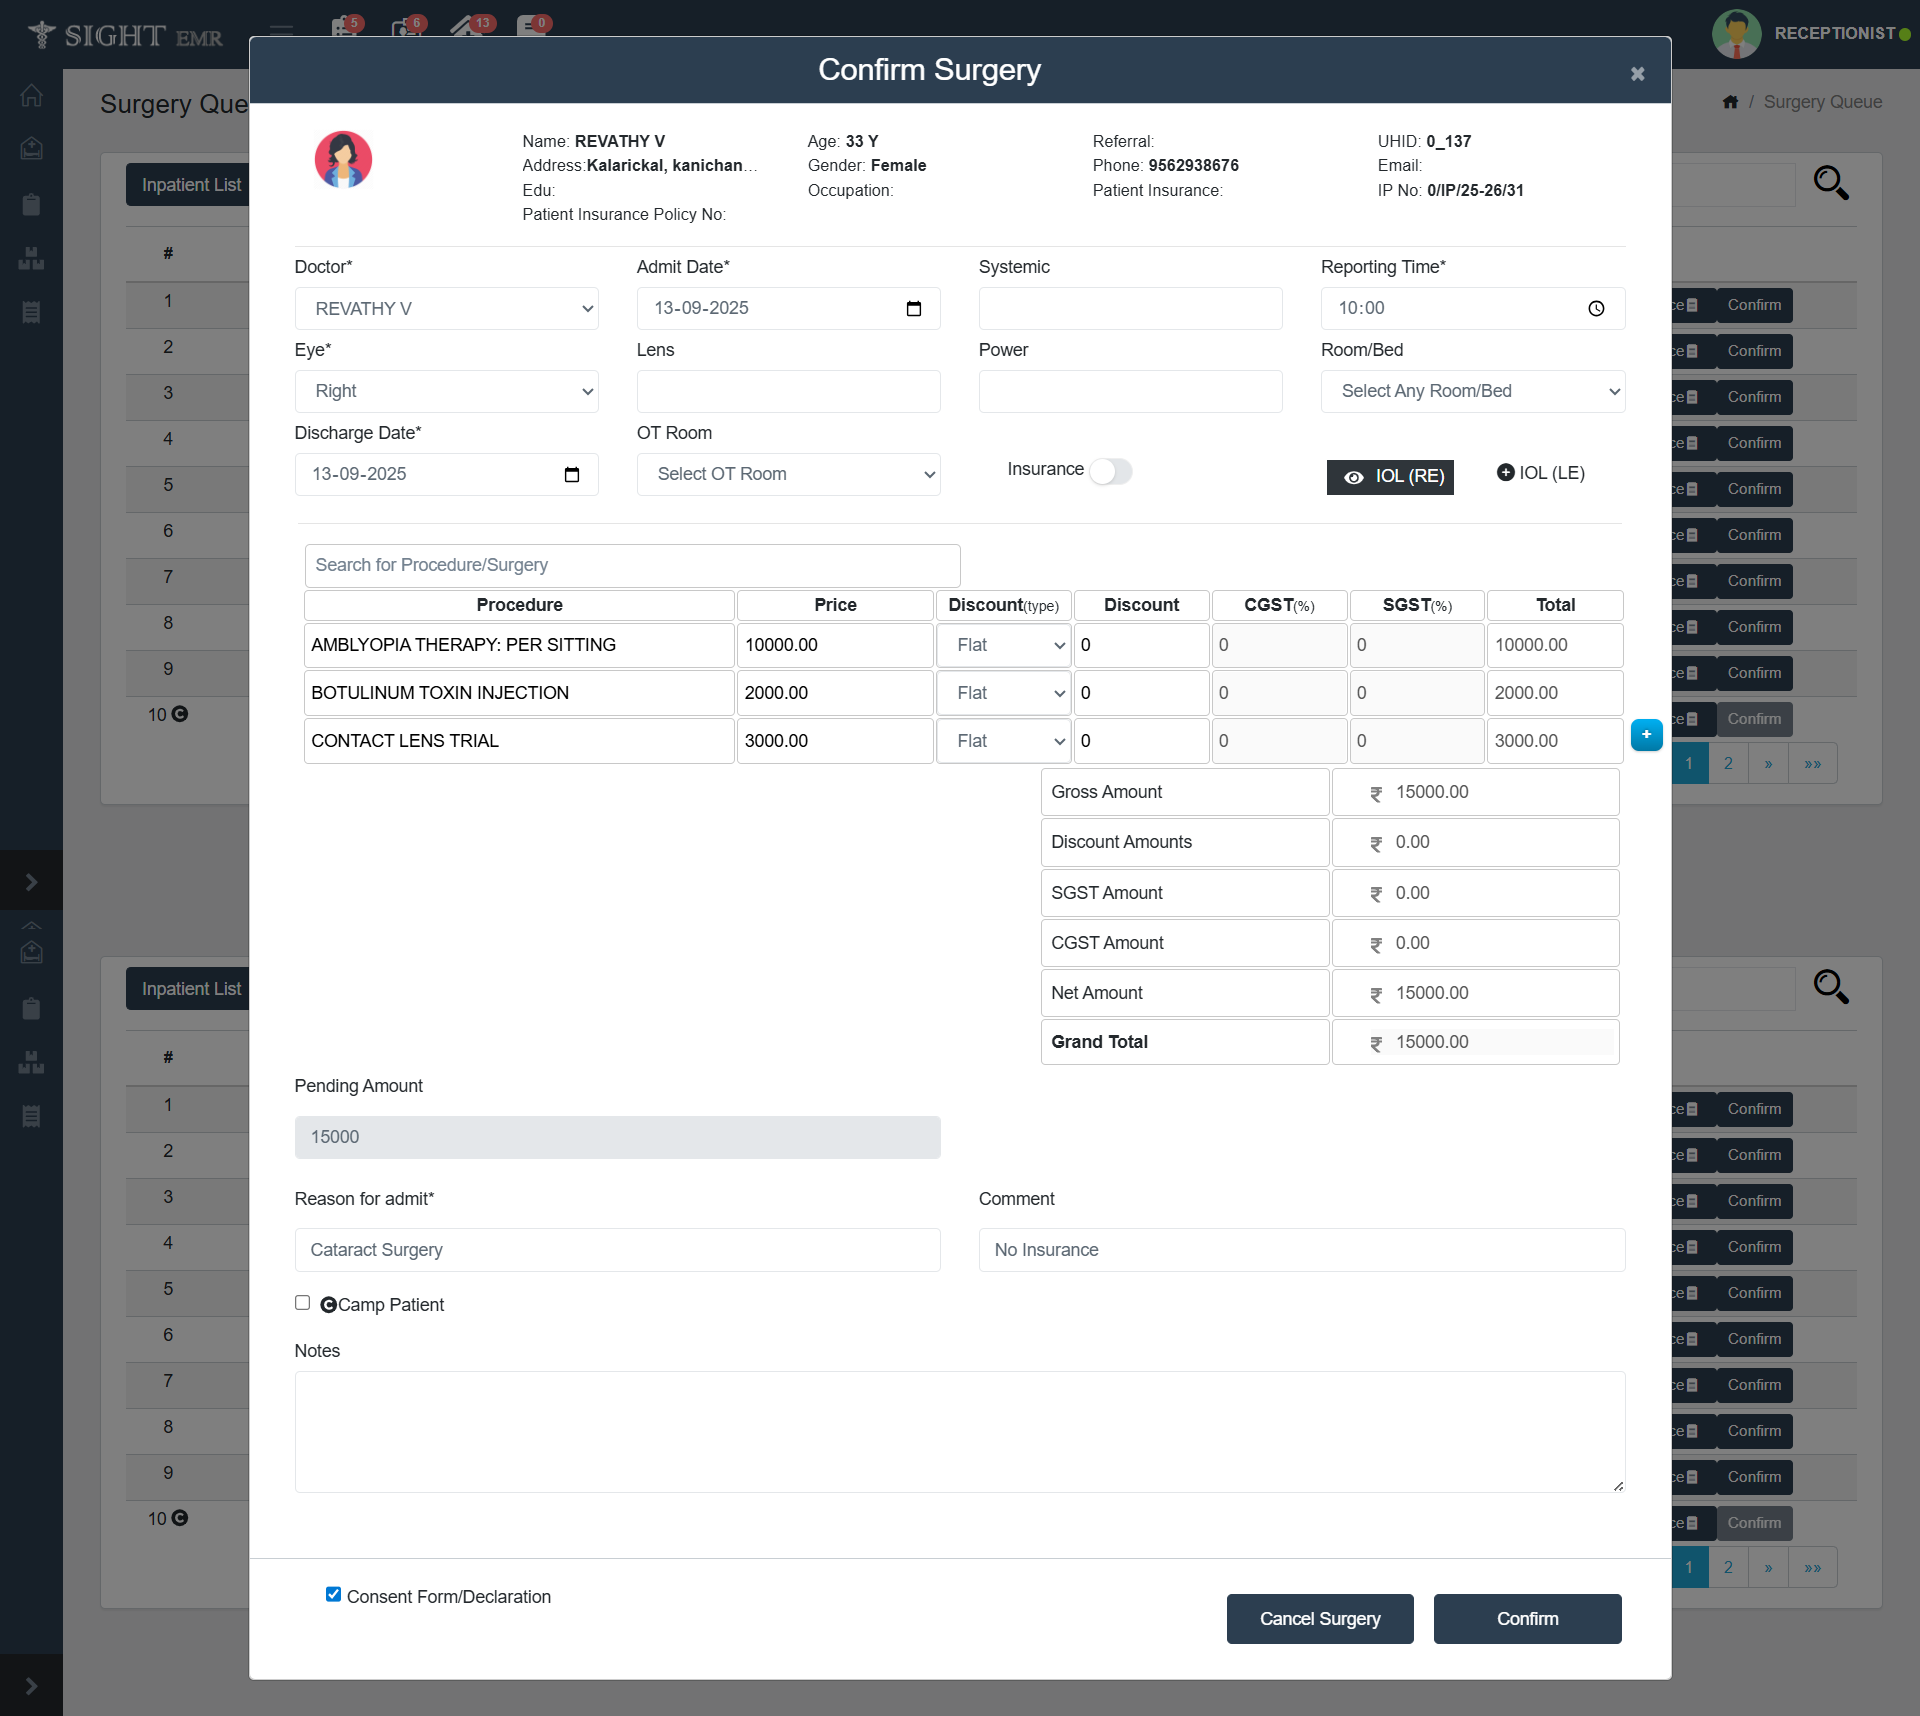
- Confirm Button: Click Confirm button to Confirm the Surgery. A Confirm Surgery screen will opens up with the same interface of Update: Insurance screen.
- In addition to that, you can edit the PRICE, DISCOUNT TYPE & DISCOUNT AMOUNT fields (if needed).
- Tick Consent Form/Declaration check box to confirm the Surgery (Only after that Confirm button will be enabled).
- Counselor can download Consent Form from the Confirm Screen if uploaded by Clinic Admin.
- Cancel surgery: Cancel the Scheduled Surgery with reason for cancellation (before confirming the surgery).
- After Booking confirmed, the patient will move to the Inpatient list.
- Surgery Confirmed patients can be Picked by Nurse/ Anaesthesiologist/ Doctor.
Inpatient list
- The Inpatient List screen displays real-time details of patients admitted for surgery. It serves as a quick-access dashboard for clinical and administrative staff to manage the status of each surgical case, including billing and discharge processes.
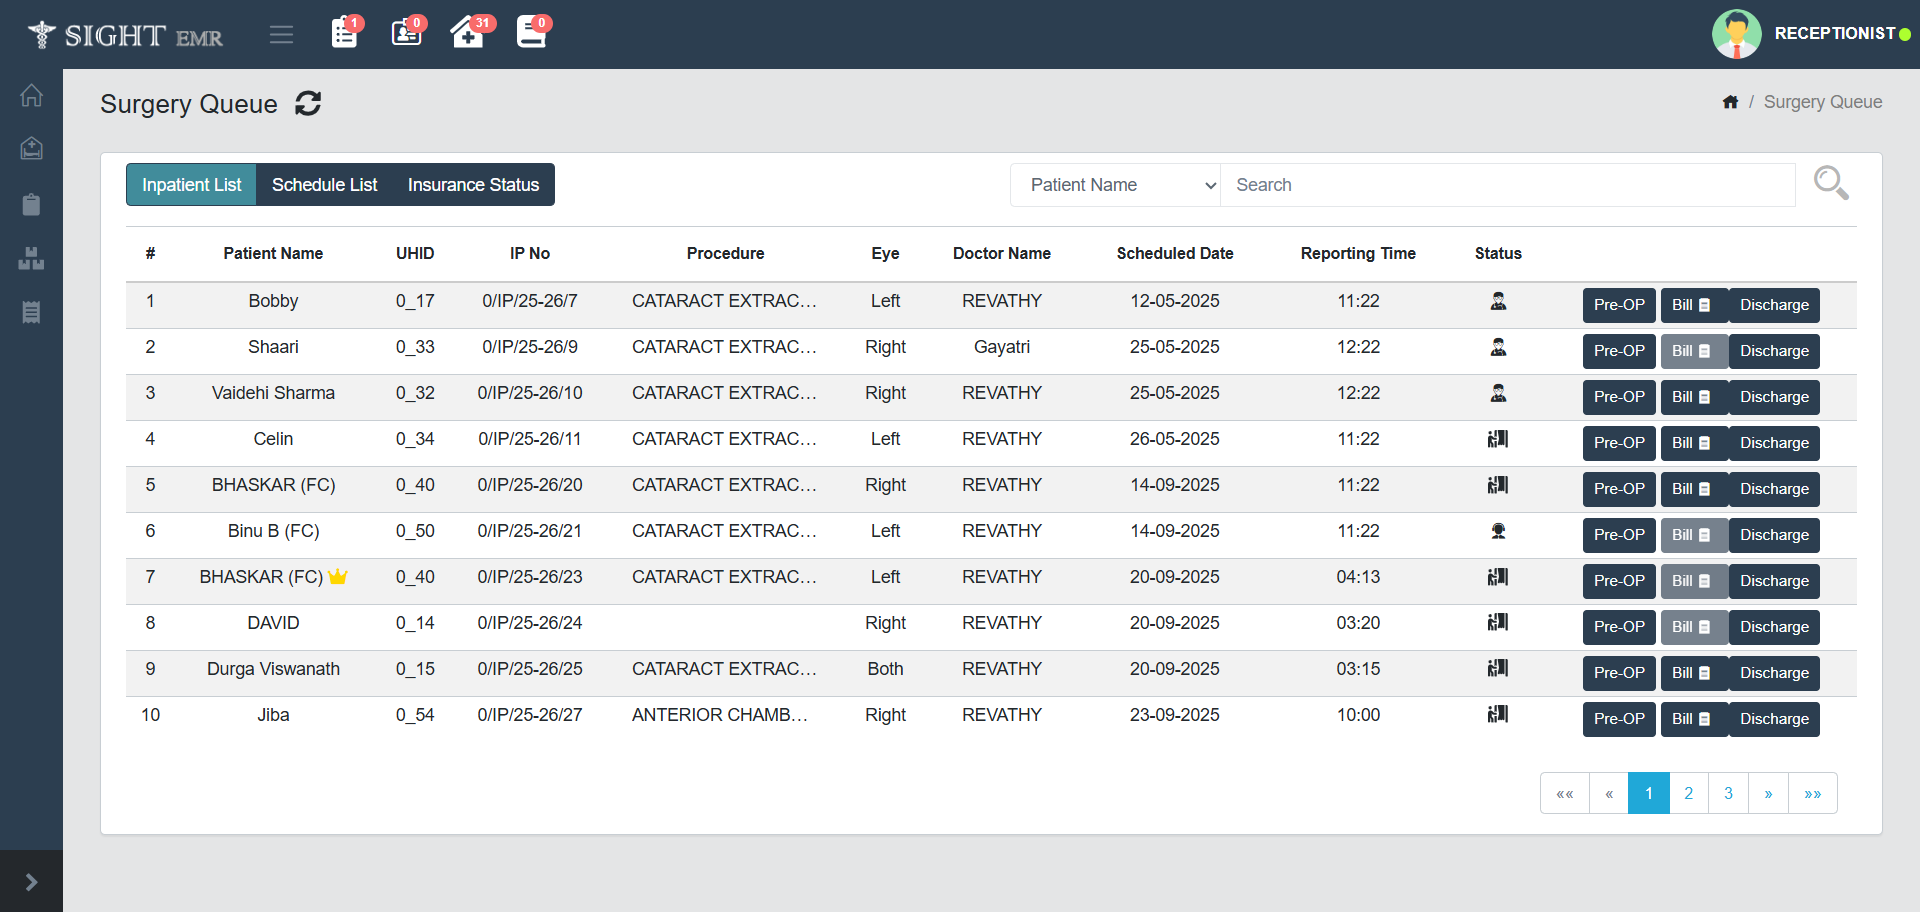
- Filter & Search: A dropdown filter allows selection based on fields like Patient Name, Doctor Name, UHID & IP No. and a search bar enables keyword search.
- Each row corresponds to an admitted surgical patient. It includes Patient Name, UHID, IP No., Procedure, Eye, Doctor Name, Scheduled Date, Reporting Time, Status (Patient is Waiting, Last Consulted by Dr/Nurse, Last Updated by Counselor etc) with icon and tool tip.
-
Pre-OP
- Pre-operative summary is now available from the Surgery Queue and also downloadable from the surgery list once generated.

-
Pre-OP Summary includes the following:
- Patient Information: Displays key patient details at the top includes Patient Name, Patient UHID/IP Number, Address, Admission Date, Surgery Date.
- Also shows Surgery-related financial details such as Surgery Cost, Paid Amount, Insurance Details, Approved Amount.
- Surgery Information:
- Surgeon: Name of the Surgeon performing the procedure.
- Remarks: Additional Notes.
- Consent Form: Status of Upload (Eg: Uploaded/ Not Uploaded).
- Surgical Details: It includes Eye Selection, Primary Procedure, Secondary Procedure, Implant and Adjuncts, Anaesthesia, Prognosis Group, Other Requirements.
- Eye Conditions: Right Eye (RE) and Left Eye (LE).
- A-Scan: It includes IOL Power, Axial Length, K1 and K2 values, Cylinder, Axis details.
- Vision Details: UDVA and CDVA values of both eyes added by the Doctor/Refractionist.
- Systemic Conditions: It includes Diabetes details, Allergies, COVID History, Other Conditions if any.
- Investigations: Includes latest investigation values such as IOP, Blood Pressure, Blood Sugar-Postprandial, RE Duct Date and RE Duct Status, Roplas.
- Clinical Findings: Clinical Findings of Right Eye (RE) and Left Eye (LE).
- Actions:
- Save: Saves the enetered details.
- Close: Closes the Pre-OP Summary Window.
- Print Summary: GEnerates a printable version (PDF) of the Pre-OP Summary.
- Patient Information: Displays key patient details at the top includes Patient Name, Patient UHID/IP Number, Address, Admission Date, Surgery Date.
-
Inpatient Bill
- Click Bill button to generate the final bill. The Billing screen provides a centralized interface to manage and generate patient bills, services, discounts, payment methods, and insurance contributions. This screen is essential for billing staff to finalize and print bills at the time of discharge or surgery completion.
- Patient Information is displayed at the top-left, including Patient Name, Phone number, UHID, IP Number, Address.
- Clinic Details are shown on the right, including Clinic Name and Phone Number.
- Choose Payment Status from drop-down (Paid/ Not Paid/ Free).
- Choose Payment method (Cash / Card/ Online/ Free).
- Add comments for Cash Payment, Card No. for Card Payment, UPI ID/Transaction No. for Online Payment.
- Select Dr. Name from the drop-down.
- The Procedure (Item) added will be displayed here with Quantity, Type: Consultation/ Consumables/ Investigations/ Others/ Procedures , Price, Discount Type (Flat/%), Discount Amount, CGST & SGST (in %), Total Amount (auto calculated based on inputs).
- All fields are editable (Can add/delete any procedure) except Total amount field.
- Billing Summary Panel: To the right of the procedure entry table including non-editable fields such as Gross Amount, Discount amount, SGST & CGST amounts, Net Amount, Discount/Excess Amount and Grand Total.
- If the patient with Wallet balance, the wallet card (**SightEMR E-card) will be displayed at the left side of the billing summary panel. The wallet card will be enabled only for Split payment method.
- Payment section:
- Paid Amount: Advance Amount collected from the patient.
- Pending Amount: Unpaid Balance (Total -Advance).
- Advance Amount: Advance received.
- For Insured Patients:
- Insurance amount: Claimed Insurance coverage
- Insurance Copay Amount: Included in Insurance amount if any.
- Co-pay Payment Status: Dropdown indicating if co-pay is settled (Paid/Not Paid)
- Total Surgery Amount: Cumulative amount billed for surgery
- Notes: Add additional notes if any.
- Print Bill Button: Generates a printable version of the current bill.
The Final Bill in the Surgery List will be disabled after generating the Inpatient Bill.
-
Discharge
The Discharge Summary screen is used to record and review the discharge details of a patient after surgery or inpatient treatment. It combines patient information, investigation results, surgery details, and discharge dates in one interface.
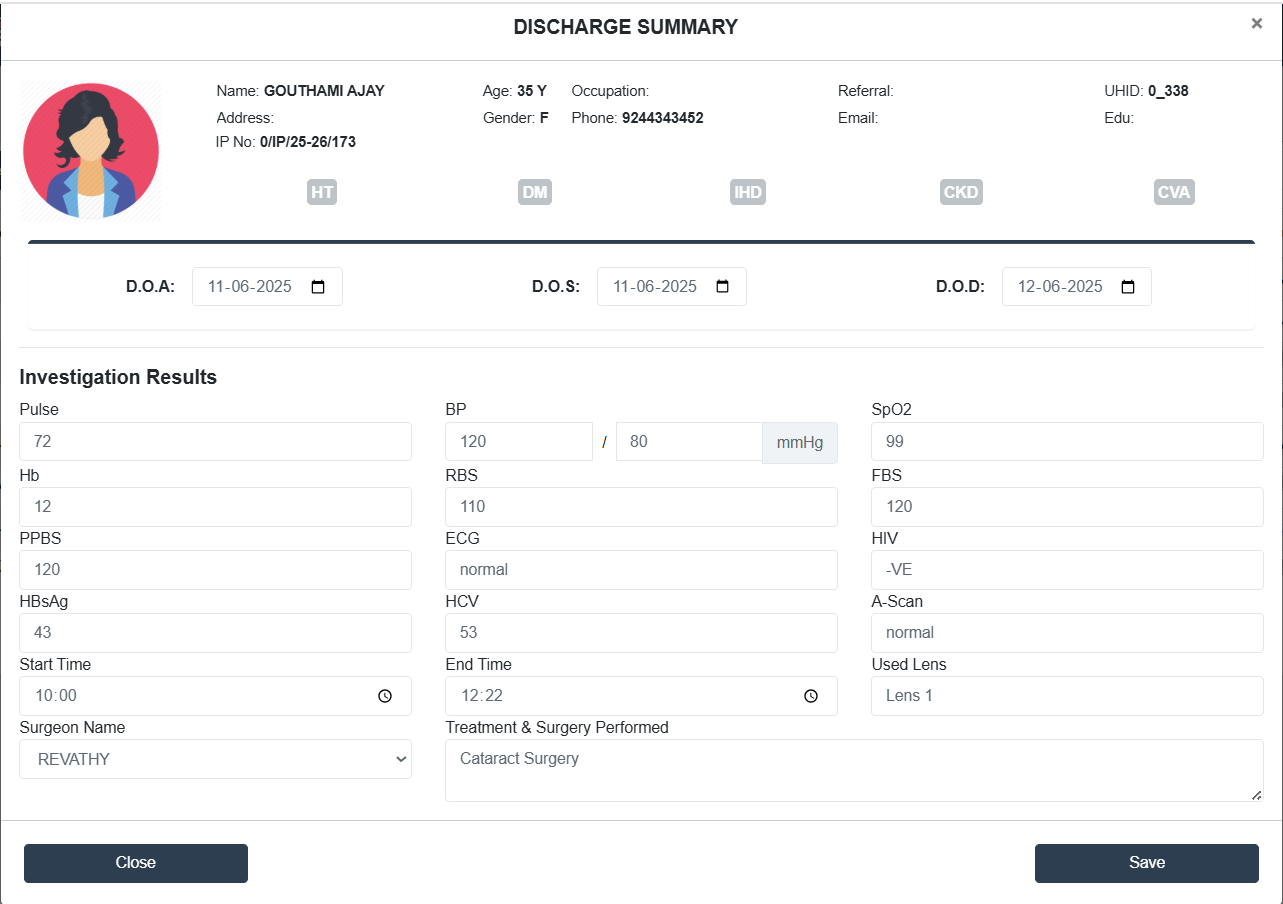
- Header Section: Displays essential patient identifiers: Name, Age, Gender, Occupation, Phone, UHID, IP No., Address, Referral Info, Email, Education.
- Indicators for Systemic.
- Date Section: View/Edit the dates using a Calender picker.
- D.O.A : Date of Admission
- D.O.S : Date of Surgery
- D.O.D : Date of Discharge
- Investigation Results Section: A structured input area for entering pre- and post-operative clinical values such as Pulse, BP,SpO2, Hb, RBS, FBS, PPBS, ECG, HIV, HBsAg, HCV, A-Scan, Used Lens.
- Select Start/End Time of Surgery (with time picker).
- Surgeon Name: Name/ Edit the Name of the Surgeon.
- Add Treatment & Surgery Performed.
- Save: Click Save button to save the Inpatient details.
- Close: Click Close button to exit the screen without saving changes.
- Enter/Edit Reason for Admission & Condition of patient At Discharge .
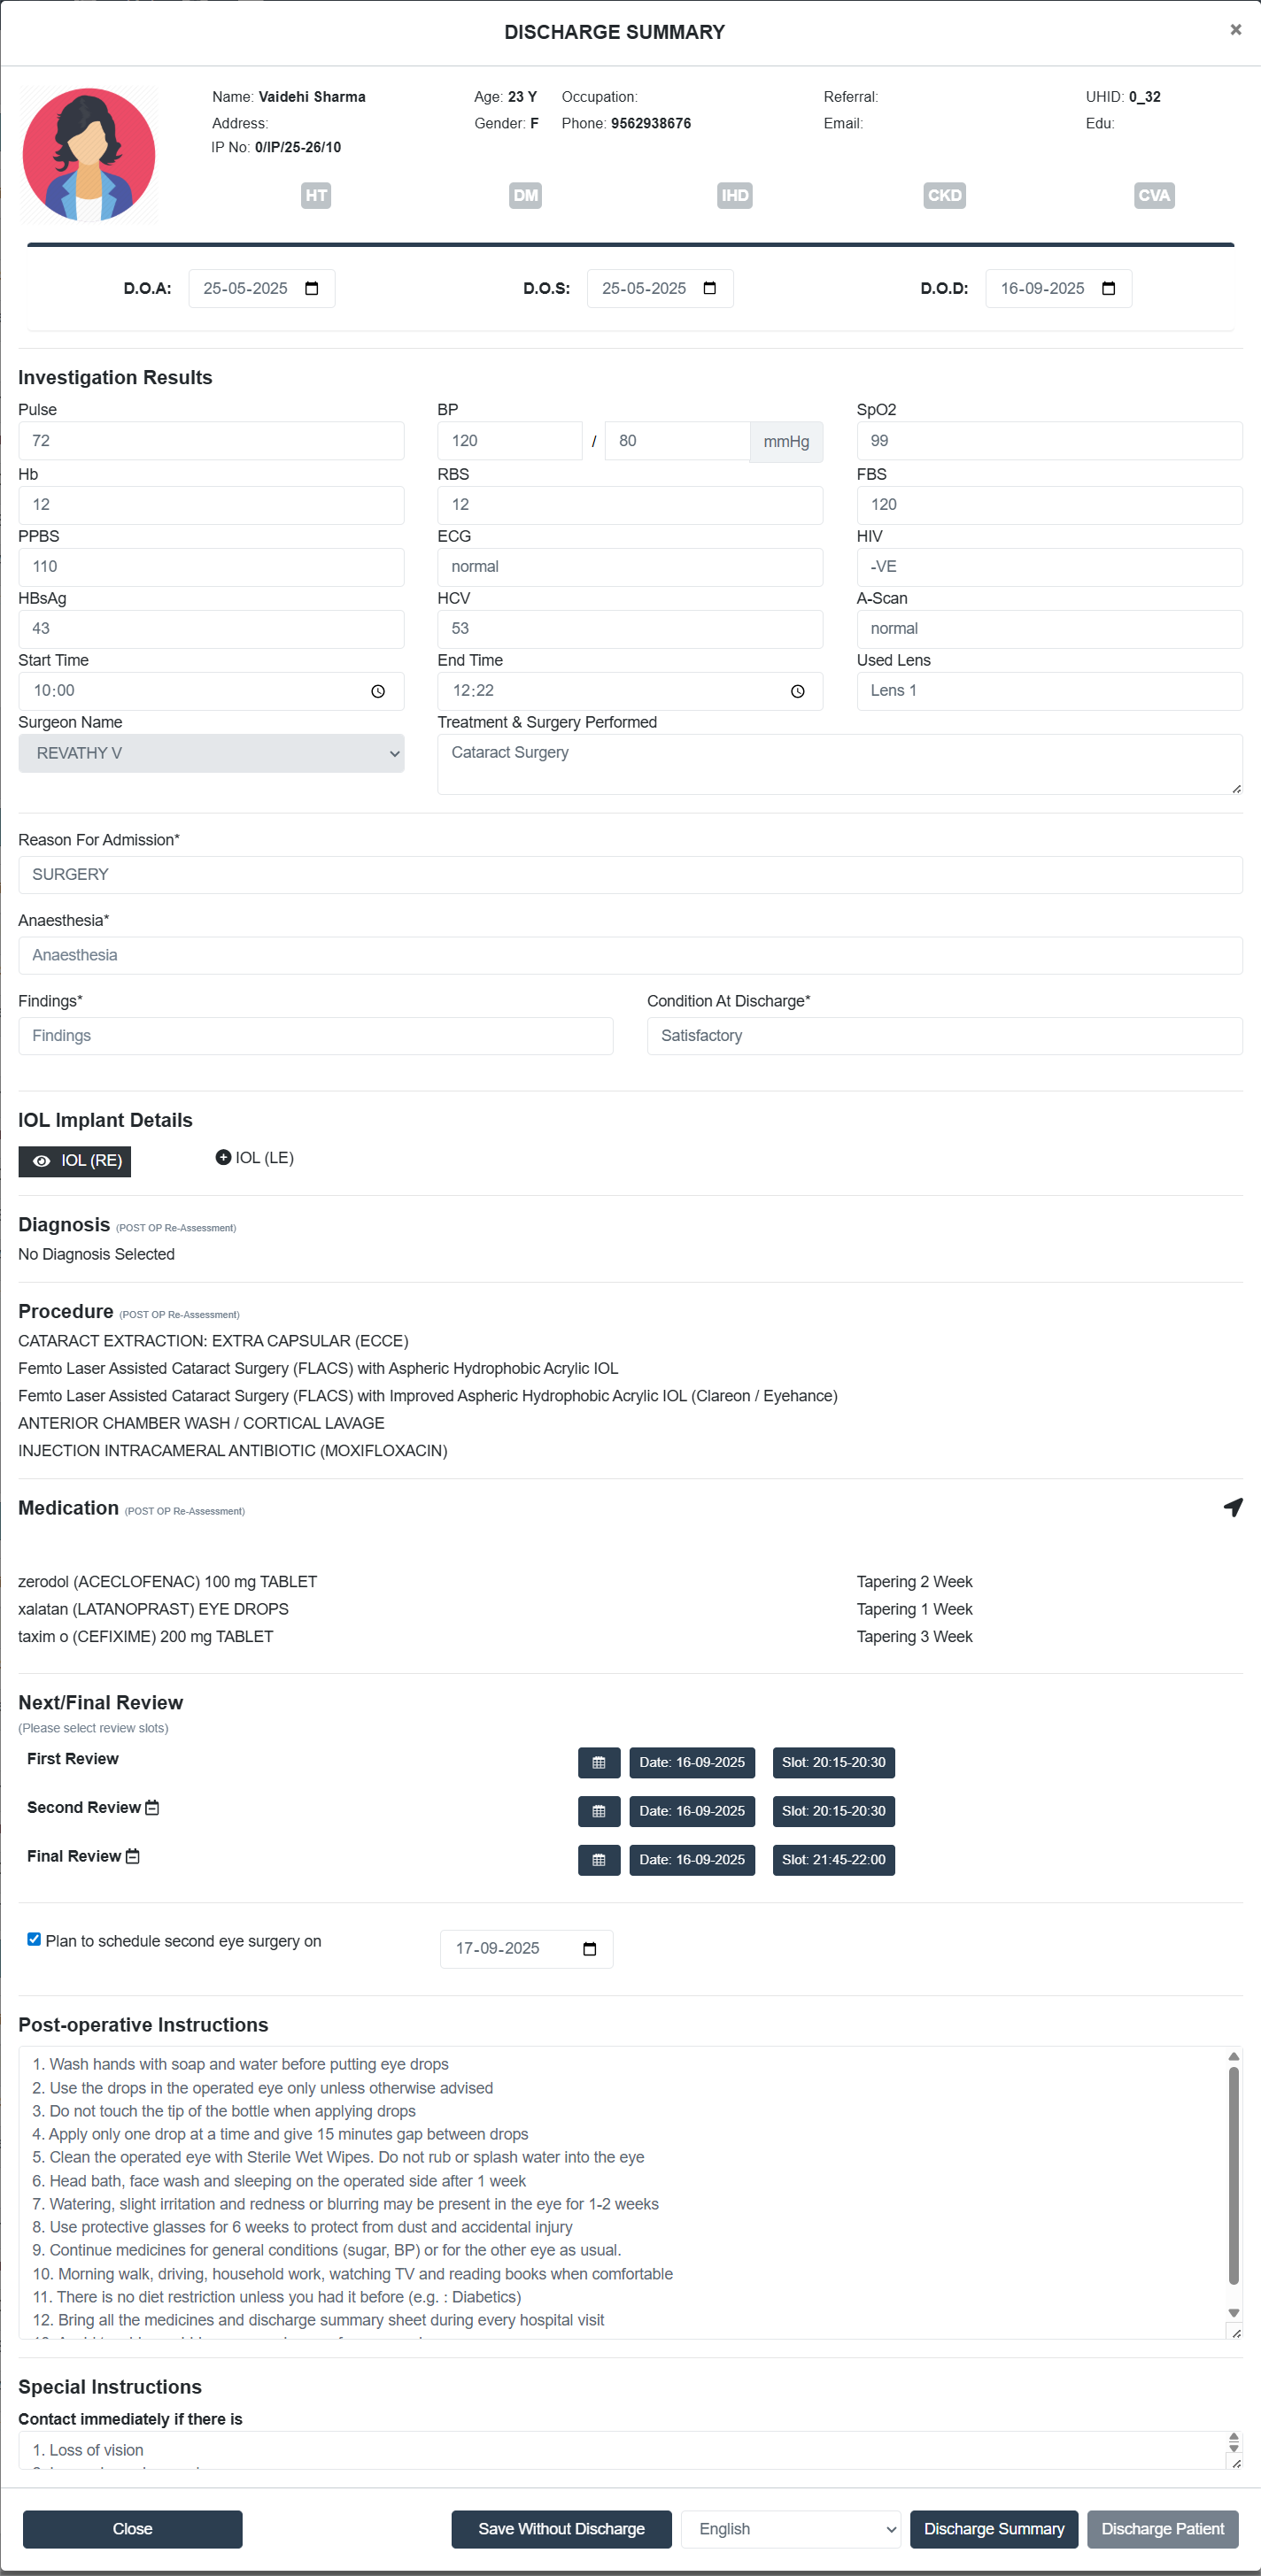
- Fill the mandatory fields: Anaesthesia and Findings.
- IOL Implant Details: Option to Add/Edit IOL Implant Details for RE and LE. It will be reflected in the Doctor screen.
- View the Diagnosis & Procedure added by the Dr (Post OP Re-Assessment).
- View/Edit Medication (Post OP Re-Assessment) by clicking the arrow ath the right side of the medication section.
- The Drug Templates and the Medicine list added by the Dr will be listed here. Double click on the Drug Templates to add the medicine.
- Click Clear All to clear the medicine data.
- Click Submit to submit the medicine details.
For Discharge by Doctor: Doctor can edit Dignosis, Procedure and Medication fields by clicking the arrow at the right side of the corresponding fields which will re-direct to the Post OP Re-Assessment screen.
- Schedule Review (Next/Final Review)
- Select the review slots for First Review, Second Review, Final Review from date picker. It is mandatory to schedule the First Review.
- The user can now select no of days to select an availability slot in addition to the current 3 months,6 months and 1 year options.
For Discharge by Doctor: The First Review, second review and Final Review will be auto-filled by system according to the available time slot.
- A checkbox is available to Plan to schedule second eye surgery.
**For Discharge by Doctor: Plan to schedule second surgery field is not available.
- View Post-operative and Special instructions.
- Action Buttons
- Close: Exit without saving.
- Save Without Discharge: Temporarily save entered data.
- Discharge Summary: Generate printable PDF of summary (Able to Print Multiple times).
- Discharge Patient: Complete discharge and update system records.