The Surgery List screen provides a comprehensive overview of all scheduled, completed, or cancelled surgeries within a selected date range. It helps the surgical and administrative team manage procedures and monitor patient statuses efficiently.
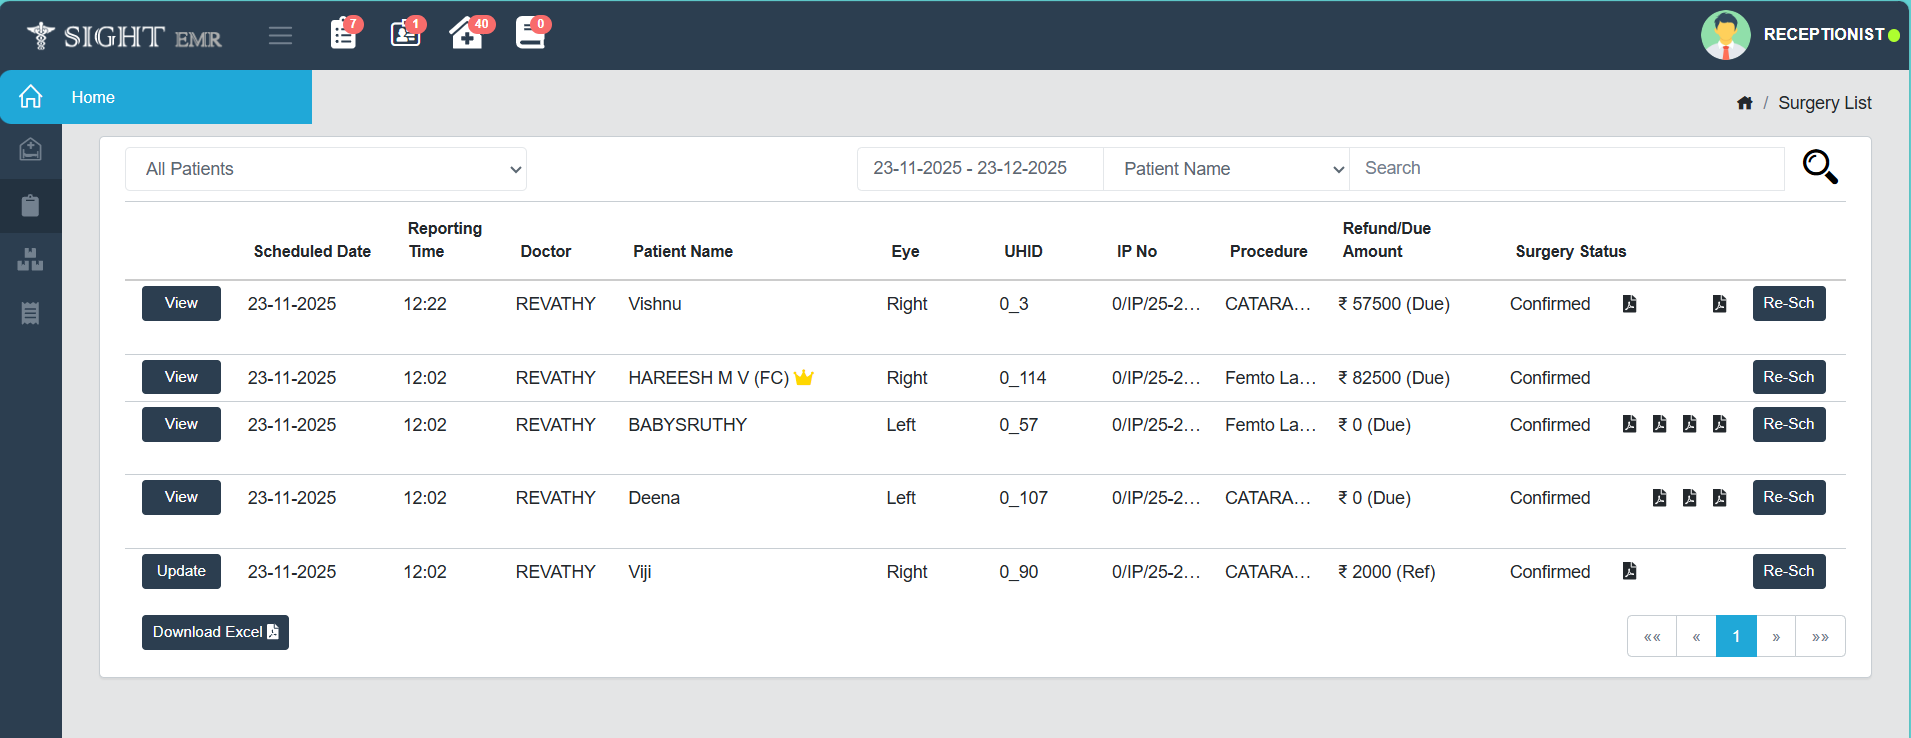
- At the top of the screen, filters are available to narrow down the list:
- Patient Type Filter: A dropdown allows you to choose between All Patients, Insurance Patients, or Cash Patients.
- Date Range Selector: You can choose a specific range of dates to filter the surgeries.
- Filter by Patient Name/ Doctor Name/ UHID/ IP No.
- Each row in the list provides details about a surgery including:
- Date & Time: Shows the scheduled date and time of surgery.
- Doctor: Name of the doctor assigned to perform the procedure.
- Patient Name: Name of the patient undergoing surgery.
- Eye: Indicates whether the surgery is for the left or right eye.
- UHID: Unique Hospital Identification number for the patient.
- IP No: The inpatient number linked to the surgery admission.
- Procedure: Name of the surgical procedure.
- Refund/Due Amount: Displays the financial status, showing either a refund or due amount with value.
- Surgery Status: Indicates the current status of surgery (Confirmed, Pending, Cancelled, Discharged).
-
Update Button: For Insurance Patients.
- Click Update Button at the left of the corresponding row.
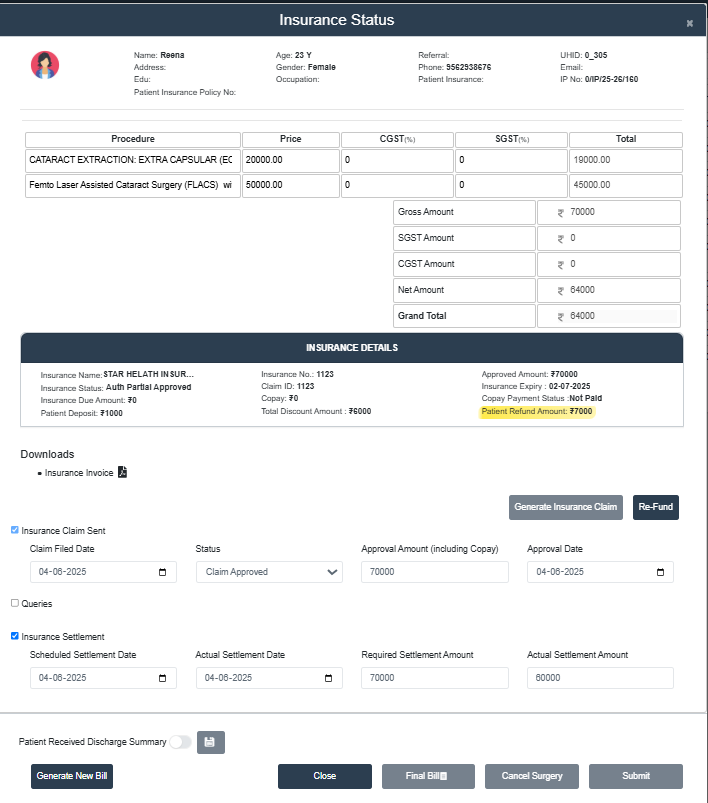
- Opens up an Insurance Status Page.
- Patient Details Section: Name, Address, Education, Age, Gender, Occupation, Referra, Phone Number, UHID, Email, Patient Insurance Name, Patient Insurance Policy Number and IP Number.
- Procedre Details with Price:
- Procedure Name: Added by the Doctor/Counselor
- Price of the Procedure: Can be edited
- CGST, SGST: Can be Edited
- Total: Auto calculated according to the input added.
- Billing Summary Section: Includes Gross Amount, SGST Amount, CGST Amount, Net amount and Grand Total.
- Insurance Details
- This screen displays detailed insurance information for a patient and allows billing and refund actions based on the insurance claim status.
- Insurance Name: Name of the insurance provider.
- Insurance Status: Shows the current claim status.
- Click the Pencil Icon to change the Insurance Status.
- Opens up Insurance Notify Screen with:
- Status (Auth partial Approved/Auth Approved).
- Claim ID: Auto filled from previous Insurance screen.
- Approval Amount: Can be edited.
- Discount: Can be Edited.
- Co-pay: View Co-pay type (Flat/%), Co-pay amount, Payment Status (Paid/Not Paid/Settle From Advance).
- Click Confirm button to save the changes.
- Click Close button to close the Insurance Notify page.
- Insurance No. and Claim ID: Unique identifiers for the Insurance and Claim.
- Approved Amount: The amount approved by the Insurance Company.
- Insurance Expiry: The date until the insurance is valid.
- Insurance Due Amount: The amount not covered by insurance.
- Copay: The fixed amount to be paid by the patient.
- Patient Deposit: Amount deposited by the patient, if any.
- Copay Payment Status: Whether the copay is paid.
- Patient Refund Amount: Displays any excess paid amount that is refundable to the patient.
- Total Discount Amount: Any discounts applied (if applicable).
- Downloads Section
- Copay Download: A PDF icon is available for downloading Co-pay Receipt.
- Insurance Invoice: Download for Insurance Invoice available only after Generate Insurance Claim.
- Click Submit button to update the Insurance Details.
- Click Generate Insurance Claim Button to initiates Insurance Claim.
- Billing Screen will appears. Edit the details if needed.
- Click Print Bill to Generate Bill.
- Claim Processing
- Insurance Claim Sent: Checkbox indicating whether the insurance claim has been sent. Fill the required fields such as:
- Claim Filed Date: The date the claim was submitted.
- Status: Current status of the claim (Claim Pending/ Approved/ Rejected).
- Approval Amount (including Copay): Approved amount inclusive of the copay (Can be edited).
- Approval Date: Date on which the claim was approved.
- Queries: A text field to enter any insurance-related queries or notes.
- Insurance Settlement: Checkbox to indicate that the insurance settlement process is completed. (Ensure the insurance claim is printed before checking this). Fill the required fields such as:
- Scheduled Settlement Date: Planned date for the insurance settlement.
- Actual Settlement Date: Actual date on which the insurance settlement occurred.
- Required Settlement Amount: Amount expected from the insurance company for settlement.
- Actual Settlement Amount: Amount actually received from the insurance provider (Actual Settlement amount should not be greater than the total amount).
- Insurance Claim Sent: Checkbox indicating whether the insurance claim has been sent. Fill the required fields such as:
- Action Buttons
- Re-Fund: Triggers a refund process for the patient.
- Submit: Saves the current form and updates all changes.
- Click Submit button after updating Insurance settlement.
- This will be the final submit.
- After that Submit button and Cancel Surgery buttons will be disabled.
- Cancel Surgery: Cancels the associated surgery for this record.
- Final Bill: It leads to Billing screen. Can Print the final bill in Estimate Format/ Normal Bill format.
- Close: To close the screen.
- Generate New Bill: For extra payments after printing the final bill.
- This screen provides all the patient details (Patient Name, Address, Patient UHID, Age, Gender, Phone number, Patient Status: Inpatient).
- Click New Bill button. It leads to Billing Screen.
- Discharge Summary
- Patient Received Discharge Summary:
- A toggle switch to confirm whether the patient has received the discharge summary.
- Select date at which discharge summary is received from date picker.
- A save icon next to it allows saving this status.
- It will be enabled only after printing Discharge Summary.
- Patient Received Discharge Summary:
-
View Button: For Cash Patients
- Click View button at the left of the corresponding patient.
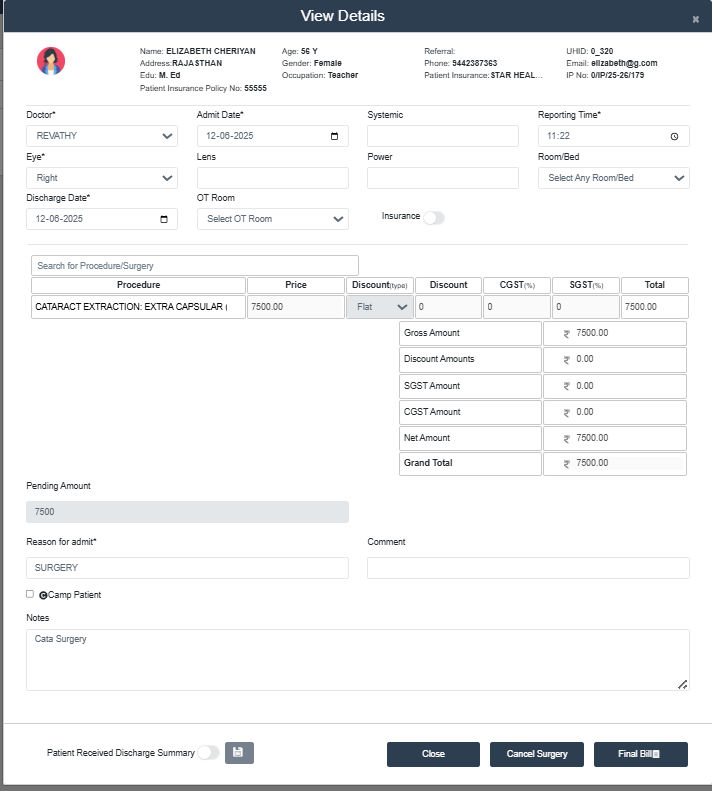
- Patient & Referral Information
At the top of the screen, the patient's key information is displayed:
- Name, Age, Gender, Address, Education, Occupation.
- UHID, Referral contact, Phone number, Email, IP NUmber.
- Admission & Surgery Details
- Doctor: Dropdown to select consulting doctor.
- Admit Date / Discharge Date: Calendar input to select dates.
- Eye: Specifies whether the right or left eye is involved.
- Lens, Systemic, Power: Text inputs for medical details.
- Reporting Time: Time selector to log time of report.
- Room/Bed: Dropdown to select the bed/room.
- OT Room: Dropdown to select the Operation Theatre room.
- Insurance Toggle: Disabled.
- Surgery Procedure Details: View the Procedure Name, Price, Discount Type, Discount Amount,CGST, SGST, Total Amount.
- Billing Summary (Right Panel)
- Gross Amount: Original cost before discounts or taxes.
- Discount Amounts: Shows how much discount is applied.
- SGST / CGST Amounts: Shows tax values.
- Net Amount: Total after discount, before tax.
- Grand Total: Final total including tax.
- Payment Info & Remarks
- Pending Amount: Shows pending amount if any.
- Reason for Admit: Can edit/view reason for admit.
- Comment: Optional remarks by billing staff.
- Camp Patient Checkbox: Flags if the patient was seen in a medical camp.
- Notes Section: Space for adding additional notes.
- Discharge Summary Confirmation: At the bottom of the screen.
- Discharge Summary Checkbox: Tick if the patient received the discharge summary
- Select the date from date picker.
- Save Button: To confirm that discharge summary was given.
- Action Buttons
- Close: Exit the screen without saving.
- Cancel Surgery: Cancels the surgery with reason.
- Final Bill : Generates and finalizes the surgical bill.
-
Reschedule Button
- Click Reschedule button at the right of the patient to reschedule surgery.
- Reschedule Surgery Screen Interface is same as that of View Details screen.
- Change the details (Date/Time).
- Click Reschedule button at the bottom right and Click OK to confirm the data.
-
Download
- Download Excel for Surgery List.