Clinic Details
- Basic Information
- Optical-Pharmacy Details
- Procedure Details
- Investigation Details
- Holiday Management
- Room/Bed
- OT Room
- NABH Accreditation Details
- Leave Management
Basic Information
This page allows administrators to set up and manage essential clinic-level configurations such as basic information, consultation timing, surgery hours, billing methods, and clinic-specific settings.
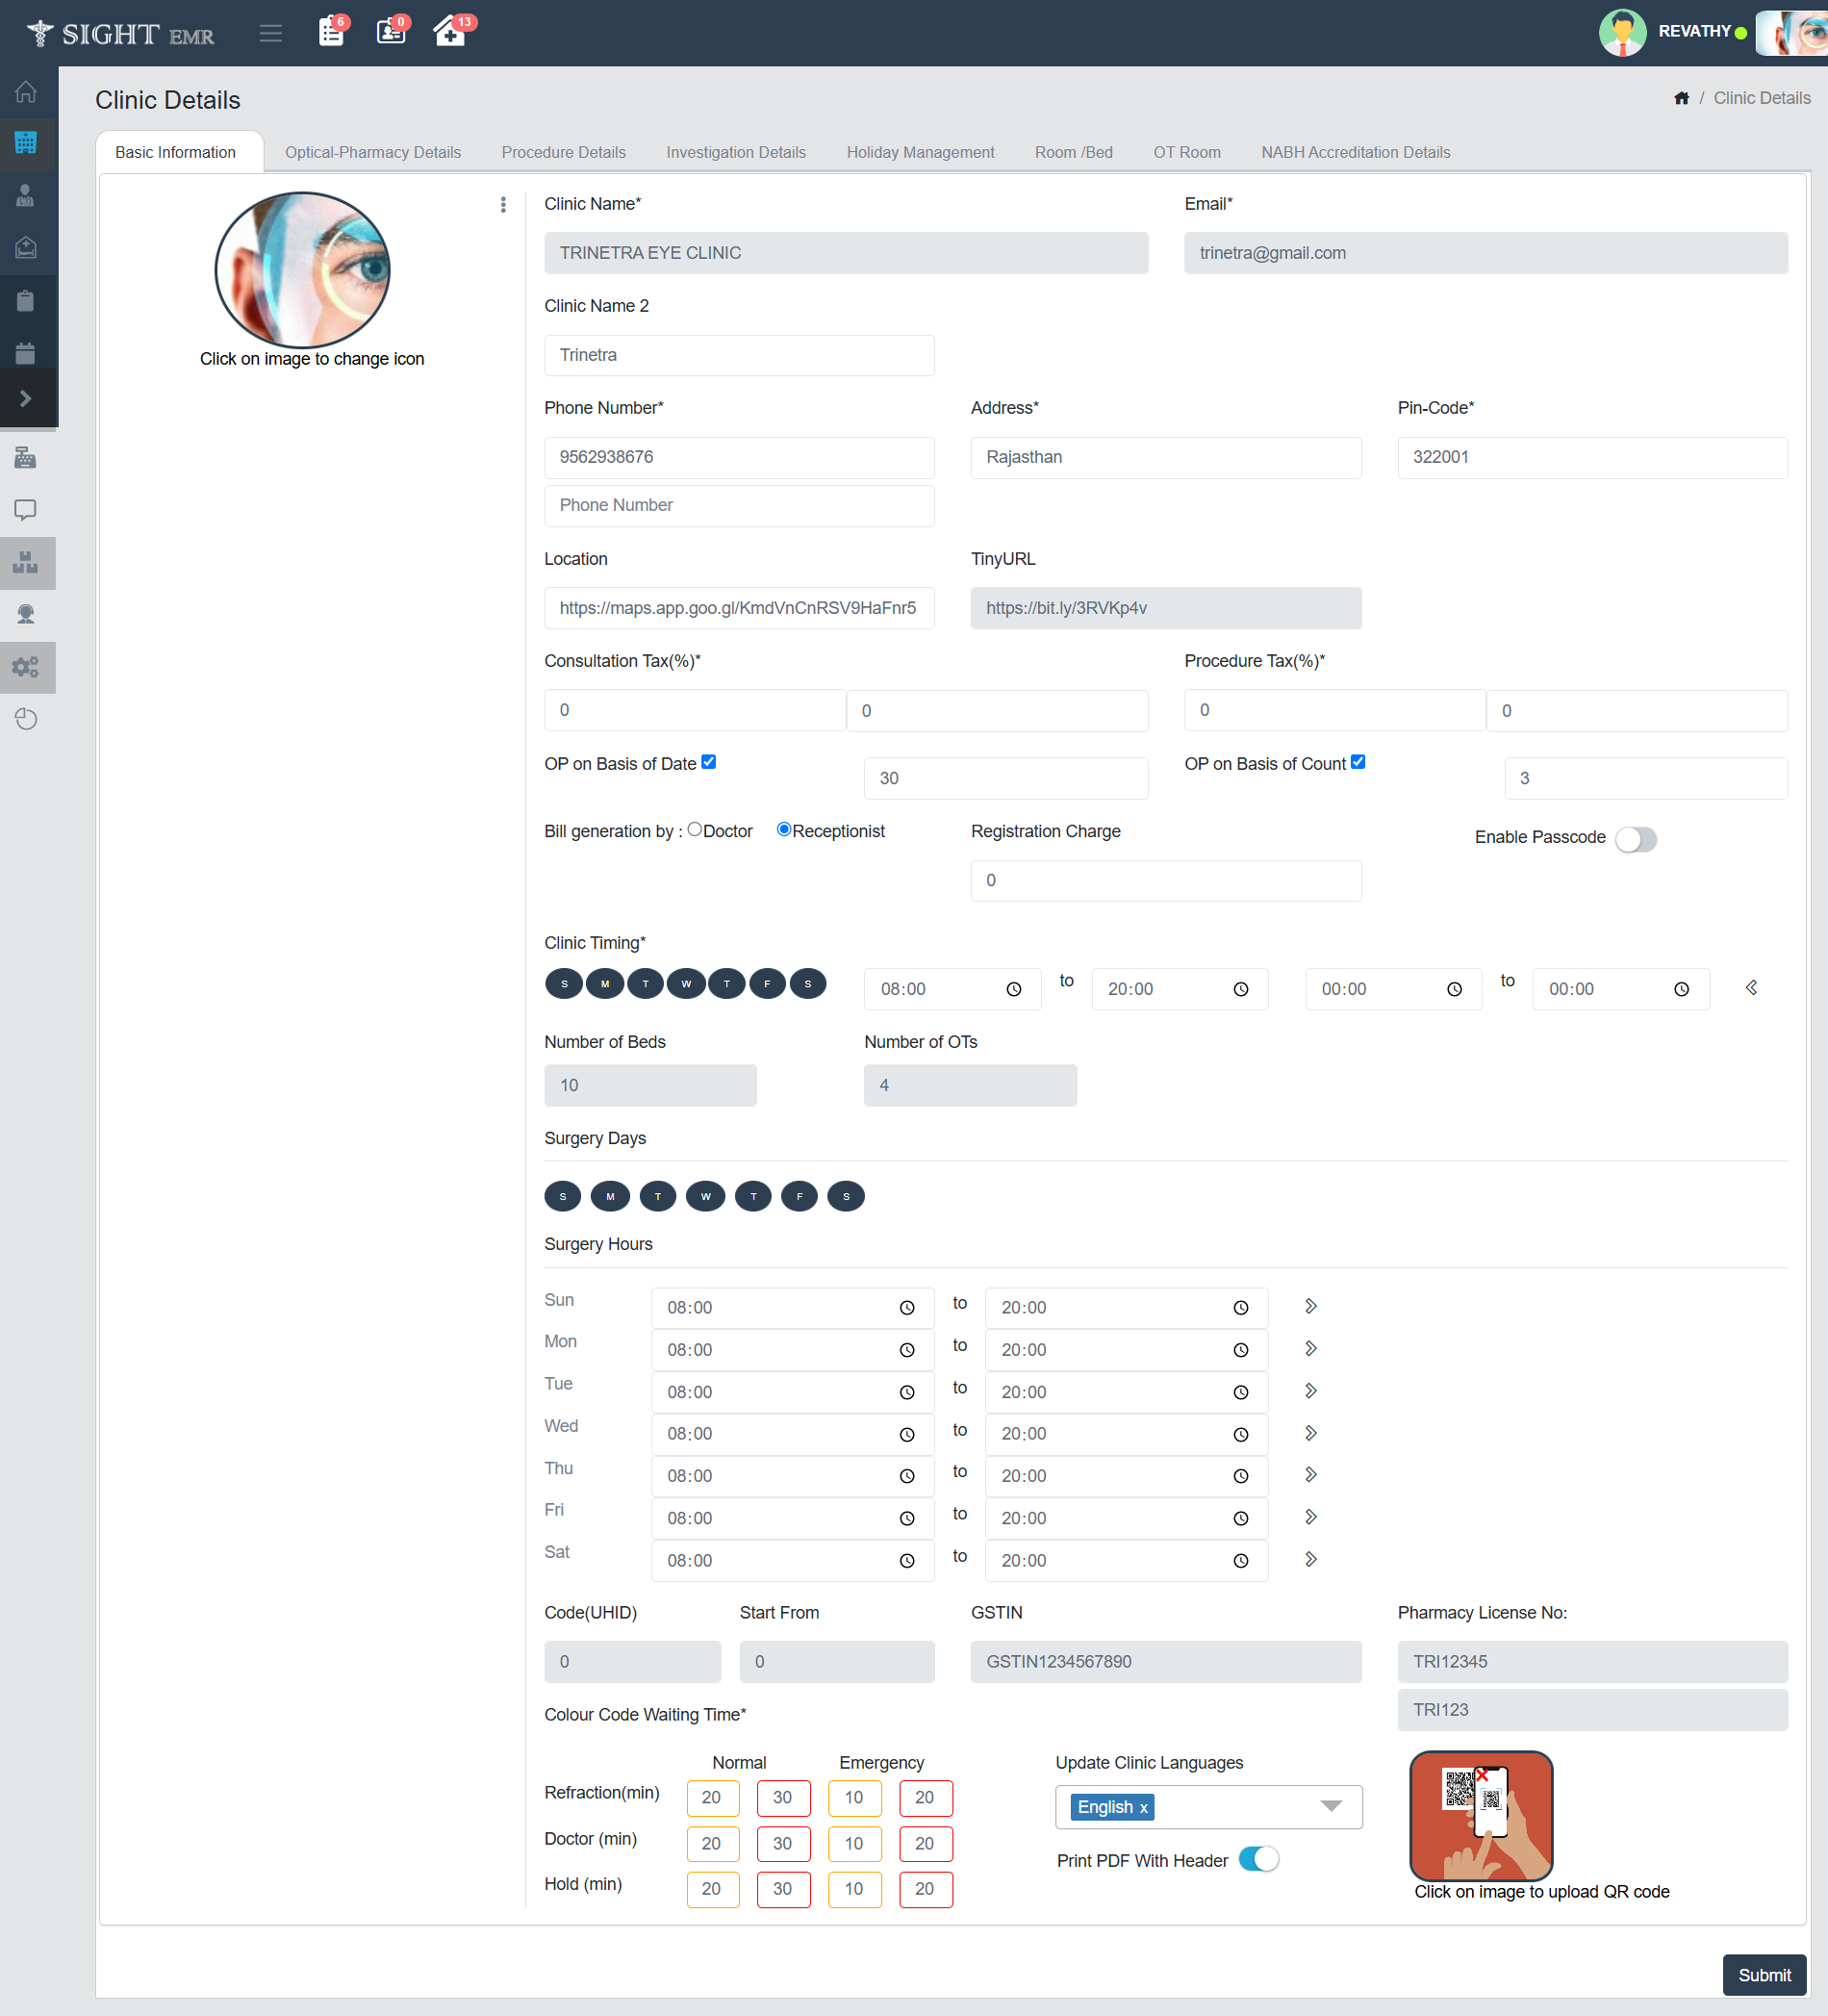
- Clinic Name: Enter the official name of your clinic. This name will appear across the EMR system.
- Email: Provide a valid clinic email address for official communication.
- Clinic Name 2: A secondary name (optional), such as a branch or sub-clinic identifier.
- Phone Number: Enter the primary contact number of the clinic.
- Address: Type the complete address of the clinic location.
- Pin-Code: Enter the postal code corresponding to the clinic’s address.
- Location: Add the clinic's Google Maps link for quick navigation.
- TinyURL: You can paste a shortened URL for convenience if applicable.
Tax and Billing Setup
- Consultation Tax (%) and Procedure Tax (%): Specify applicable tax percentages for consultations and procedures.
- OP on Basis of Date / Count: Set whether OP counts are tracked based on date or visit count.
- Bill Generation By: Choose whether the Doctor or Receptionist will be responsible for generating bills.
- Registration Charge: Set any fee to be charged at the time of registration.
- Enable Passcode: Toggle this option if passcode authentication is required for added security.
Clinic Timing
- Select the days of the week the clinic will be operational.
- For each selected day, set the start and end time in 24-hour format. Multiple shifts can be configured using the “+” icon.
Surgery Details
- Number of Beds: Enter how many beds are available for in-patient care.
- Number of OTs: Input the number of operation theatres in your clinic.
- Surgery Days and Hours: Choose surgery days and set timing separately, just like clinic hours. This allows scheduling surgeries independently.
Miscellaneous Settings
- UHID Start Code: Starting number for Unique Health ID generation. It should start from zero.
- GSTIN: Enter the registered GST Identification Number if applicable.
- Pharmacy License No.: Provide your registered pharmacy license number.
- Clinic Code: A unique code identifier for the clinic for internal use.
- Colour Code Waiting Time: Configure estimated waiting times (in minutes) for different service types like Refraction, Doctor, and Hold — under Normal and Emergency conditions.
Language & Printing
- Update Clinic Languages: Select the default language for clinic communication and printed documents.
- Print PDF With Header: Toggle this option to enable/disable clinic header on generated PDF files.
Icons and Images
- Clinic Icon: Click on the image area at the left of the screen to upload a new logo or change the existing clinic image. Click on three dots at the right side of the icon to Remove Photo.
- QR Code: Click on the QR code image placeholder to upload your clinic’s QR code for payment, identification, or access links.
Final Step
- Submit Button: Once all fields are reviewed and filled, click on Submit to save your clinic settings.
Optical-Pharmacy Details
This section is used to input and manage the details of the Pharmacy and Optical store associated with the clinic. You can upload branding icons, contact information, and store timings.
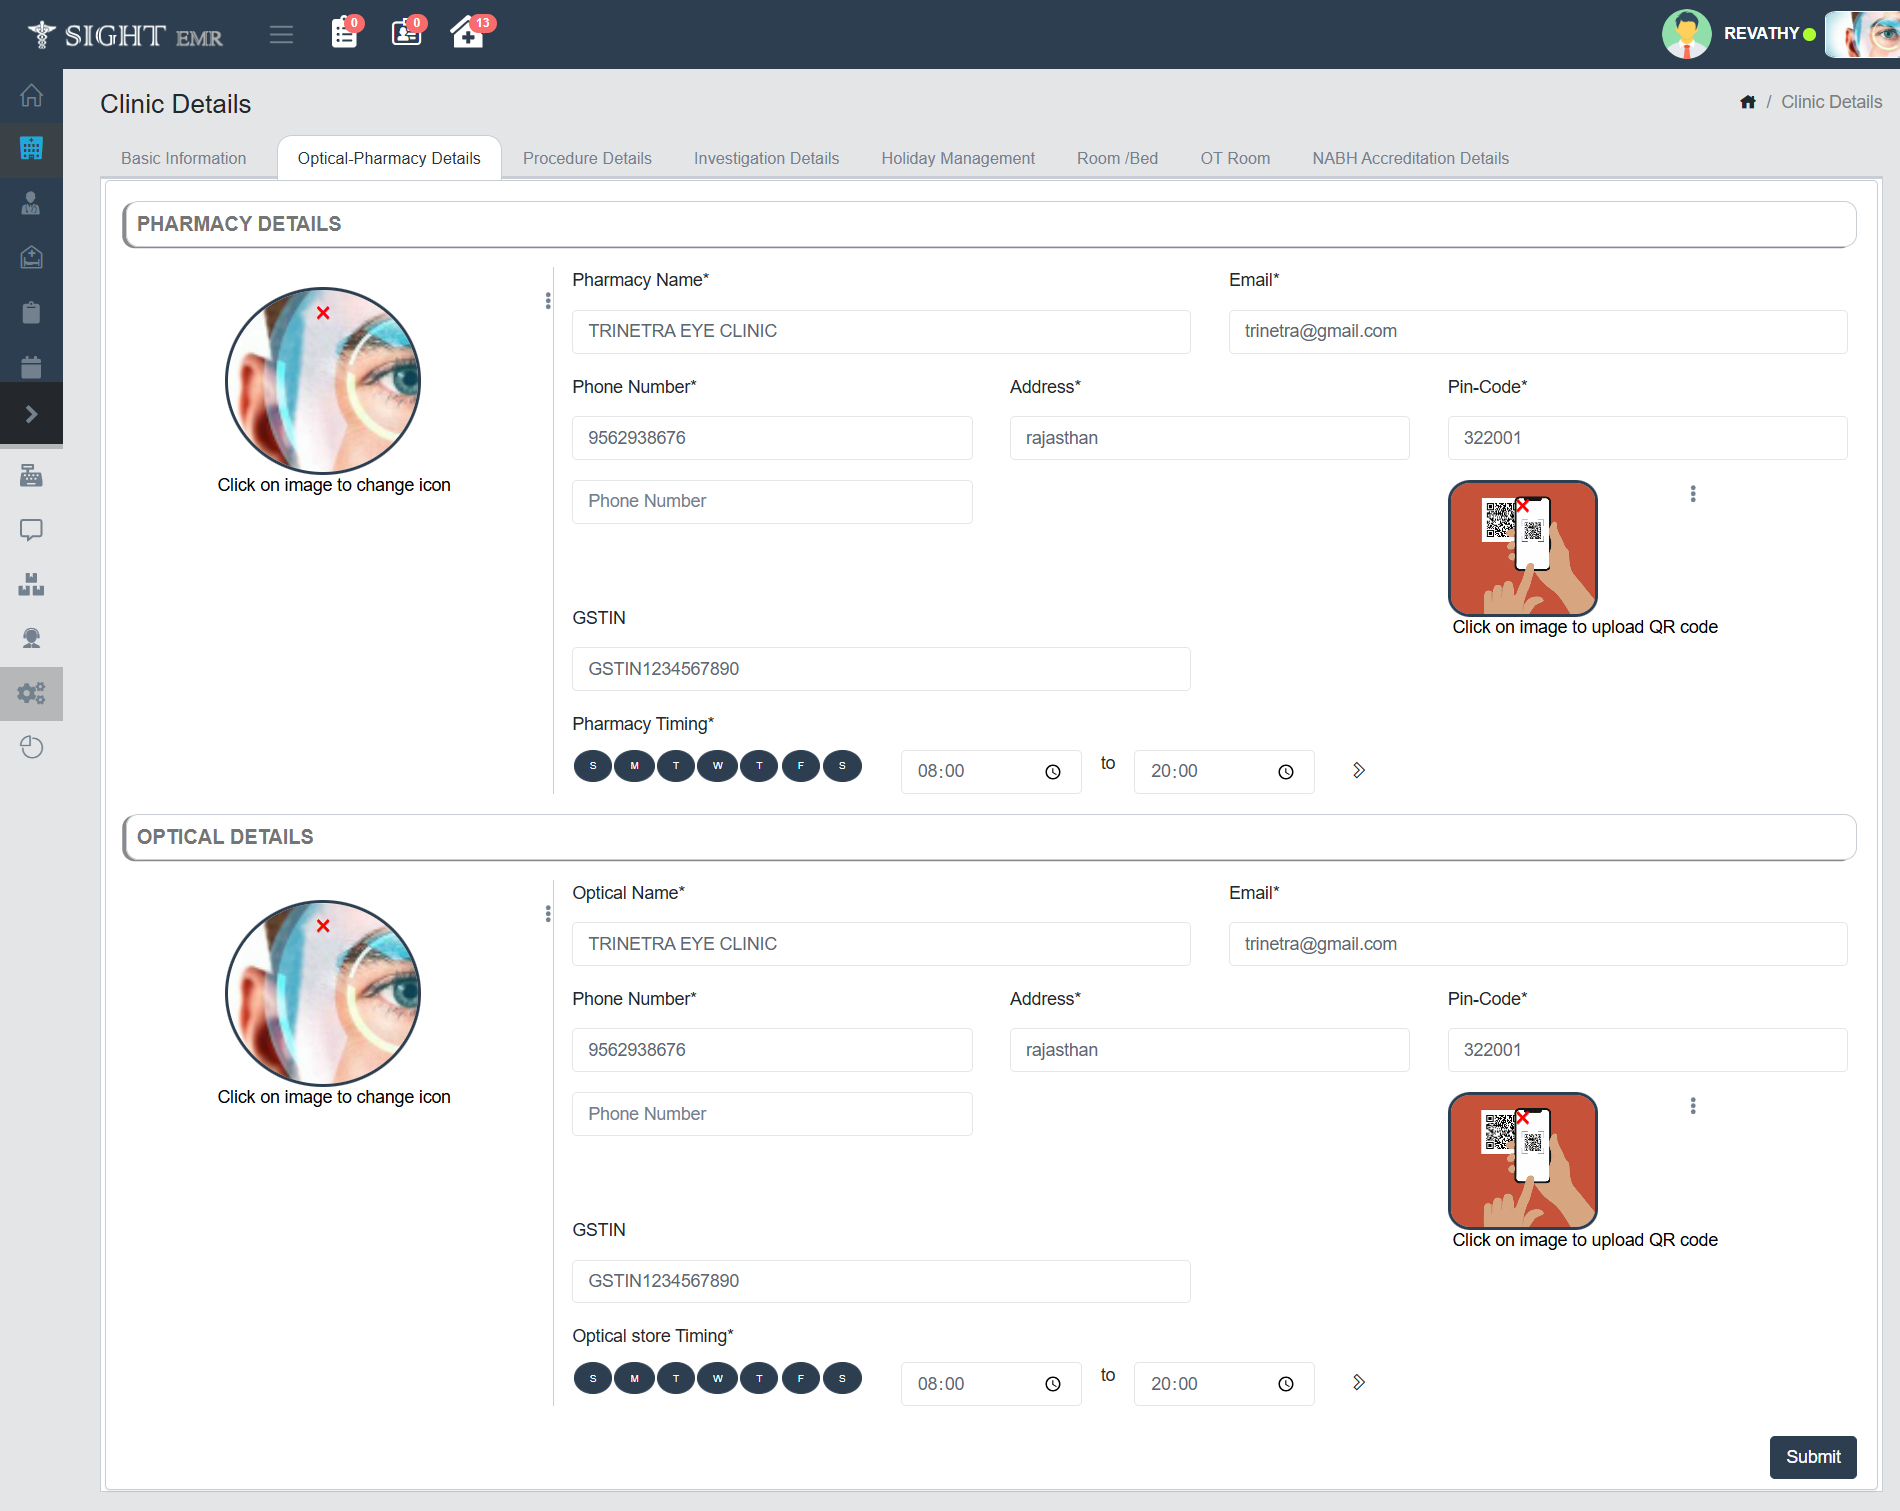
Accessing the Page
- Navigate to Clinic Details from the sidebar.
- Click on the Optical-Pharmacy Details tab from the top navigation bar.
Pharmacy Details Section
- Icon Image: Click on the circular pharmacy image to upload or change the icon that visually represents the pharmacy.
- Pharmacy Name*: Enter the name of the pharmacy.
- Email*: Provide a valid email address associated with the pharmacy.
- Phone Number*: Enter the primary contact number for the pharmacy.
- Address*: Type in the full address where the pharmacy is located.
- Pin-Code*: Enter the postal code of the pharmacy’s location.
- QR Code Upload: On the right side, click the QR code image to upload a QR code. This could be for payment or operational purposes.
- GSTIN: Fill in the GST Identification Number of the pharmacy (if applicable).
- Pharmacy Timing*: Choose the working days by selecting the weekday buttons. Set the opening and closing times appropriately.
Optical Details Section
- Icon Image: Click on the circular optical store image to upload or change the icon that visually represents the pharmacy.
- Pharmacy Name*: Enter the name of the optical store.
- Email*: Provide a valid email address associated with the optical store.
- Phone Number*: Enter the primary contact number for the optical store.
- Address*: Type in the full address where the optical store is located.
- Pin-Code*: Enter the postal code of the optical store's location.
- QR Code Upload: On the right side, click the QR code image to upload a QR code. This could be for payment or operational purposes.
- GSTIN: Fill in the GST Identification Number of the optical store (if applicable).
- Pharmacy Timing*: Choose the working days by selecting the weekday buttons. Set the opening and closing times appropriately.
Save Details
- After entering the information in both sections, Click on the Submit button at the bottom right to save the details.
Procedure Details
This section allows you to manage a list of clinical or surgical procedures offered by the clinic. You can search, edit, activate/deactivate, and set pricing and validity dates for each procedure.
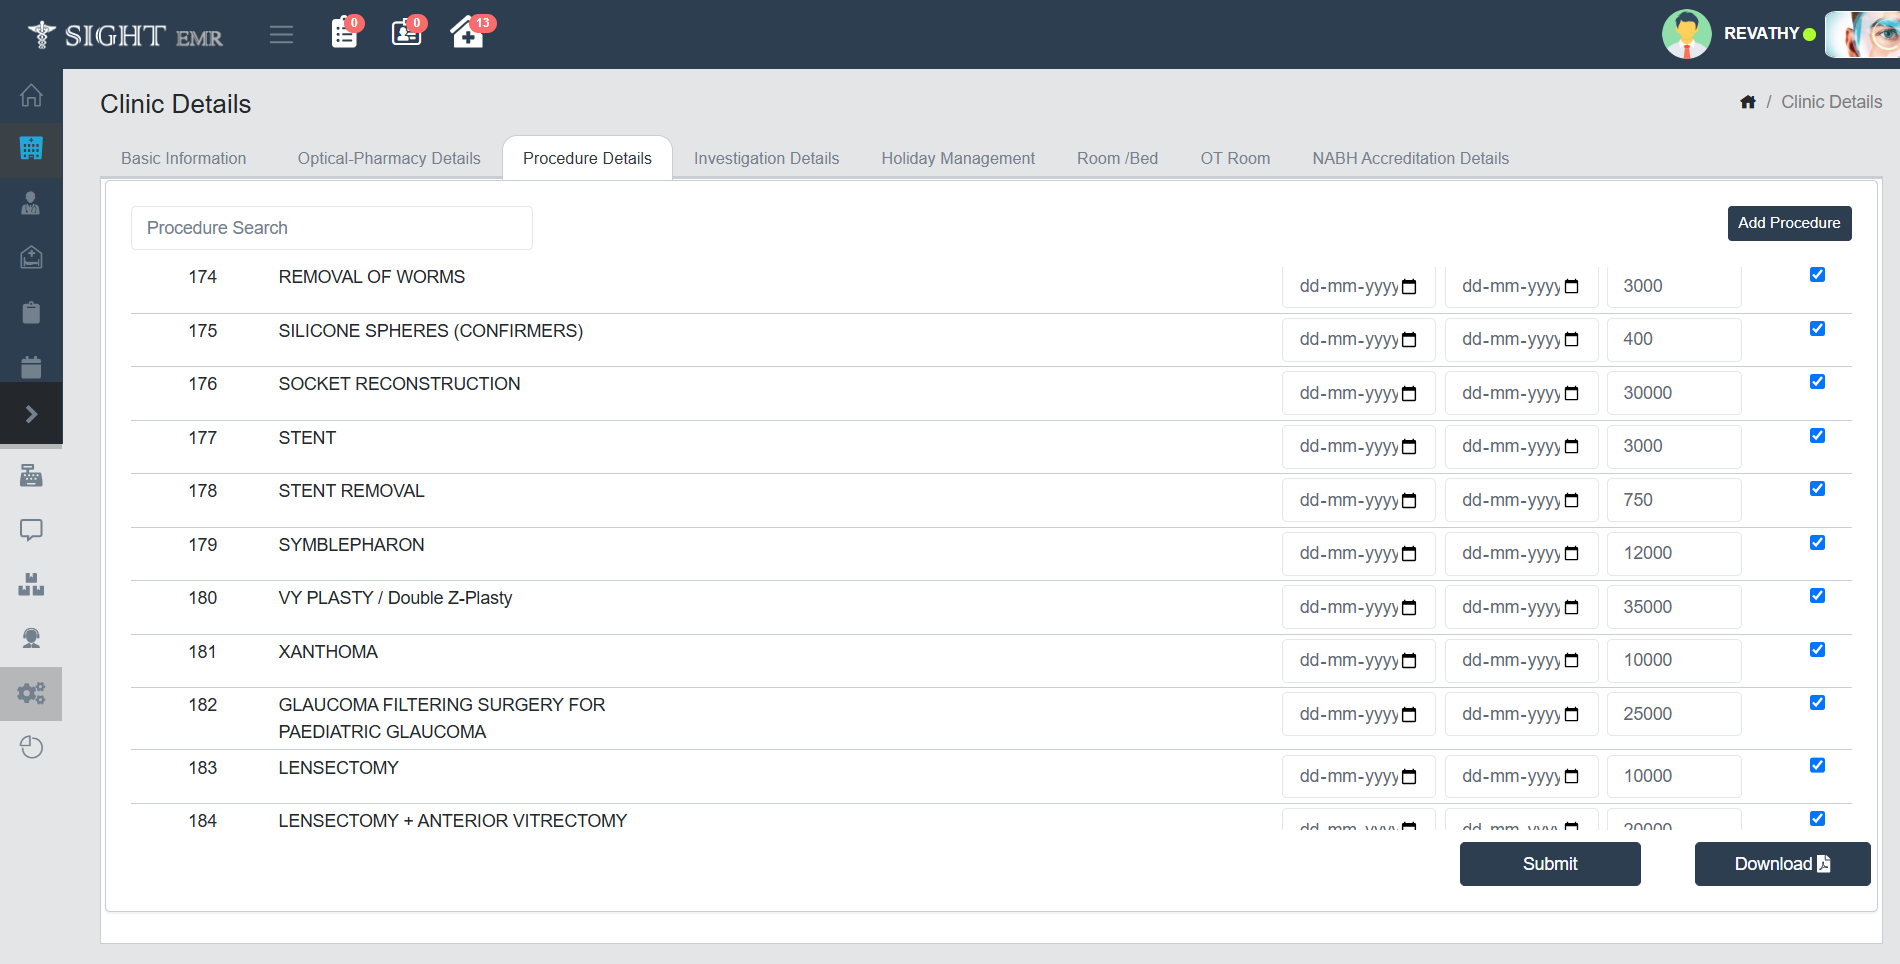
Accessing the Page
- From the main sidebar, click on the Clinic Details icon.
- Navigate to the Procedure Details tab located in the horizontal menu bar at the top.
Features on the Procedure Details Page
Procedure List
- The main content displays a scrollable list of available medical procedures.
- Each entry includes:
- Procedure Code/ID
- Procedure Name
- Start Date and End Date fields for each procedure to define validity period.
- Cost Field to define or update the price of the procedure.
- Checkbox to enable or disable a specific procedure.
Procedure Search
- Use the search bar at the top to quickly filter the list by typing the procedure name or ID.
Adding a New Procedure
- Click the Add Procedure button located at the top-right corner.
- A new entry row will appear where you can enter the required details like name, dates, and cost.
- Fill in Procedure Details:
- Procedure Name*: Enter the name of the procedure.
- Procedure Type*: Select the type from the dropdown menu.
- Procedure Cost*: Enter the base cost of the procedure.
- Hospital Department*: Mention the department where the procedure is performed.
- Insurance Name: Type or search from available insurance plans, if applicable.
- Procedure Description: Provide a brief description or clinical notes about the procedure.
- Effective Date*: Set the start date from when the procedure becomes valid.
- Expiry Date: Optionally, provide an end date for the validity of this procedure.
- SCTID: Yoy may add SCTID (SNOMED CT Identifier).
- Keyword: You may add optional tags or keywords to help in search and categorization.
- Action Buttons:
- Close Button: Click this to exit the form without saving.
- Add button: Click this to save the New Procedure and close the popup.
- Add Package (Optional):
- Click the “Add Package” button at the bottom of the procedure form.
- A new modal titled Add Package opens.
- Adding Package Details:
- Item: Enter the name of the item or service included in the procedure package.
- HSN/SAC: Enter the appropriate tax classification code if applicable.
- Amount: Input the amount for each item.
- Net Amount: Automatically calculated based on item price and applicable taxes (if set).
- Click the blue + button to add the item to the list.
- Click Trash icon to delete the added item.
- Procedure Total and Net Total: Shown at the bottom, dynamically calculated as items are added.
- Action Buttons:
- Close Button: Click this to exit the form without saving.
- Add button: Click this to save the New Package and close the popup.
- Adding Package Details:
Editing Procedure Details
- You can directly edit the cost, start date, or end date by clicking into the respective input fields next to a procedure.
- Use the date pickers to select dates in dd-mm-yyyy format.
Enabling or Disabling a Procedure
- Each procedure has a checkbox at the end of its row:
- Checked – Procedure is active.
- Unchecked – Procedure is inactive and may not be visible during clinical operations.
Saving Changes
- After editing or adding data, click the Submit button at the bottom of the page to save all changes.
Download
- Click the Download button to export the current procedure list to a PDF file. This can be used for records, audits, or reporting.
Investigation Details
This section is used to manage and configure the list of diagnostic and lab investigations provided by the clinic. Each entry includes test names, pricing, and departmental categorization.
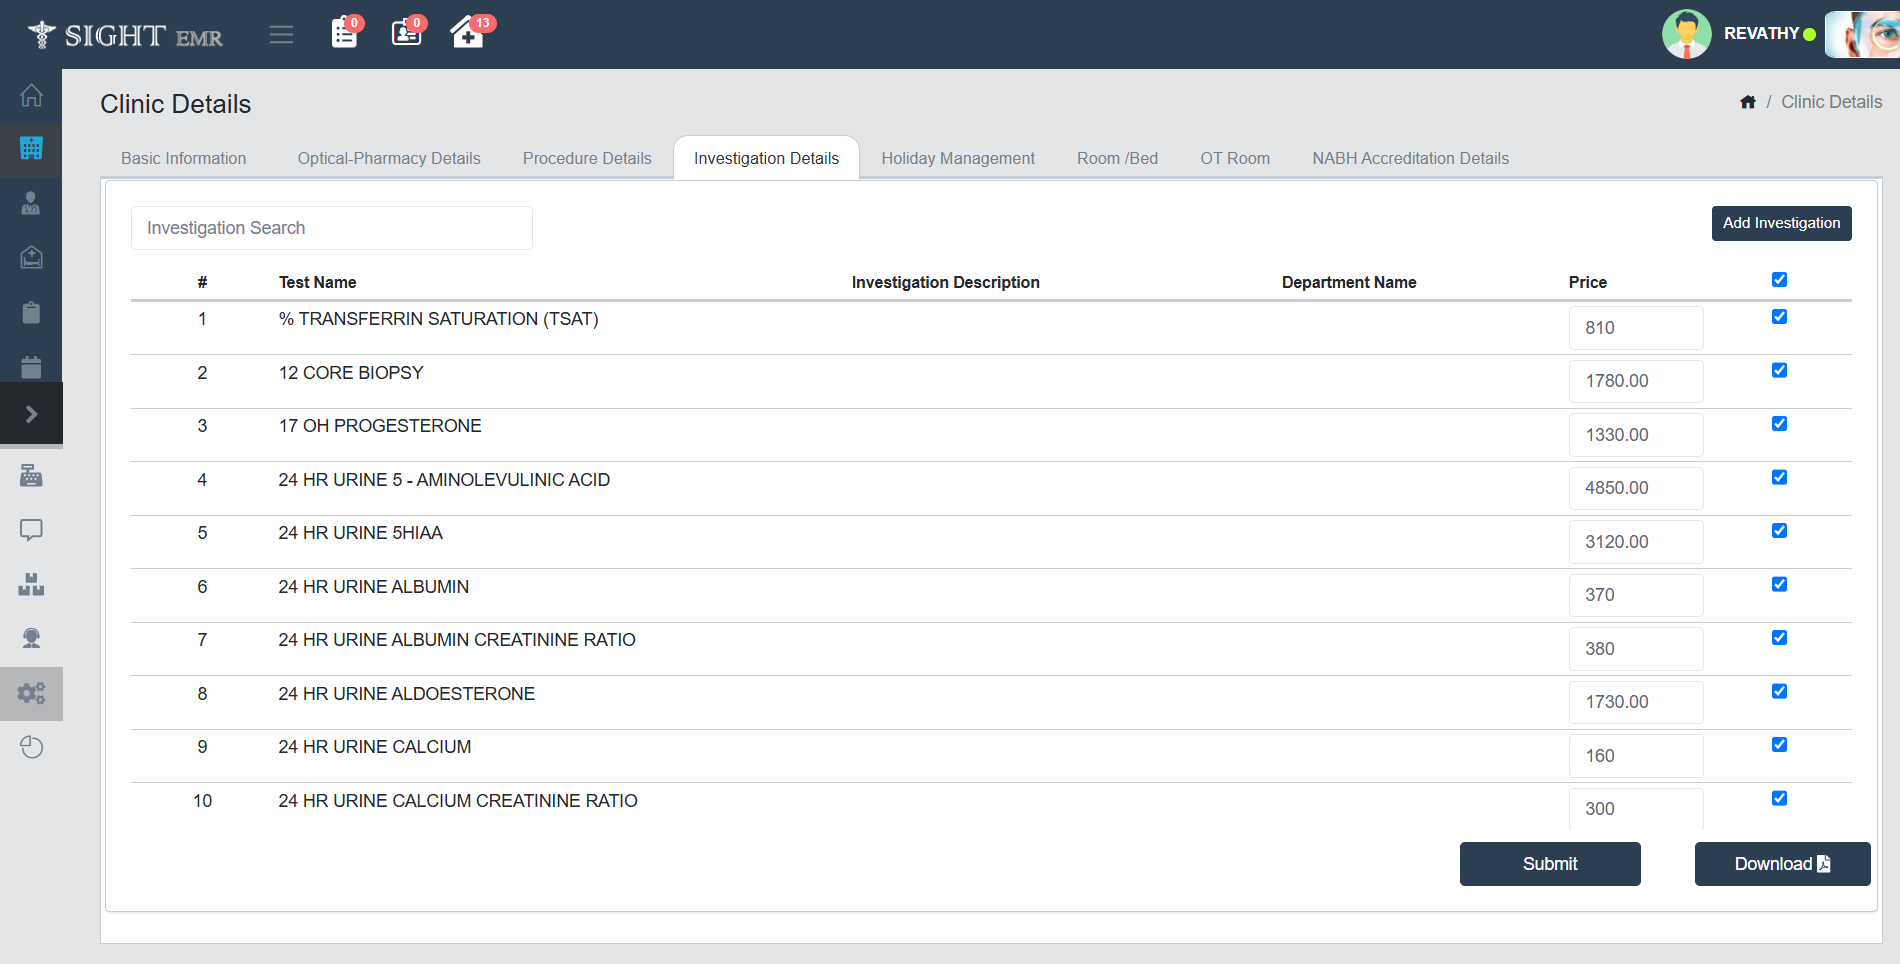
Accessing the Investigation Details Section
- Click on the Clinic Details module from the sidebar.
- Navigate to the Investigation Details tab from the horizontal tab list.\
Features on the Investigation Details Page
Investigation List
- The main content displays a scrollable list of available Investigations.
- Each entry includes:
- Test Name: Name of the investigation/test
- Investigation Description
- Department Name: Indicates the clinical department responsible for the test.
- Price: Editable field to set the test charge.
- Active Status Checkbox: Tick the checkbox to mark the investigation as active and available for use.
Procedure Search
- Use the search bar at the top to quickly filter the list by typing the Investigation name or ID.
Adding a New Investigation
- Click the "Add Investigation" button located at the top-right corner.
- A new entry row will appear where you can enter the required details like name and cost.
- Fill in Procedure Details
- Test Name*: Enter the full name of the investigation/test.
- Department Name*: Specify the clinical or diagnostic department that handles the test.
- Price*: Set the price for the investigation.
- Investigation Description: Add a short description or notes about the test (optional).
- SCTID: Yoy may add SCTID (SNOMED CT Identifier).
- Keyword: You may add optional tags or keywords to help in search and categorization.
- Action Buttons:
- Close Button: Click this to exit the form without saving.
- Add button: Click this to save the New Investigation and close the popup.
Editing Investigation Details
- You can directly edit the cost by clicking into the respective input fields next to an Investigation.
Enabling or Disabling a Investigation
- Each Investigation has a checkbox at the end of its row:
- Checked – Investigation is active.
- Unchecked – Investigation is inactive and may not be visible during clinical operations.
Saving Changes
- After editing or adding data, click the Submit button at the bottom of the page to save all changes.
Download
- Click the Download button to export the current Investigation list to a PDF file. This can be used for records, audits, or reporting.
Holiday Management
This section allows the clinic administrator to define holidays during which the clinic will remain closed or operate with limited services. Holidays can be categorized as Mandatory or Restricted.

Accessing Holiday Management
- Go to the Clinic Details module from the sidebar.
- Click on the Holiday Management tab from the top navigation bar.
Creating a New Holiday
- Select Date: Use the date picker to choose the holiday date.
- Type of Holiday: Choose from the dropdown whether the holiday is Mandatory or Restricted.
- Description: Enter the holiday’s name or purpose.
- Submit: Click the Submit button to save the holiday entry.
Viewing Existing Holidays
- All saved holidays are listed below the form.
- Each row displays:
- Date
- Holiday Type
- Description
Editing or Deleting a Holiday
- Edit: Click the Pencil icon next to a holiday entry to modify the date, type, or description.
- Delete: Click the Trash icon to remove the holiday permanently from the system.
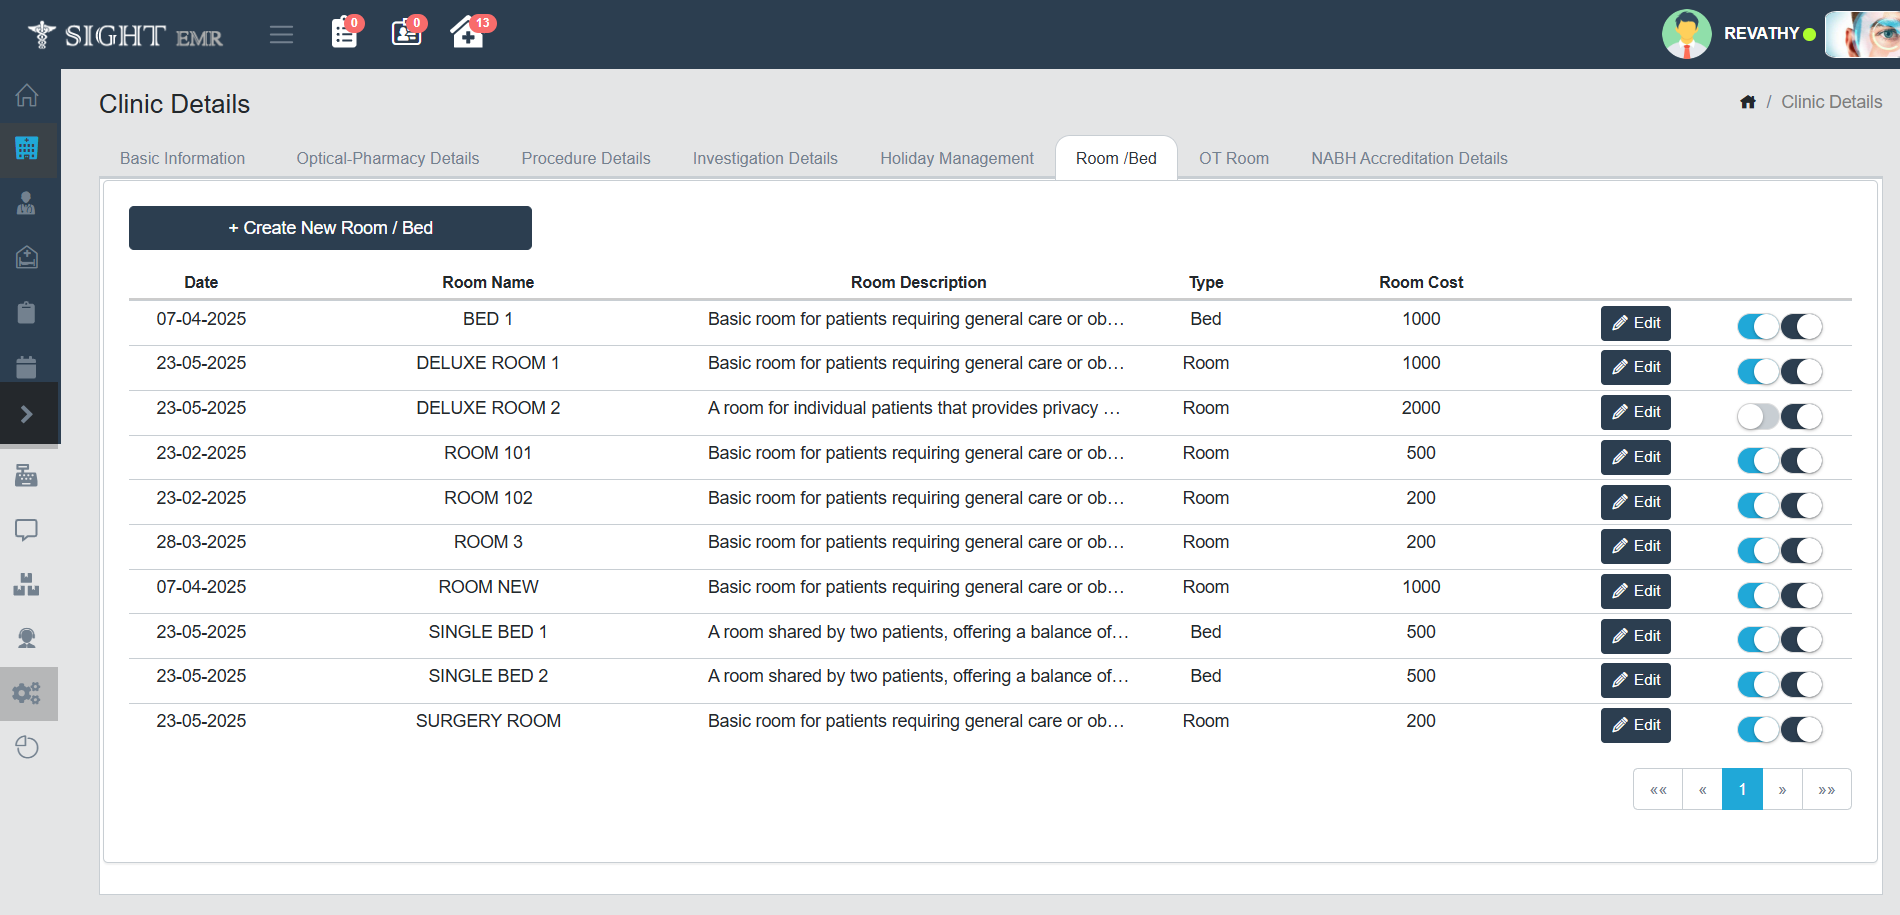
Room/Bed Management
The Room/Bed section helps administrators manage different types of rooms or beds available in the clinic, including their costs, descriptions, and activation status.
Accessing Room/Bed Management
- Navigate to the Clinic Details module from the left-hand menu.
- Click on the Room / Bed tab.
Adding a New Room or Bed
- Click on the Create New Room / Bed button at the top of the section.
- Fill in the following details:
- Date: When the room/bed entry is being created.
- Room Name: Add Unique name.
- Room Description: A brief description of the room or bed.
- Type: Choose whether the entry is a Room or Bed.
- Room Cost: Enter the associated cost per day or usage.
- Click Submit to add the entry.
Editing Existing Room/Bed Entries
- Each row displays key details such as:
- Date of Entry
- Room/Bed Name
- Description
- Type
- Cost
- To the right of each entry, the following options are available:
- Edit: Click the Edit button to modify details of that room or bed.
Activation Toggles:
- First toggle represents Availability of Room/Bed status: Available/Non-Available (ON/OFF).
- Second toggle represents Activation of Room/Bed status: Activate/ Deactivate (ON/OFF).
Pagination
- Use the pagination controls at the bottom right corner to view additional Room/Bed entries if present.
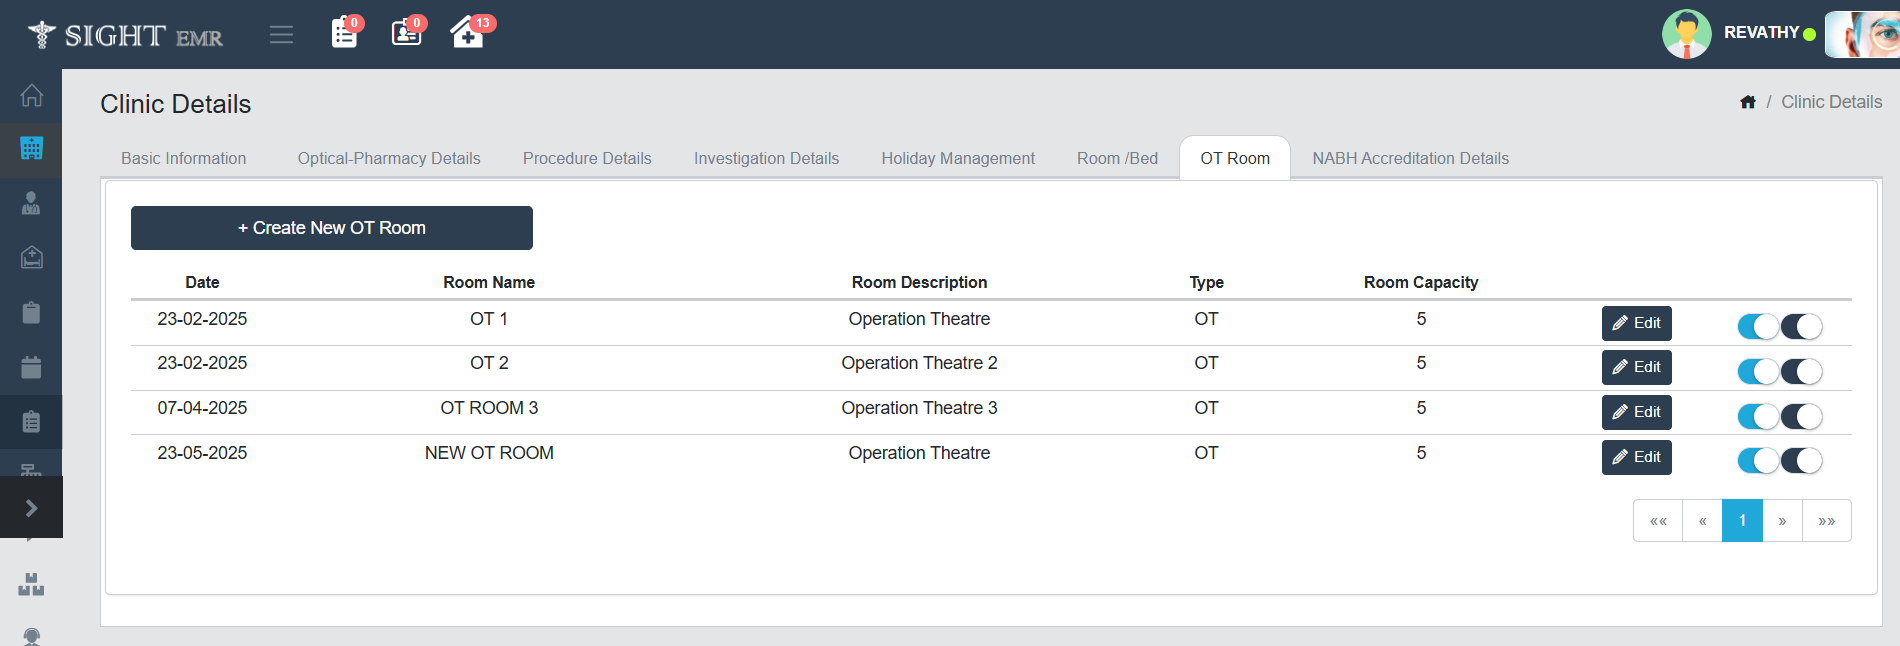
OT Room Management
The OT Room section enables clinic administrators to manage and maintain details of all Operation Theatres (OTs) available.
Accessing OT Room Management
- Navigate to the Clinic Details module from the left-hand menu.
- Click on the OT Room tab.
Adding a New OT Room
- Click on the Create New OT Room button at the top of the section.
- Fill in the following details:
- Date: When the OT Room entry is being created.
- Room Name: Add Unique name for the OT.
- Room Description: A brief description of the OT Room.
- Type: Automatically selected as OT.
- Room Capacity: Enter the number of patients/surgeries the OT can accommodate.
- Click Submit to add the entry.
Editing Existing OT Room Entries
- Click the Edit button next to the desired OT room.
- Update any field as needed and save the changes.
- To the right of each entry, the following options are available:
- Edit: Click the Edit button to modify details of that OT Room.
Activation Toggles:
- First toggle represents Availability of OT Room status: Available/Non-Available (ON/OFF).
- Second toggle represents Activation of OT Room status: Activate/ Deactivate (ON/OFF).
Navigation
- Use the pagination controls at the bottom right corner to view additional OT room entries if present.
NABH Accreditation Details
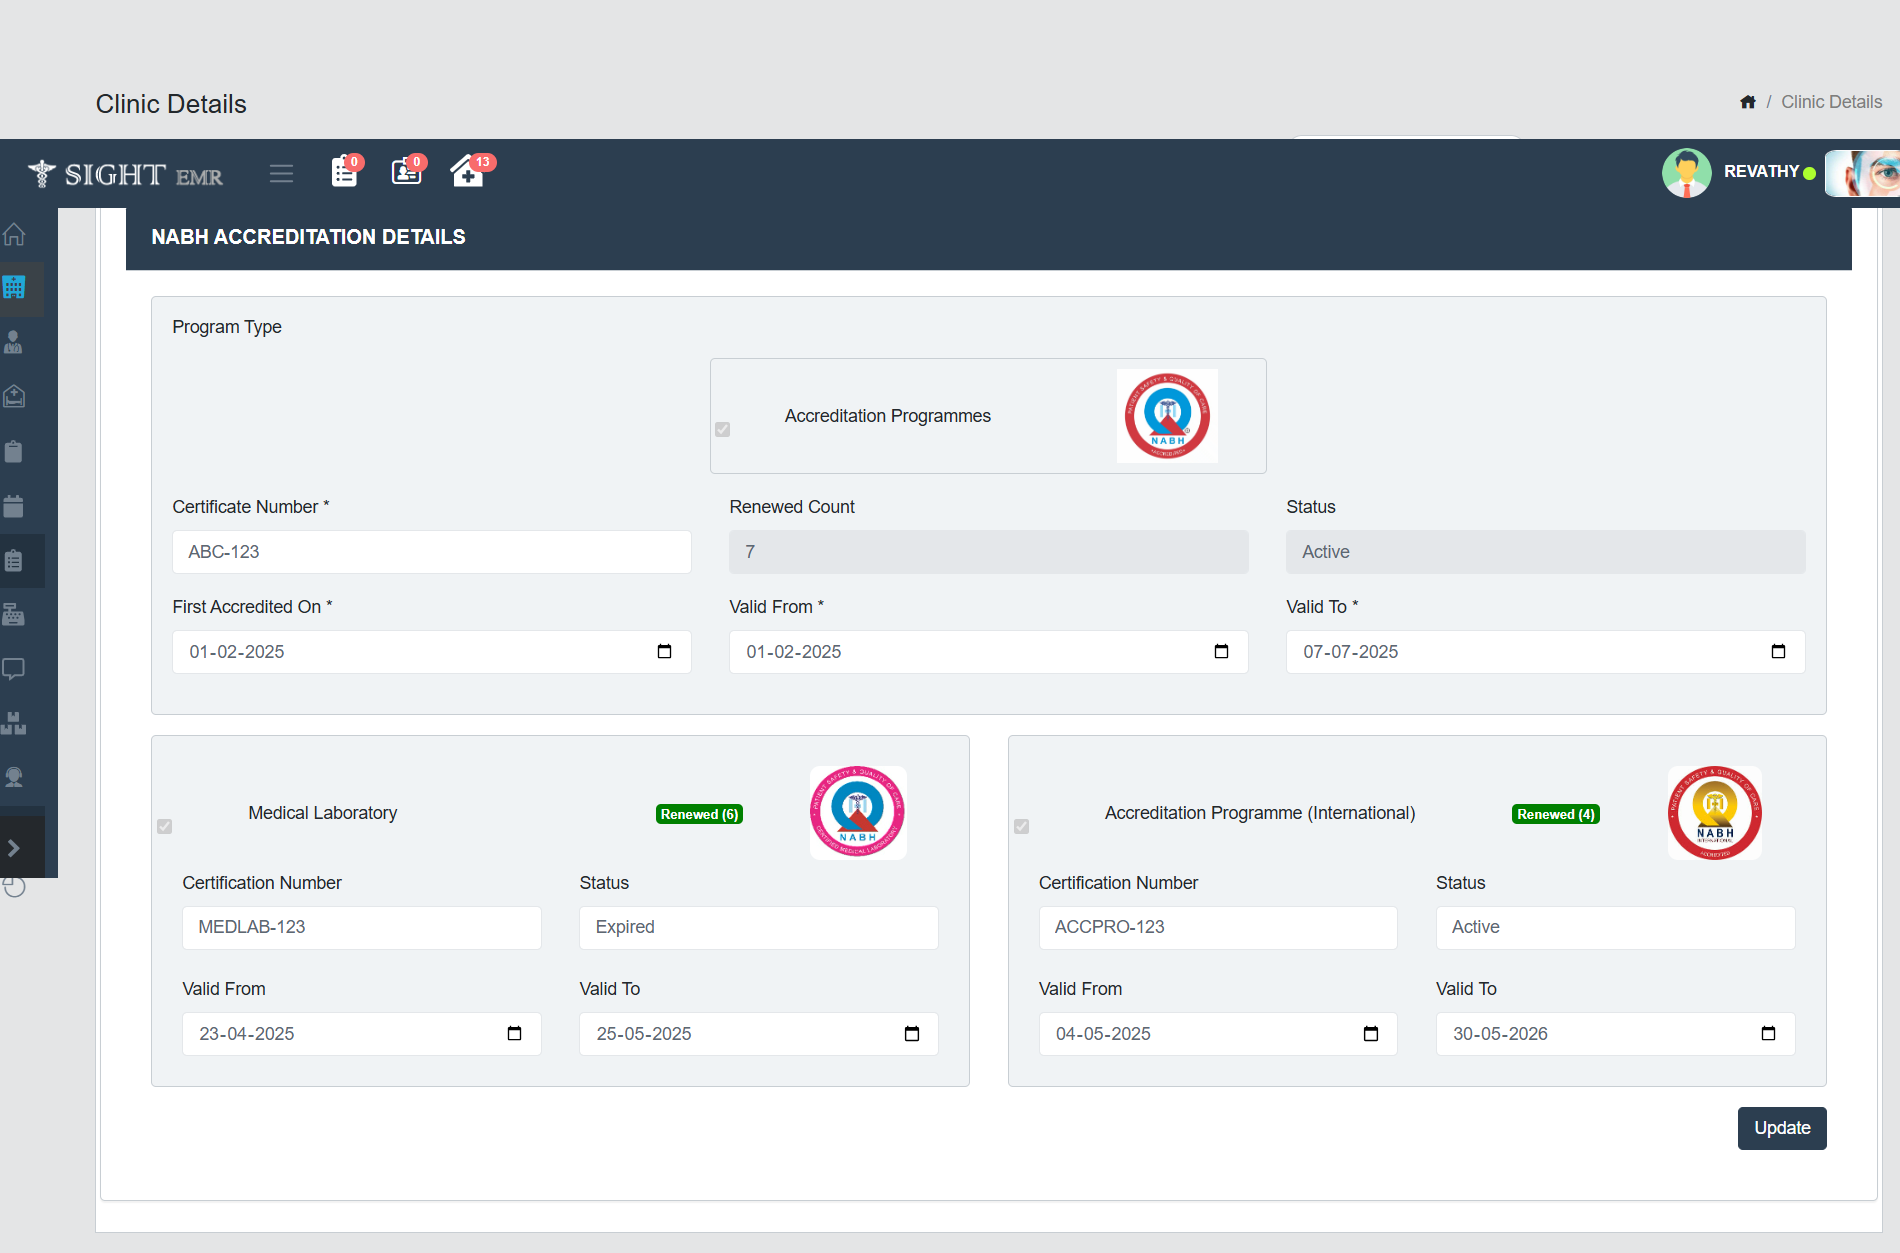
This module provides a structured overview of NABH (National Accreditation Board for Hospitals & Healthcare Providers) accreditations held by the clinic. It includes information for:
- Program types:
- Accreditation Programmes
- Entry Level Certification Programme - Hospital & SHCO
- Entry Level Certification Programme - AYUSH Centre & AYUSH Hospital


- Other Accreditation Programs:
- Medical Laboratory
- Nursing Excellence
- Emergency Department in Hospital
- Accreditation Programme (International)
- Medical value Travel Facilitator (MVTF)


Program Type (Non-Editable)
- This section identifies the type of accreditation programme. There are checkboxes to indicate which programs are applicable.
Certificate Number
- This is the official NABH certificate number issued to the clinic for the selected program type.
Renewed Count
- Indicates the number of times the accreditation has been renewed. This reflects the clinic’s accreditation history and consistency in maintaining standards.
Status
- Displays the current validity of the accreditation. It can show values like:
- Active - Accreditation is currently valid.
- Expired - Accreditation has lapsed and needs renewal.
- Expired Soon - When the expiry date is within 30 days.
First Accredited On
- This date field shows when the clinic first received the specific accreditation.
Valid From
- Indicates the starting date of the current accreditation cycle.
Valid To
- Shows the expiry date of the current accreditation cycle. Users should monitor this field closely to ensure timely renewal.
Accreditation Logos
- Next to each accreditation card is the respective NABH logo, visually confirming the program type.
Renewal Badge
- A green label (Renewed 6) displays how many times the certification has been renewed for each program. This is helpful for tracking program longevity.
Update Button
- After editing or verifying accreditation details, click the Update button to save any changes. Ensure all required fields (marked with *) are filled before updating.
1. NABH Accreditation Details can be added by Super Admin.
2. Clinic Admin can edit only Certificate Number, First Accredited On, Valid From, Valid To.
Leave Management
The Leave Management tab allows you to define and manage leave settings for various staff roles within the clinic.
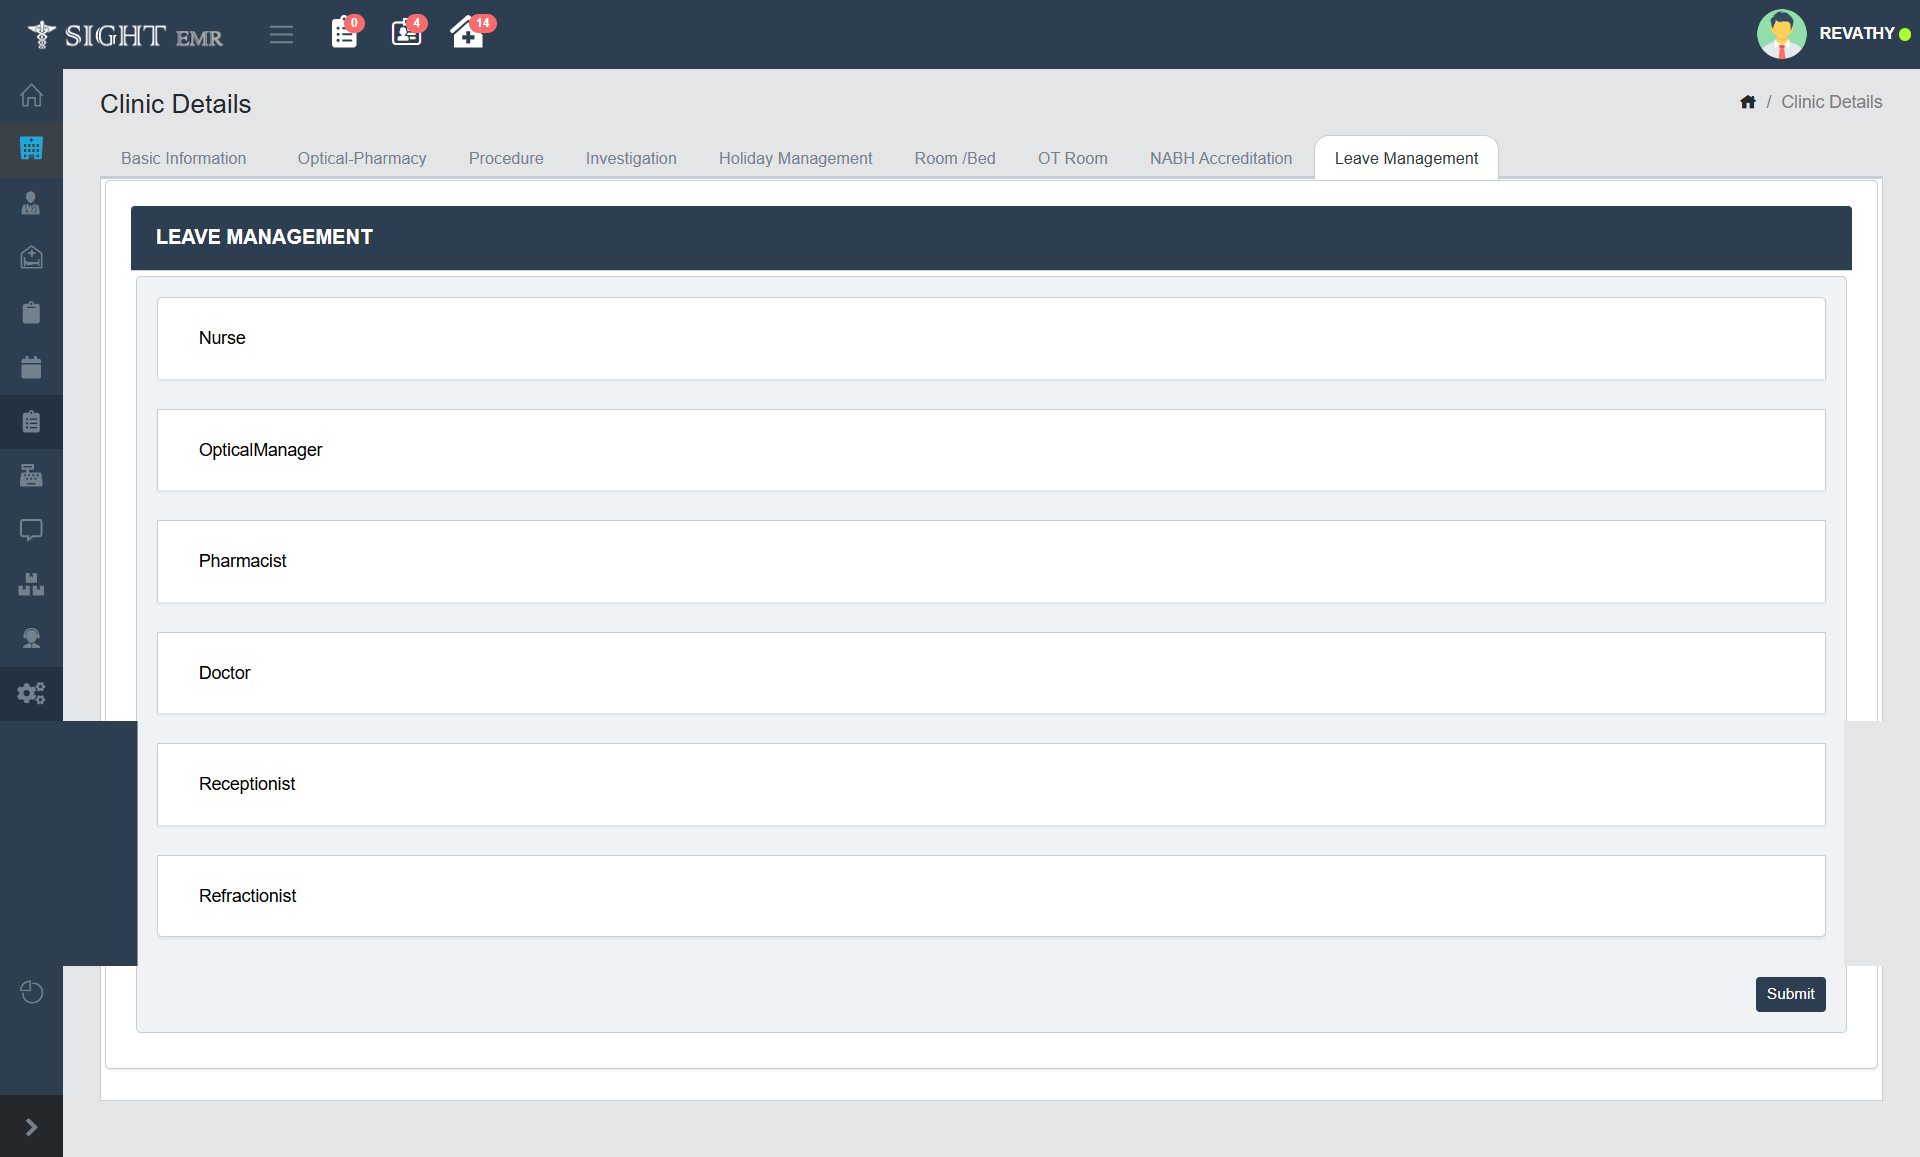
Accessing Leave Management
- Open the Clinic Details section from the main settings.
- Click on the Leave Management tab.
- You will see a list of roles such as:
- Nurse
- Optical Manager
- Pharmacist
- Doctor
- Receptionist
- Refractionist
- Click on any role name to configure leave settings for that specific category.
Leave Configuration Screen
- Once you select a role, the detailed configuration screen will appear, allowing you to define rules for three types of leave:
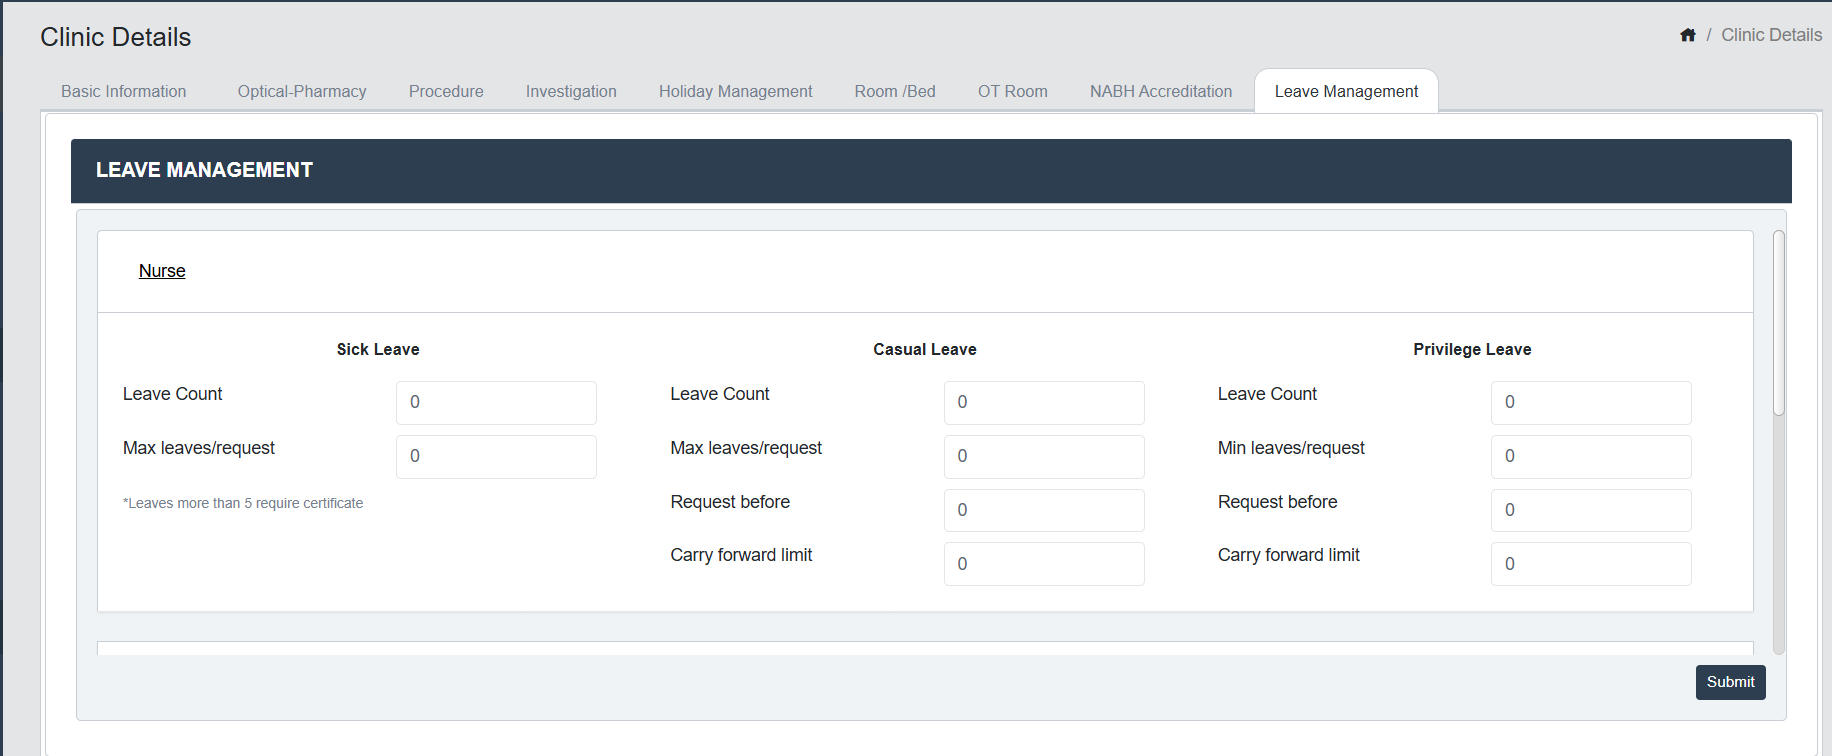
- Sick Leave:
- Leave Count: Total number of sick leaves allowed for the year.
- Max Leaves/Request: Maximum number of sick leaves that can be requested in a single application.
- A note indicates that leaves more than 5 require a certificate.
- Casual Leave:
- Leave Count: Total number of casual leaves available annually.
- Max Leaves/Request: Maximum number of casual leaves allowed per request.
- Request Before: Number of days before which the employee must apply for casual leave.
- Carry Forward Limit: Number of unused casual leaves that can be carried forward to the next year.
- Privilege Leave:
- Leave Count: Total privilege leave entitlement.
- Min Leaves/Request: Minimum number of privilege leaves that can be requested at once.
- Request Before: Days prior to the leave date that the request should be submitted.
- Carry Forward Limit: Number of privilege leaves that can be carried forward to the following year.
Saving the Configuration
- After entering all details for the selected role.
- Review the configured limits and rules.
- Click Submit at the bottom right to save the changes.