Update Existing Patient
- 🖥️Web
- 📱Mobile
- Go to ‘Patient’ (Side Nav)
- Select ‘Search Patient’
- Patient List:
The Patient List screen provides a structured overview of all registered patients in the system. It supports administrative, clinical,and operational workflows by enabling quick access to patient data, editing options, and search/filter functionality.
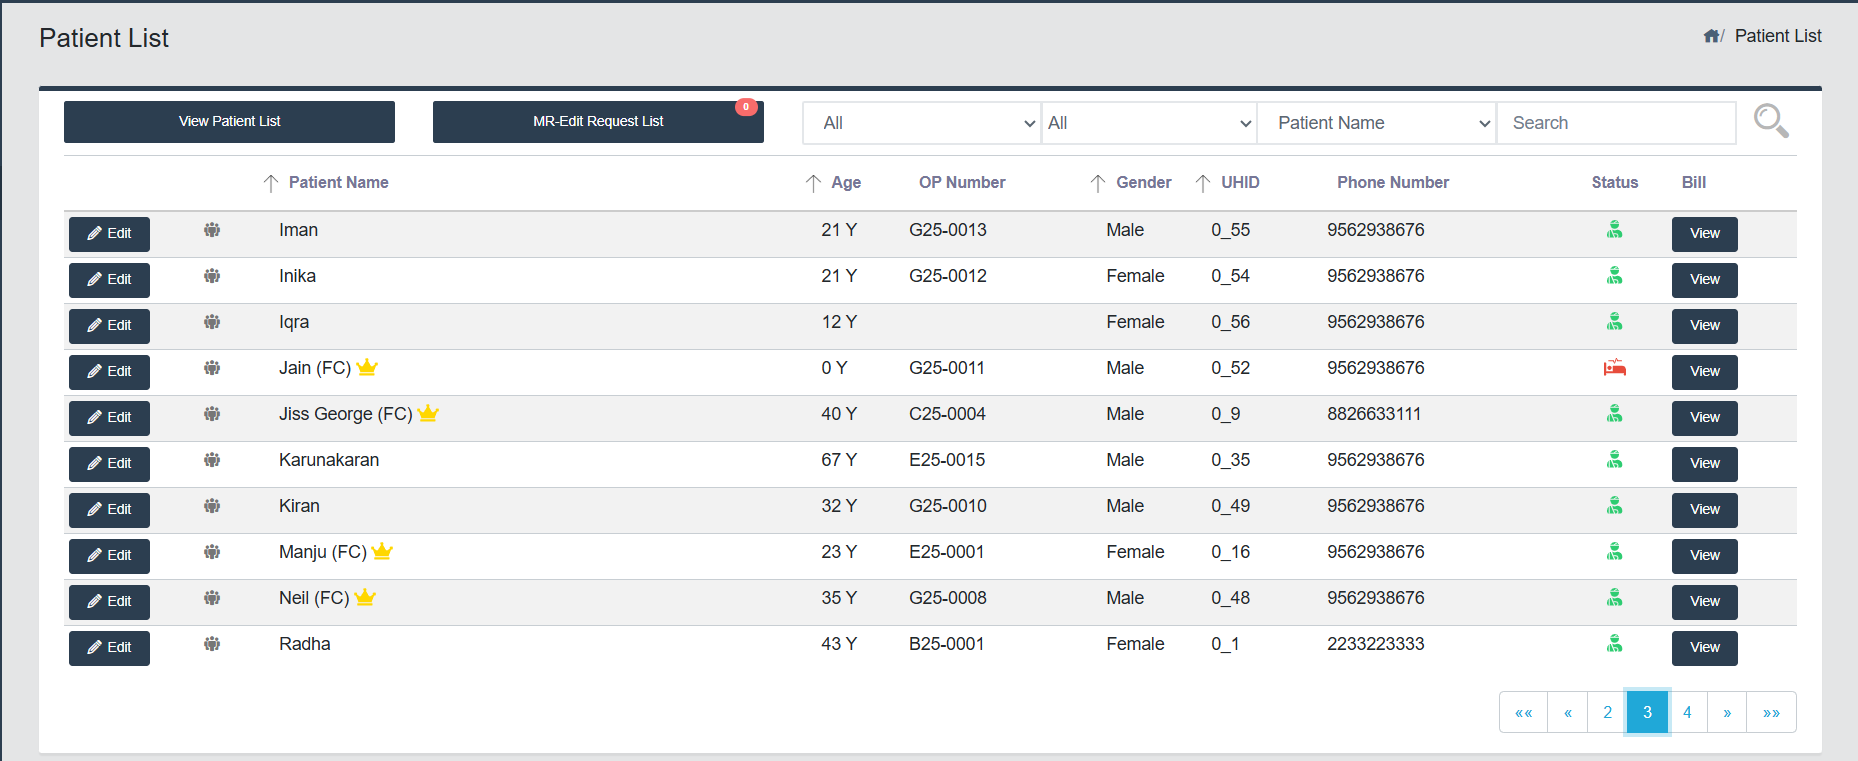
- Screen Components Overview:
- Top bar:
- Title: Patient List – Clearly indicates the current screen context.
- Home Icon: (top-right) for easy navigation to dashboard or homepage.
- Action Button:
- View Patient List Button: Click View Patient List Button to view the list of all patients with details such as Name, Age, OP Number, Gender, UHID, Phone Number.
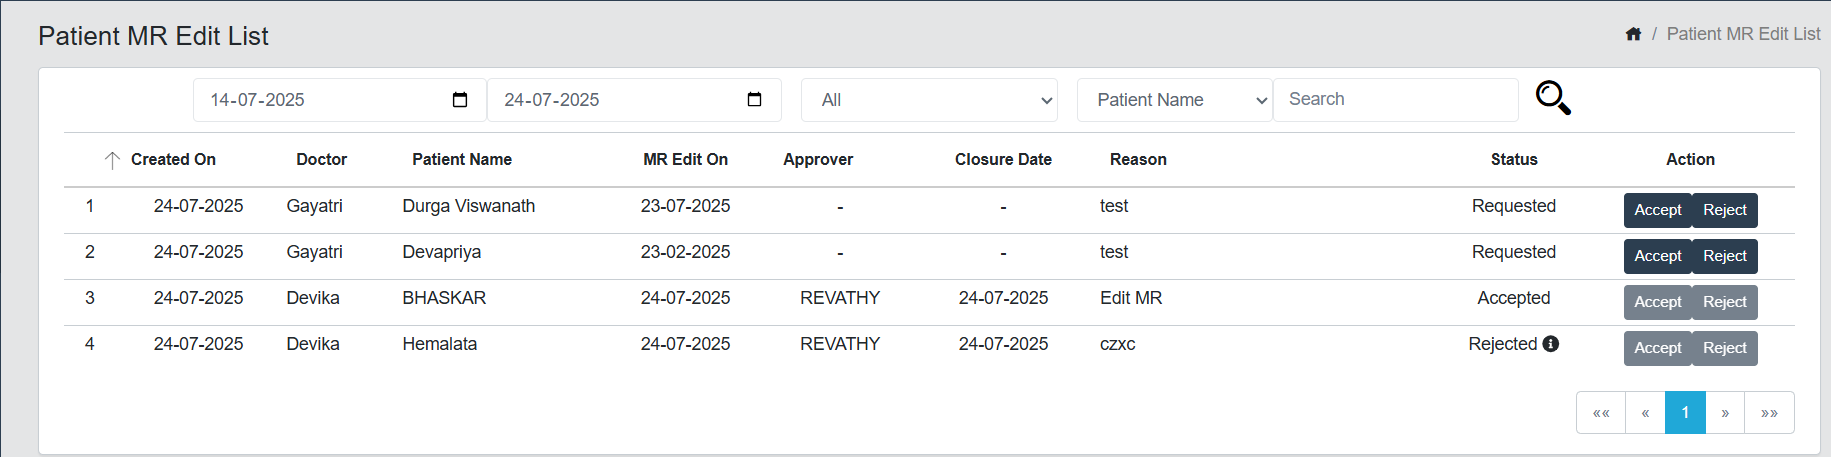
- MR Edit Request List Button: Click MR Edit Request List button to view the list of Request by Doctors to edit the existing MR.
- This screen provides the details of the list including Created On, Doctor, Patient Name, MR Edit On, Approver, Closure Date, Reason, Status (Requested/Accepted/Rejected/Edited/Expired with Reason).
- Filter Row: Date wise filter, Drop down filter for status (All, Requested, Accepted, Rejected, Edited, Expired), Drop down filter for Patient Name, Doctor Name.
- Action Buttons:
- For MR Edit Approver: There will be 2 buttons available for Accept and Reject the MR Edit Request.
- For Doctor who requested for MR Edit: Click Edit MR Button which will be enabled only after accepting the request by MR Edit Approver. The Doctor can edit the details from the Dr screen and save the details.
- Top bar:
- Filter Row:
- Dropdown filters for:
- Inpatient
- Outpatient
- Last visited in a day/week/month
- Patient name
- Phone number
- UHID
- Alt ID
- Address
- Search field: Free-text input for searching by patient name
- Dropdown filters for:
- Pagination Controls:
- Located at the bottom-right
- Includes:« First, ‹ Prev, Page Numbers, Next ›, Last » (Current page is highlighted in blue)
- Functional Highlights:
- Edit Patient: Quickly modify patient demographics or medical history.
- View Bill: Review patient billing details based on specific date ranges.
- Status Icon:
- Red Bed Icon: Inpatient
- Green Icon: Out Patient
- External Customer
- Edit Button
- Click on the Edit button in the Patient List screen to view or update the patient's details.
- Edit patient details if needed . Follow Steps 1 to 7 of Registering a New Patient
- Update Patient
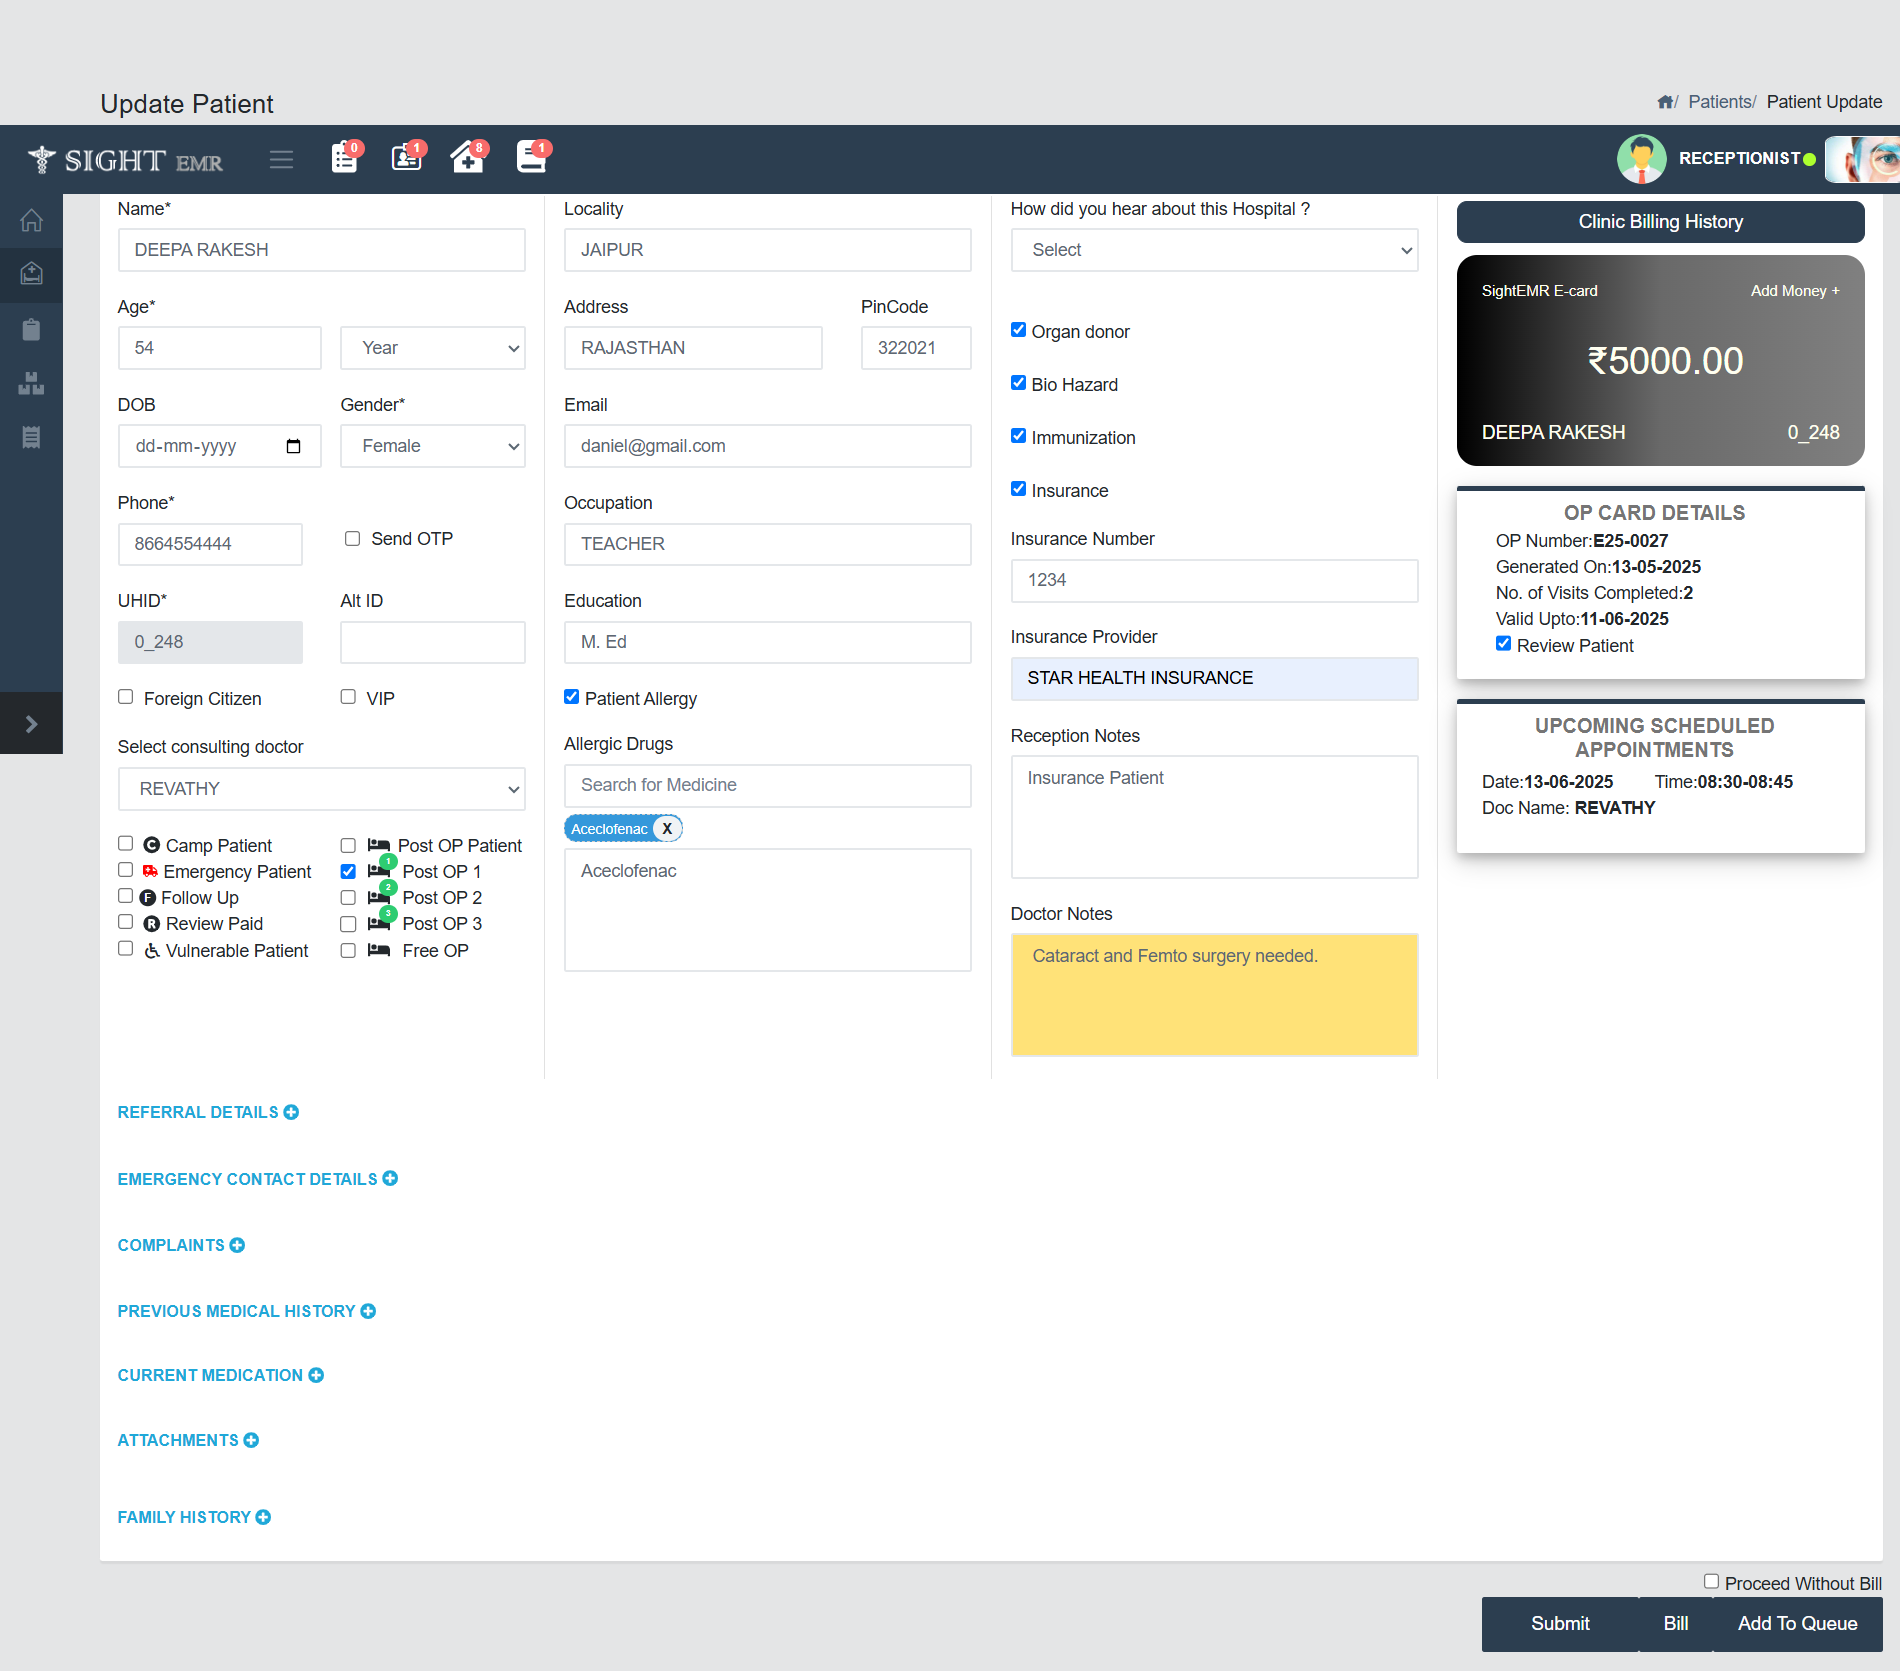
- Medico-Legal Case Toggle
- A switch to indicate whether the patient’s visit falls under a medico-legal case (MLC).
- Off (default): Not a medico-legal case.
- On: Marks the case for legal documentation and alerts relevant workflows.
- Submit patient details
- Clinic Billing History
- This section provides an overview of the patient’s clinic billing information
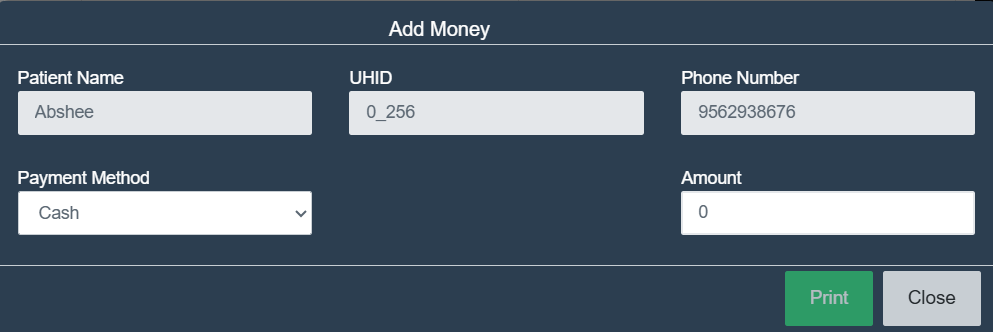
- SightEMR E-Card
- A virtual card showing the patient’s current clinic balance.
- Includes the ‘Add Money’ option to top up the patient’s wallet using cash/card/online payment methods.
- OP Card Details
- Displays key data about the patient's OP Card including ‘OP No.’, ’Generated on’, ‘No. Of visits completed’, ‘Valid upto’.
- Review Patient check box: To mark this patient as a Review/Follow-up case. Note: Checking the “Review Patient” box indicates that this is a follow-up visit and may trigger different billing or scheduling workflows.
- Upcoming Scheduled Appointments
- This panel provides a quick view of the patient's next scheduled appointment, helping both clinicians and patients stay informed and organized.
- It displays Date, Time and Dr’s Name
- Click Submit button to update the patient details only.
- Generate bill if needed. If not, tick the check box Proceed without Bill.
- Click Add to Queue button to add the existing patient to the Waiting queue.
note
The Inpatients/ External Customers cannot be added to Queue.
Patient List
- Go to ‘Patient List’ (Side Nav)
- Title: Patient List
- Clinic Name: Displays the Clinic Name
- Icons
- Menu (top-left): Opens the sidebar/navigation.
- Search (magnifying glass): Allows searching patients.
- Refresh (circular arrow): Refreshes the list.
- Add User (person with plus): Registers a new patient.
- Icons

- Patient Card Components:
Each patient is represented by a card containing the following:- Profile Image: Generic avatar displayed.
- Name, Age, and Gender: Clearly mentioned
- Phone Number: Contact number of the patient.
- UHID (Unique Health ID): Internal unique identifier.
- Alt ID: Alternate identifier if available.
- OP No.: Outpatient Number for visit tracking.
- Action Buttons:
- Edit: Opens the patient profile in edit mode.
- Surgery: Opens the surgical records or scheduling interface.
Update Existing Patient
- Go to ‘Patient List’ (Side Nav)
- Click on Edit Button: Opens the patient profile in edit mode.
- Created On, last visited date, last Visit Doctor will be displayed at the top (below header).
- Edit the Patient details if needed (follow Step 1 to 14)
- Verified Icon will appears if the patient already done the OTP Verification.
- Add Existing OP Card details (Optional)
- Action Buttons
- Update: Click update button to update the patient details. After successful updation the page refreshes back to Ptient List.
- Add to Queue (Blue Button): Click Add to Queue button to add the patient to Waiting Queue only after selecting the Consulting Doctor.