Schedule Appointment
- 🖥️Web
- 📱Mobile
Schedule Patient
-
Schedule Management
- Go to Schedule Patient.
- Select Schedule Management.
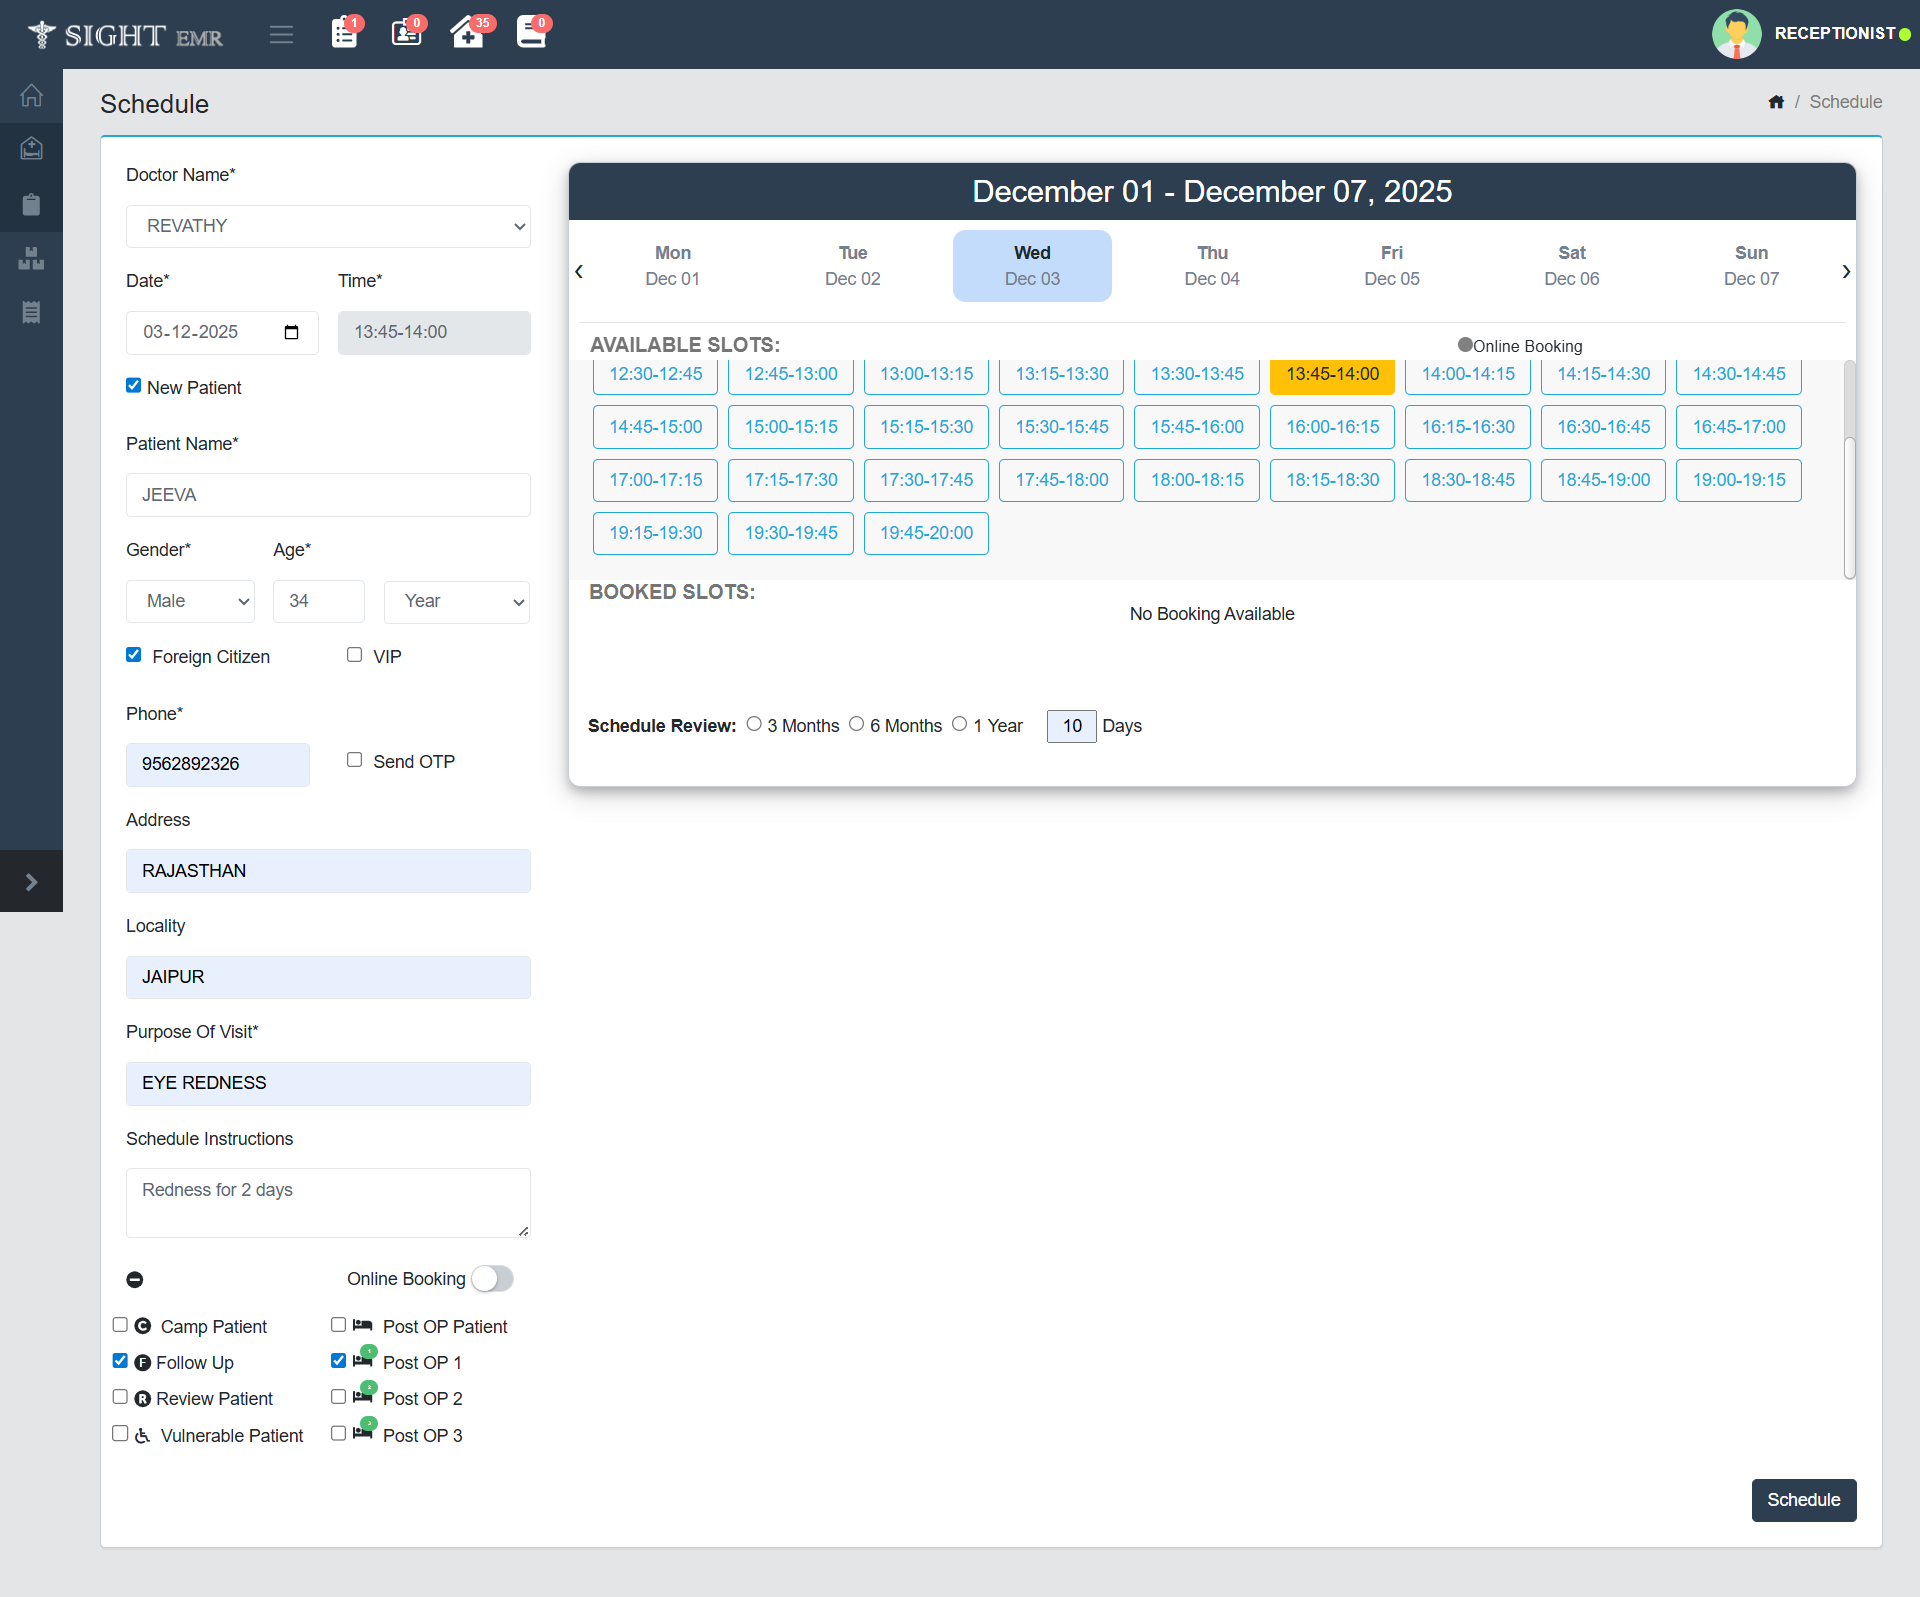
| Field | Description |
|---|---|
| Doctor Name* | Select the doctor from the dropdown list. |
| Date* | Choose the appointment date using the calendar picker. |
| Time* | Select or enter the time of appointment. |
| New Patient | Check this box if the patient is new. |
| Patient Name* | Search and select from registered patients. (Search by Patient name/Ph. No./UHID/Alt ID) |
| Purpose of Visit* | Enter the reason for consultation. |
| Schedule Instructions | Optional notes for the visit. |
| Online Booking | Toggle switch to allow online appointment booking. |
- For New Patients: Enter Patient Name/ Gender/ Age/ Purpose of Visit/ Address/ Mobile No. Verification.
- For Existing Patients: Search the patient by Patient Name/ UHID/ Phone Number/ Alt ID. Select the patient from the list that appears.
note
Last Visit Dr and Date will be displayed at the bottom left.
-
Slot Availability Panel (Right Side)
- Date Range: Select a date to view slots for that specific week.
- Available Slots: Displays all available time slots for each day. Click a slot to schedule an appointment.
- Booked Slots: Shows appointments already scheduled.
- Schedule Review: Mark for follow-up scheduling in 3 months, 6 months, or 1 year.
- The user can now select no of days to select an availability slot in addition to the current 3 months,6 months and 1 year options.
-
Check Boxes (Optional): Tick the check boxes for Camp Patient/ Follow Up/ review Patient/ Vulnerable Patient/ Post OP Patient/ Post OP 1/ Post OP 2/ Post OP 3.
-
Submit Appointment: Click the Schedule button at the bottom right to save the appointment.
-
The Scheduled patients will be displayed in Schedule List (Side Nav) date-wise.
-
Schedule List (Side Nav)
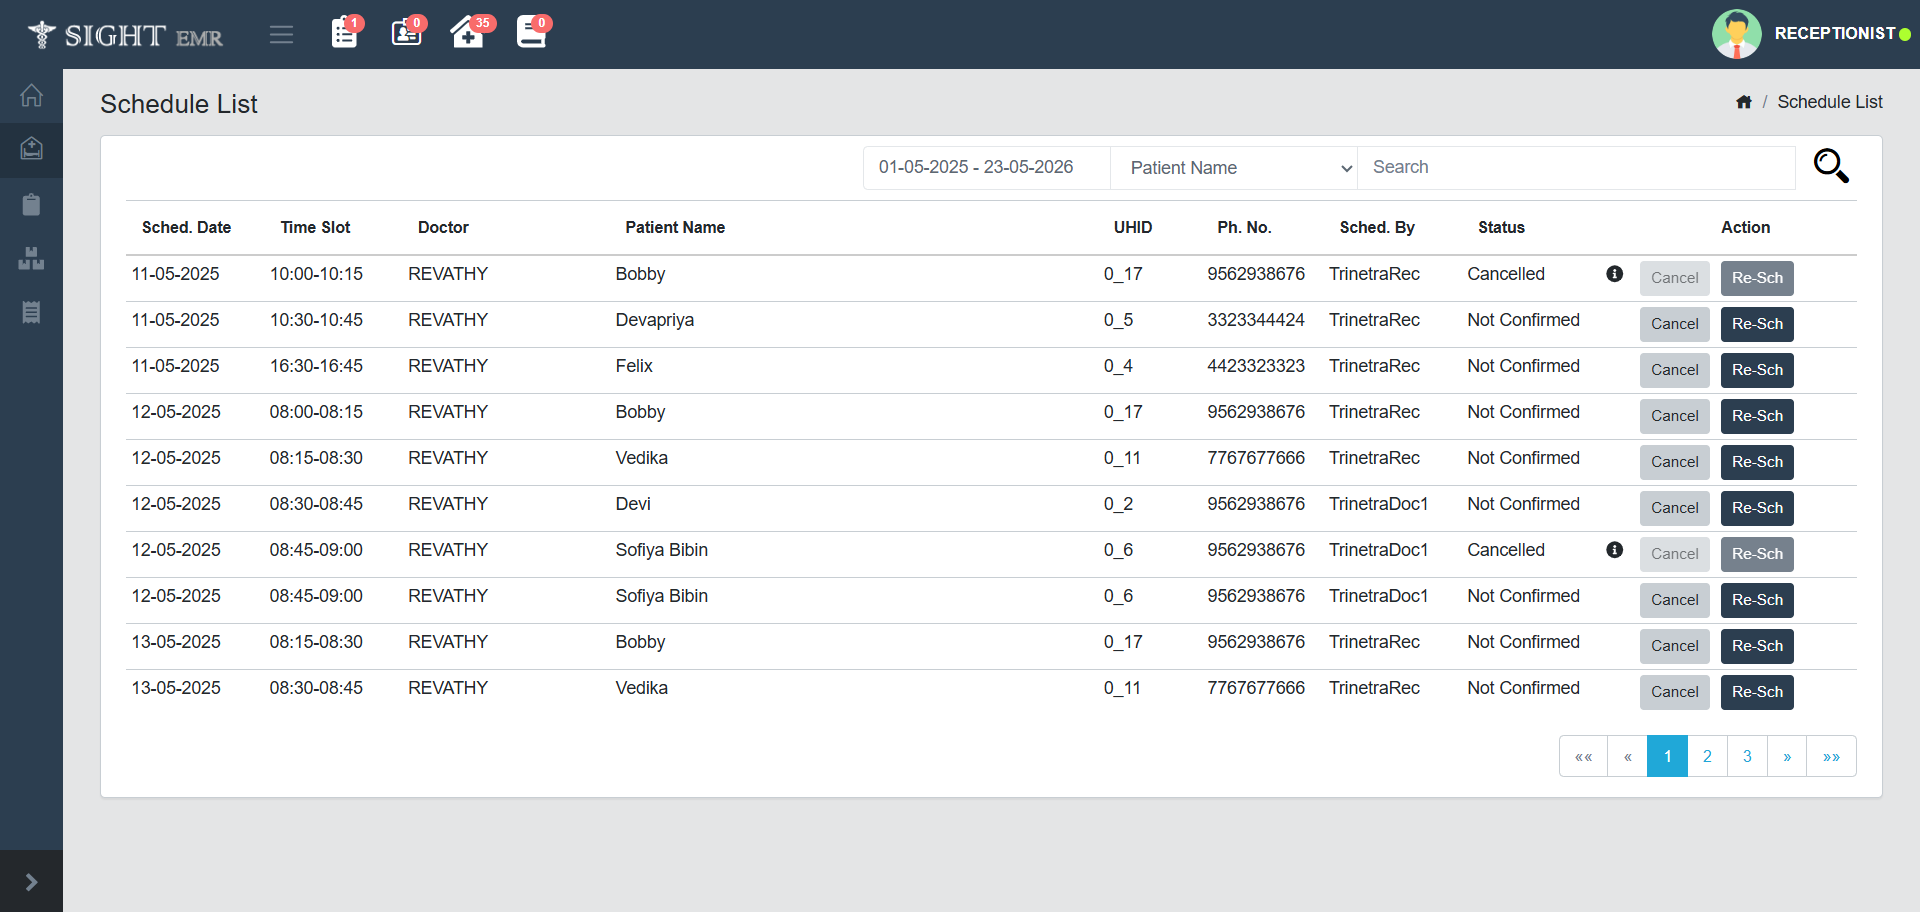
- The Schedule List module provides an interface to view, manage, and modify all scheduled appointments with Scheduled date, Time Slot, Doctor, Patient Name, UHID, Phone No., Scheduled By, Status (Confirmed/Not Confirmed/Cancelled appointments:with reason )
- Date Range Filter: Allows filtering of schedules within a specified date range.
- Search and Filter: Appointments can be filtered using Patient name/ Doctor Name/ UHID/ Phone Number/ Alt ID.
- Pagination: Displays all appointments in a paginated format with 10 records per page for easy navigation.
- Cancel button: Click Cancel a scheduled appointment. Fill the reason for the cancellation. The reason for cancellation will be displayed in an 'i' hover.
- Reschedule button: Opens the rescheduling interface to select a new time slot for the existing appointment.
note
The Appointment Scheduled for the current date will be displayed in Schedule List (Side Nav) and also in the Waiting Queue: Schedule List.
Schedule
- Go to Schedule (Side Nav).
- Select Doctor from the drop-down list.
- Select Date from week calender.
- Select Time from the available slots.
- Click Next button to move forward.
- A screen will appear to add the schedule details for a New Patient/Existing Patient with Doctor Name, Date and slot selected.
- For Existing Patient
- Search by Patient Name/ Alt ID/ UHID/ Phone Number and select from the list.
- Enter Purpose of Visit.
- Enter Schedule Instructions if any.
- Tick check boxes (Optional): Follow Up, Camp Patient, Review Patient, Vulnerable Patient, VIP Patient, Foreign Citizen, Post OP Patient/ Post OP 1/ POst OP 2/ Post OP 3.
- For New Patient
- Fill mandatory fields such as:
- Enter Name and Age (Specify Year/Month).
- Select Gender (Male/Female) from drop-down list.
- Enter Phone Number and Purpose of Visit.
- Enter Address and Schedule Instructions (Optional).
- Tick check box Send OTP for Mobile Number Verification.
- Tick check boxes (Optional): Follow Up, Camp Patient, Review Patient, Vulnerable Patient, VIP Patient, Foreign Citizen, Post OP Patient/ Post OP 1/ POst OP 2/ Post OP 3.
- Submit Schedule Button at the bottom of the screen to confirm the schedule. The patient will be listed in Schedule List.
- Fill mandatory fields such as:
- For Existing Patient
Schedule List
- Click Schedule button near Queue button at the bottom.
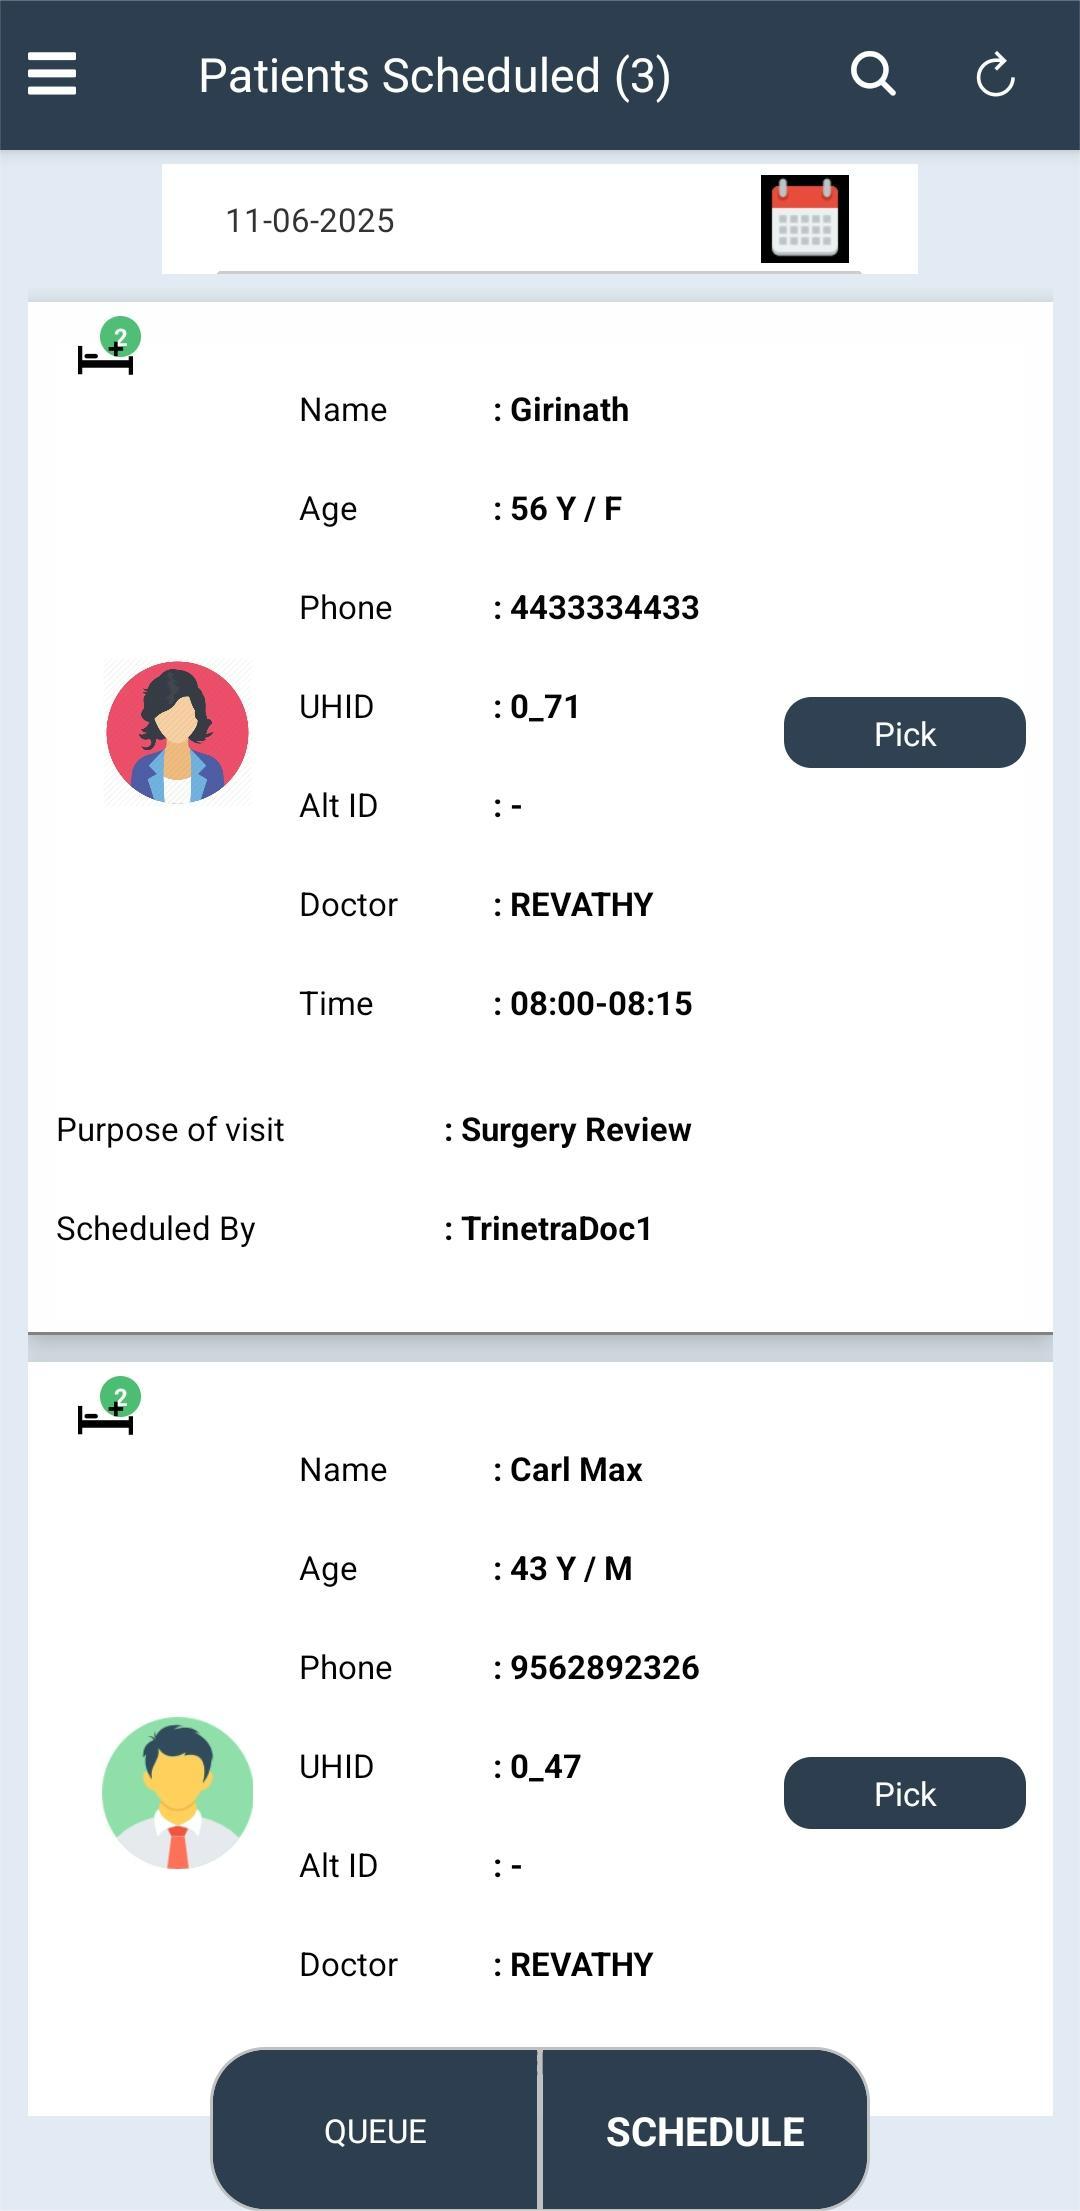
- This screen displays the Scheduled patient list date wise.
- Click Pick button to Cancel/Reschedule/Confirm patients to Waiting Queue (Only for current day scheduled patients).
- Scheduled details of the patient will be displayed with Date, Selected slot, Doctor Name, Patient Name, Age, Alt ID, UHID, Phone Number, Purpose of Visit, Schedule Instructions, Schedule By.
- User can call the patient by clicking the phone icon near to the phone number.
- OP Card details are displayed with OP number, Generated On, Valid Upto, No. of Visits Completed.
- Edit the check boxes if needed (Review patient, Review Paid, Vulnerable Patient, Camp Patient, Follow Up, VIP Patient, Foreign Citizen, Post OP Patient/Post OP 1/Post OP 2/ Post OP3).
- Action Buttons
- Cancel: Click Cancel to cancel the appointment with reason. This will be displayed in Schedule list with reason in i hover.
- Reschedule: Click Reschedule button to change the date/slot of the appoinment.
- Select Doctor from drop-down list.
- Select Date and Slots to be rescheduled.
- Click Clear to clear the data.
- Click Next to go ahead with the reschedule.
- Reschedule Details screen will appear with changed date.
- Click Submit to confirm the Reschedule.
- Confirm: Click Confirm button to confirm the appointment. The Patient will be added to Waiting Queue.
Schedule List (Side Nav)
- Go to Schedule List (Side Nav).
- This screen displays list of Scheduled patients with Patient name, Age, Schedule Date and Slot, Schedule By, Alt ID, Phone Number and Status (Confirmed/ Non-Confirmed/ Cancelled with reason).
- Click Pick button to Cancel/ Reschedule the Appointment.
- Schedule Details Screen will open up.
- There is no option to Confirm the appointment from the screen.