Clinic Admin
Key Roles
Employees / HR Management
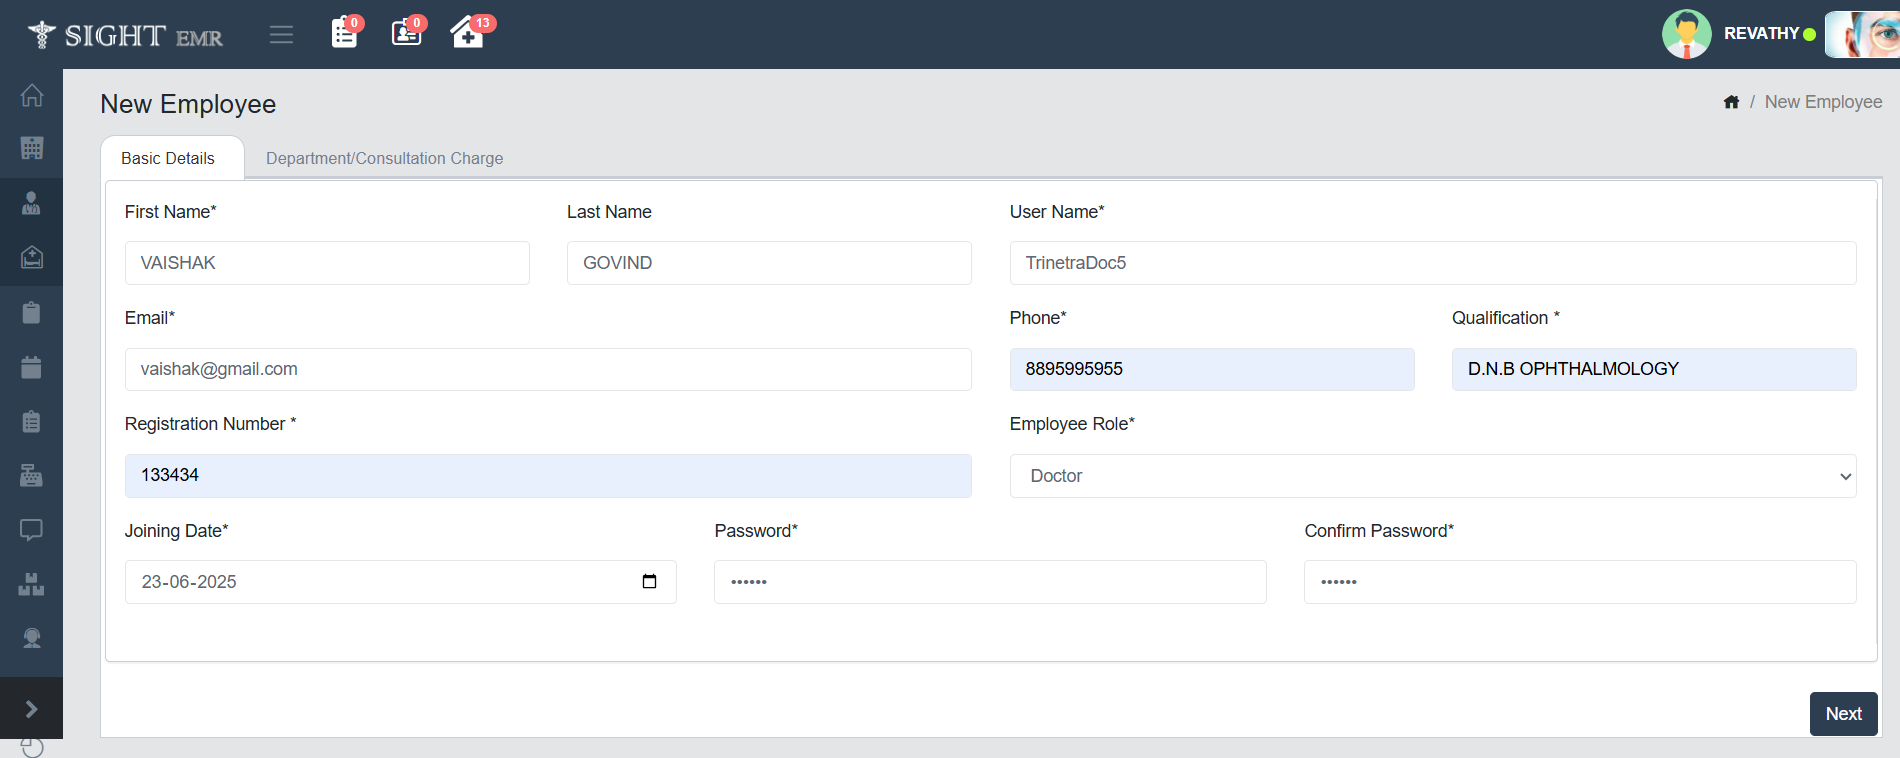
New Employee
- Go to Employees (Side Nav).
- Select New Employee
- This screen allows the Admin to add a new employee to the system.
- Basic Details Tab: Once the page loads, you will see a form under the “Basic Details” tab. This is where essential employee information is entered:
- First Name*: Enter the employee’s first name. This is a required field.
- Last Name: Enter the last name of the employee (optional).
- User Name*: Specify a unique username for the employee. This will be used for logging into the system.
- Email*: Provide a valid email address for the employee. This is mandatory for communication and verification.
- Phone*: Enter the employee’s contact number. This is also a required field.
- Qualification*: Enter the academic or professional qualification of the employee. This field is mandatory only for Doctor.
- Registration Number*: Input the employee’s official registration number.Required for Doctors.
- Employee Role*: Select the appropriate role from the dropdown (e.g., Doctor, Nurse, Receptionist). This determines their access and functionality within the EMR.
- Joining Date*: Choose the employee’s joining date using the date picker provided.
- Password*: Set Temporary Password for the User. This will be used for first login.
- Confirm Password*: Re-enter the password to confirm it matches.
- Once all fields are completed, click the Next button at the bottom right to proceed to the Department/Consultation Charge tab. This fieled will be displayed only for Doctor Role.
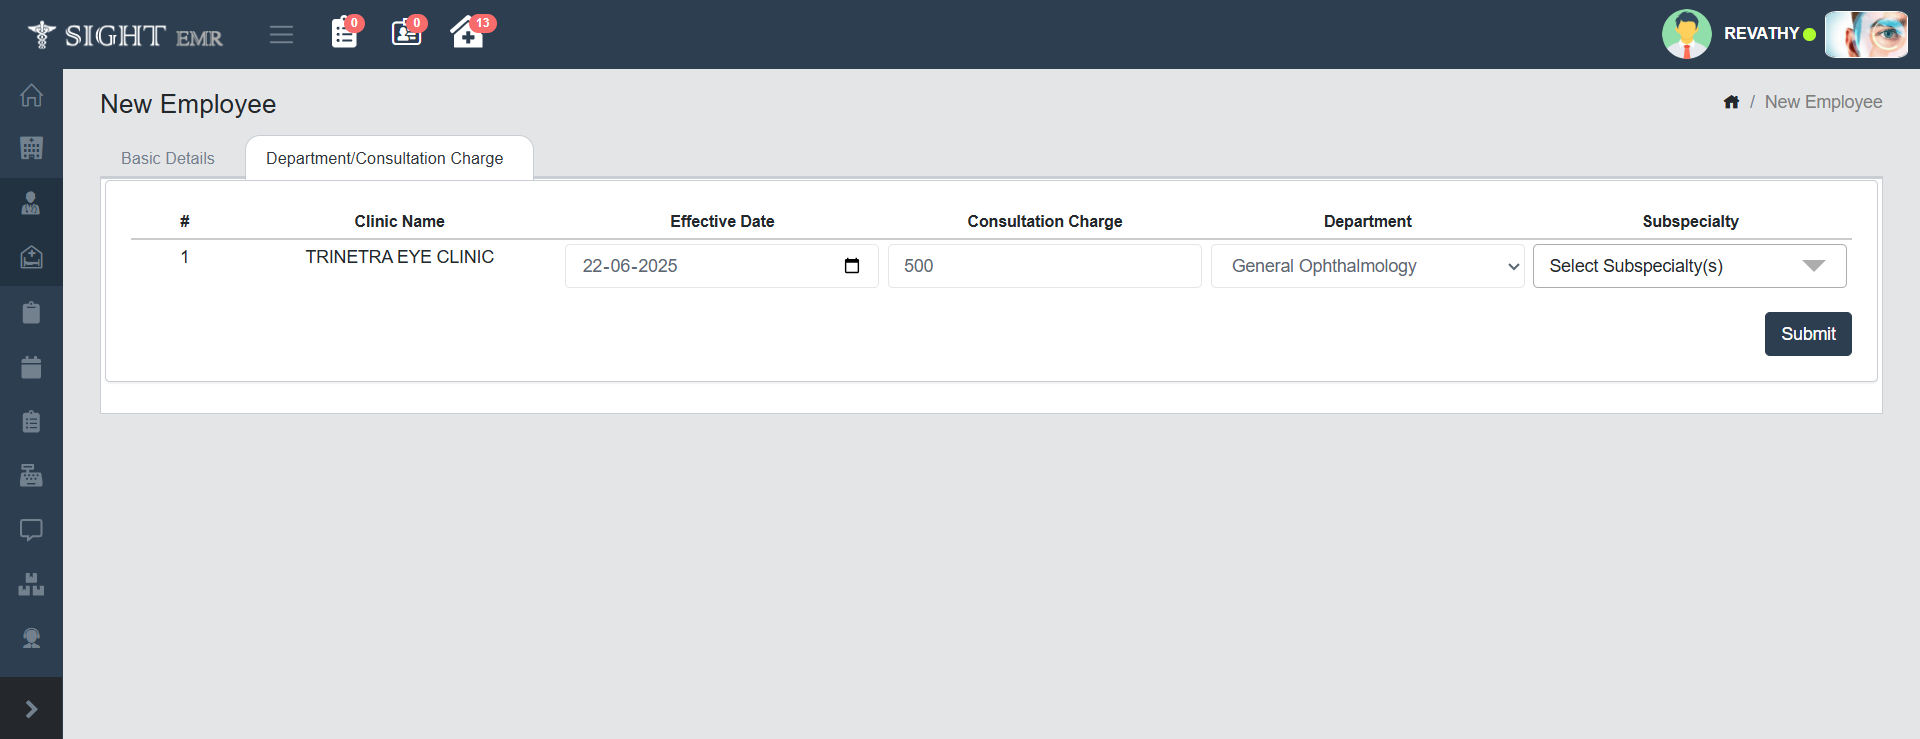
- Fields in this Section:
- Clinic Name: This field automatically displays the clinic or hospital name.
- Effective Date: Select the date from which the entered consultation charge and department information will become active. Use the date picker to choose the correct date.
- Consultation Charge: Enter the amount to be charged for a consultation by this employee.
- Department: Choose the main department this employee will be assigned to. This dropdown includes various departments added by the Super Admin.
- Subspecialty: (Optional) If applicable, select one or more subspecialties relevant to the department. This dropdown will change dynamically based on the department chosen.
- After filling in all necessary details, Click the Submit button to save the employee's information and finalize the onboarding.
- A success message or confirmation will be shown if all validations are passed.
Employee List
- This screen displays a searchable, paginated list of all registered employees in the system. It can be accessed from the side navigation bar by selecting the Employees module and then clicking on Employee List.
- Each row in the table displays basic information about an employee, including:
- Edit Button: Click the Edit button beside any employee record to open the edit screen and update that employee's details.
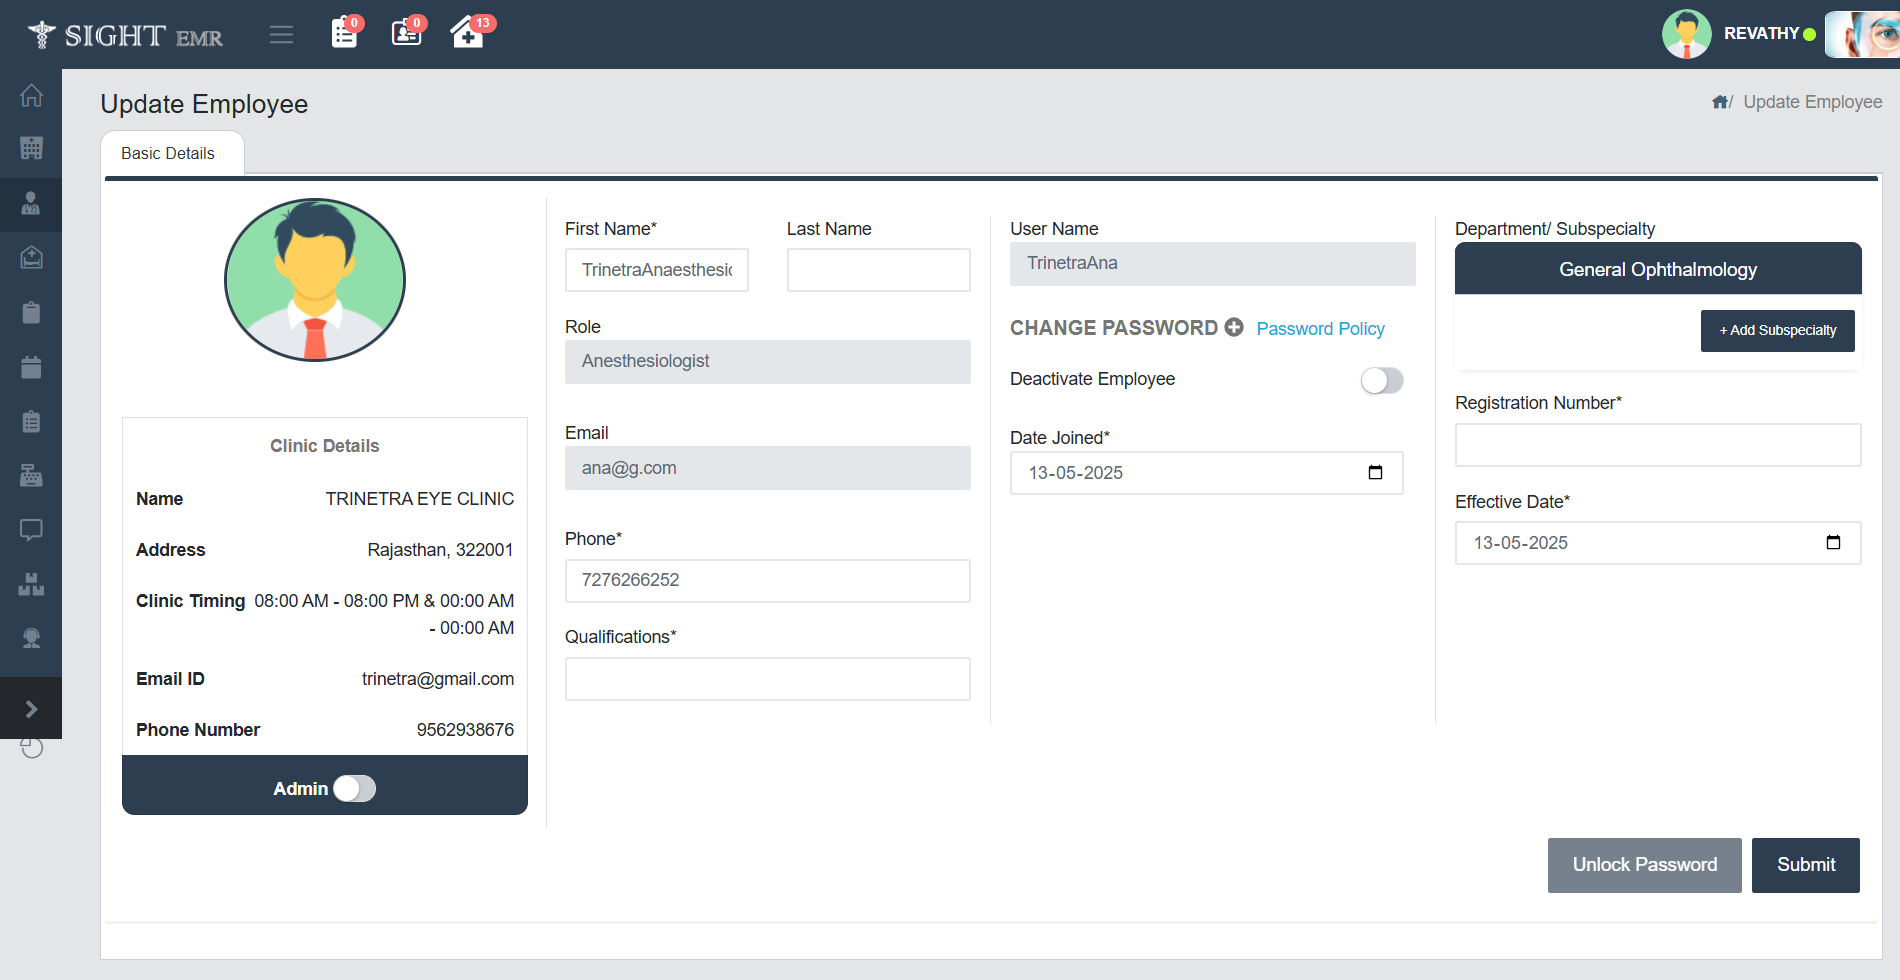
- You can Edit, View or Deactivate Employees from the list.
- Reset mobile button: Reset Mobile for Mobile app (Receptionist &Refractionist).
- Can edit Joining Date and Release Date.
- Can Change Password according to the Password Policy provided.
- Action Buttons:
- Unlock Password: Used if the employee account is locked. Clicking this will reset the lock status.
- Submit: Click Submit button to save all the changes made to the employee profile.
- User Name: The username assigned during employee registration.
- Email: The registered email ID of the employee.
- Registration Number: A unique professional or employee number.
- Employee Role: Specifies the position or role such as Doctor, Nurse, Optical Manager, Pharmacist, etc.
- Active Status: Indicates whether the employee is currently Active or Inactive in the system.
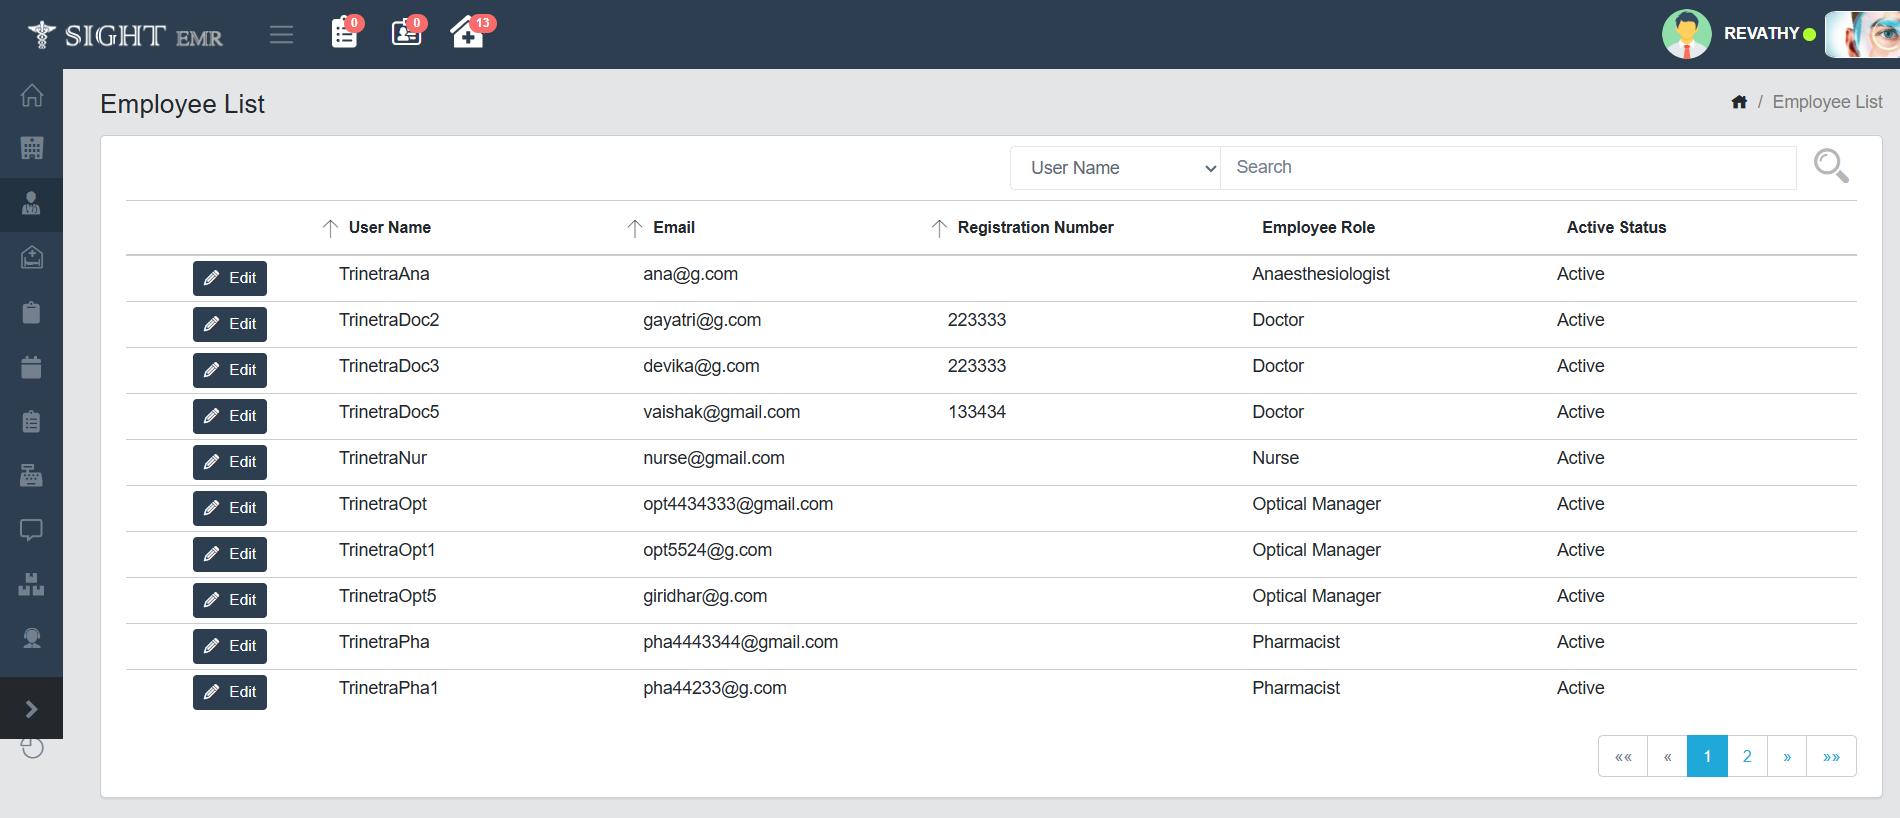
- Search and Filter:
- Use the search bar on the top right to filter employees by User Name, Registration Number, Phone Number, Email.
- Pagination:
- Navigate through pages using the pagination controls at the bottom right.
- The current page is highlighted.
- Use arrows to go to the next, previous, first, or last page.
Employee Leave/ Schedule
Leave Management
- In the Leave Management screen, a calendar view is displayed.
- Navigation Controls:
- Previous / Next: Navigate between months.
- Today: Jump to the current date.
- To mark an employee as absent or on leave, simply click on the desired date.
- Click Add Leave/Absent Button in the Calender.
- Add Leave / Absent – Popup Form will appear.
- This form allows you to record leave details for any employee.
- Fields in the Popup:
- Type*: A dropdown to select the type of leave.
- Employee*: Dropdown list to select the employee taking the leave. It includes all employees registered in the system.
- Date*: Automatically prefilled with the selected date from the calendar. You can also adjust the range using the date picker for multi-day leave.
- Leave Reason*: Free text area to enter the reason for leave.
- Click the Submit button to add leave for the particular date.
- The calendar will then show a red badge (with a count) on the date, indicating leave has been marked.
- The calendar will now display the Employee's name and a red dot on leave days.
Surgery/ Online
This section is used to schedule surgeries or online consultations for doctors:
- Click the Employee Leave/ Schedule from the left sidebar.
- Select Surgery/ Online.
- On the calendar view, click the Add Surgery/Online button for the required date.
- A form will appear where you can:
- Select Type (Surgery Booking or Online Consultation).
- Choose the Doctor Name.
- Enter the Date.
- Specify Time From and Time To.
- Add Comments if any.
- Click Submit to save the schedule. The calendar will now show a marker for that entry.
- Click Remove to delete the entry.
Patient Management - Patient List
- Edit/Update/Deactivate patient details and Clinic Sync is available.
- Wallet: Add advance amount to the wallet and admin can refund any pending amount in the wallet to the patient at any time. Receipts can be printed from the Wallet for Advance and Refund.
Manage Purchase
Expense Invoice
- Can Generate Clinic Expense Invoices.
Expense List
- Can View all the Expenses (Invoice and Draft) of all Invoice Categories (Clinic Expense, Optic Store, Pharmacy).
- Download Expense Invoice as Excel and PDF.
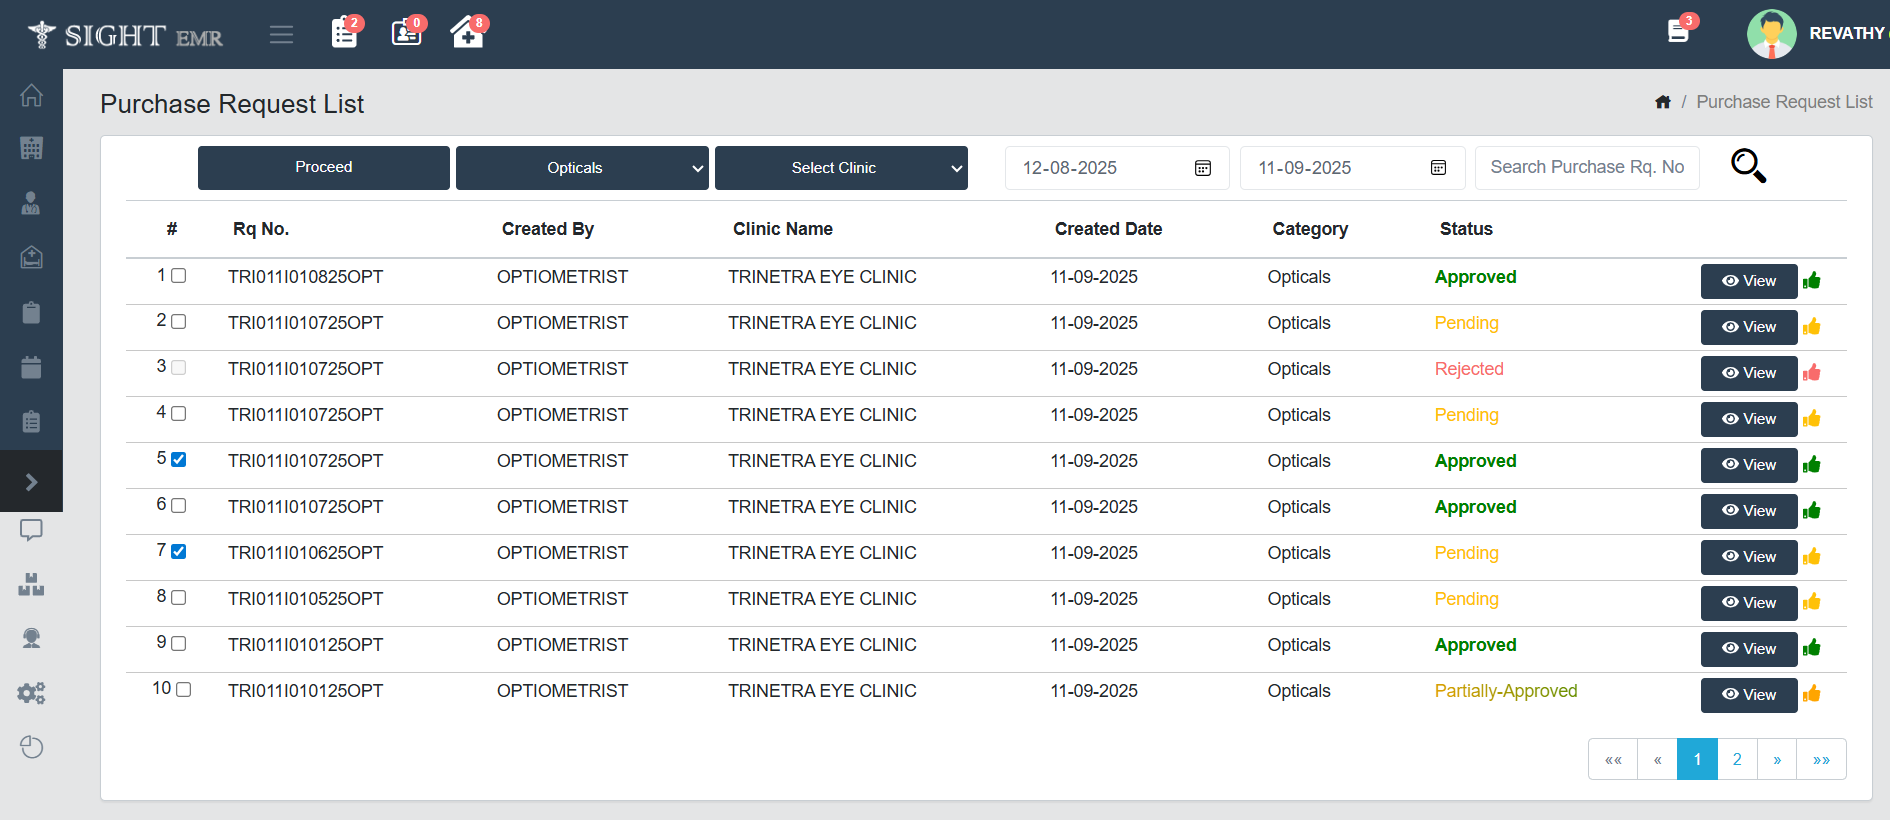
Purchase Request List
Clinic Admins can be given an additional role of “Purchase Manager” for reviewing and approving “Purchase Requests” from Pharmacy and Optical Store. Access to generate “Purchase Orders” are restricted to Purchase Manager Roles only.
- Viewing Purchase Requests
- From the left-side menu, select Purchase Request List.
- The Purchase Request List screen will display all requests created by staff.
- Each request includes details such as Request Number, Created By, Clinic Name, Created Date, Category, and Status.
-
Statuses may appear as:
- Pending - Awaiting review or approval.
- Approved - Fully approved by admin.
- Partially Approved - Some items approved, others pending.
- Rejected - Request declined. Cannot do any changes to the Rejected Request.
-
Use the filters to search by Category (Opticals/Pharmacy), Clinic, or Date.
-
To view the details of a request, click the View button.
-
Approving or Rejecting Requests
- Option 1:
- From the Purchase Request List, check the boxes for the requests you want to take action on.
- Click Proceed to Generate Purchase Order.
- Option 2:
- Click the thumb besides View button.
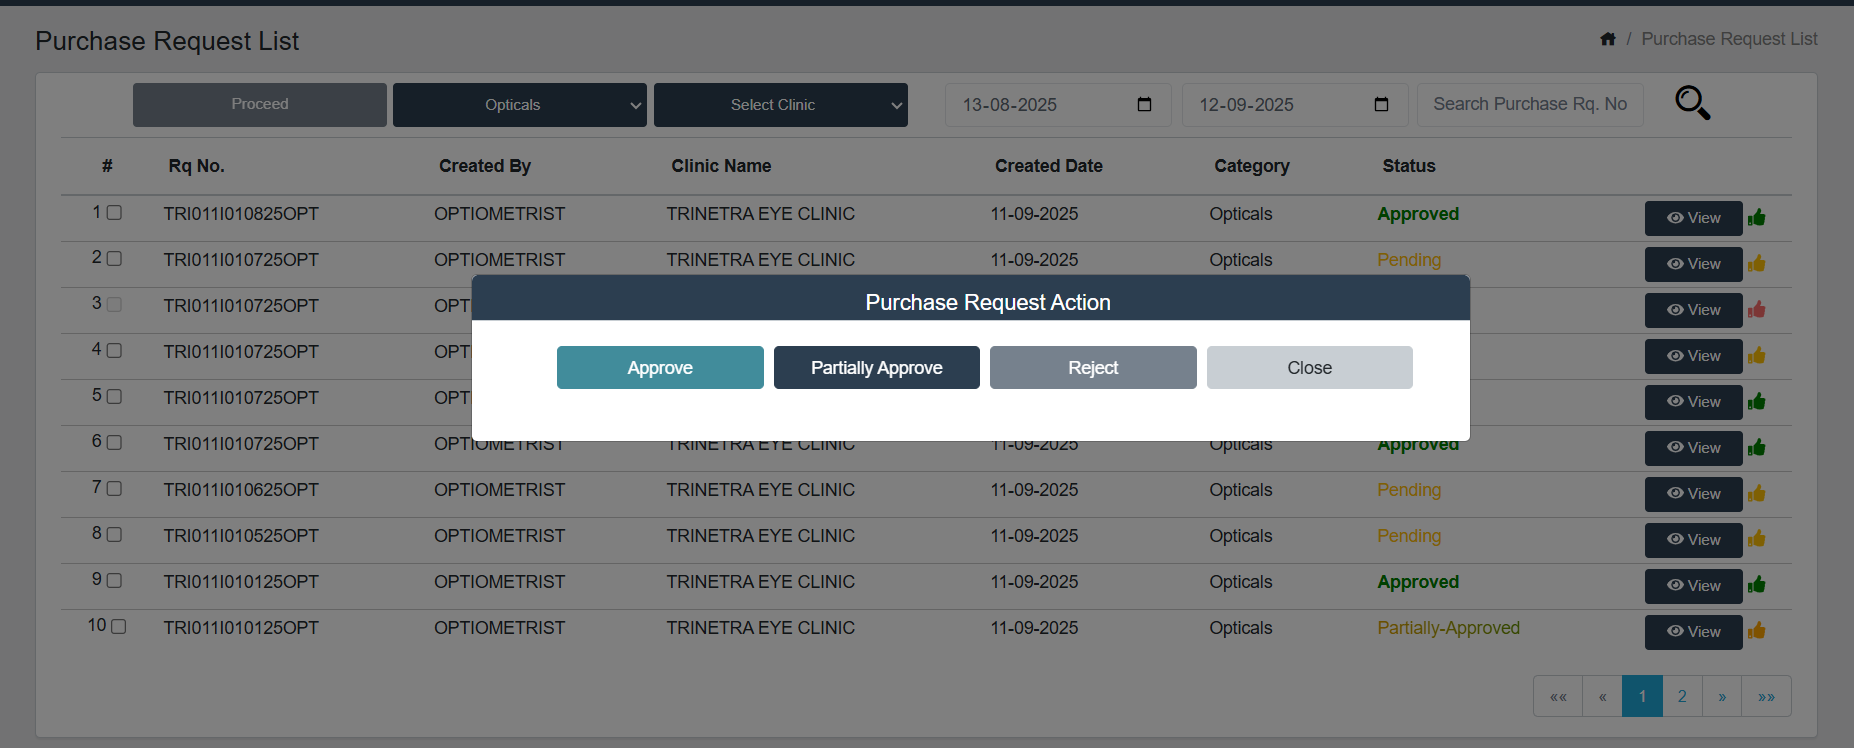
- A Modal box appears for Purchase Request Action with the following buttons Approve, Partially Approve, Reject the corresponding request entry.
- Click Close button to close the Modal window.
- Option 1:
-
Generating a Purchase Order
- For Pending/Approved/Partially Approved requests, click Proceed to move to the Generate Purchase Order screen.
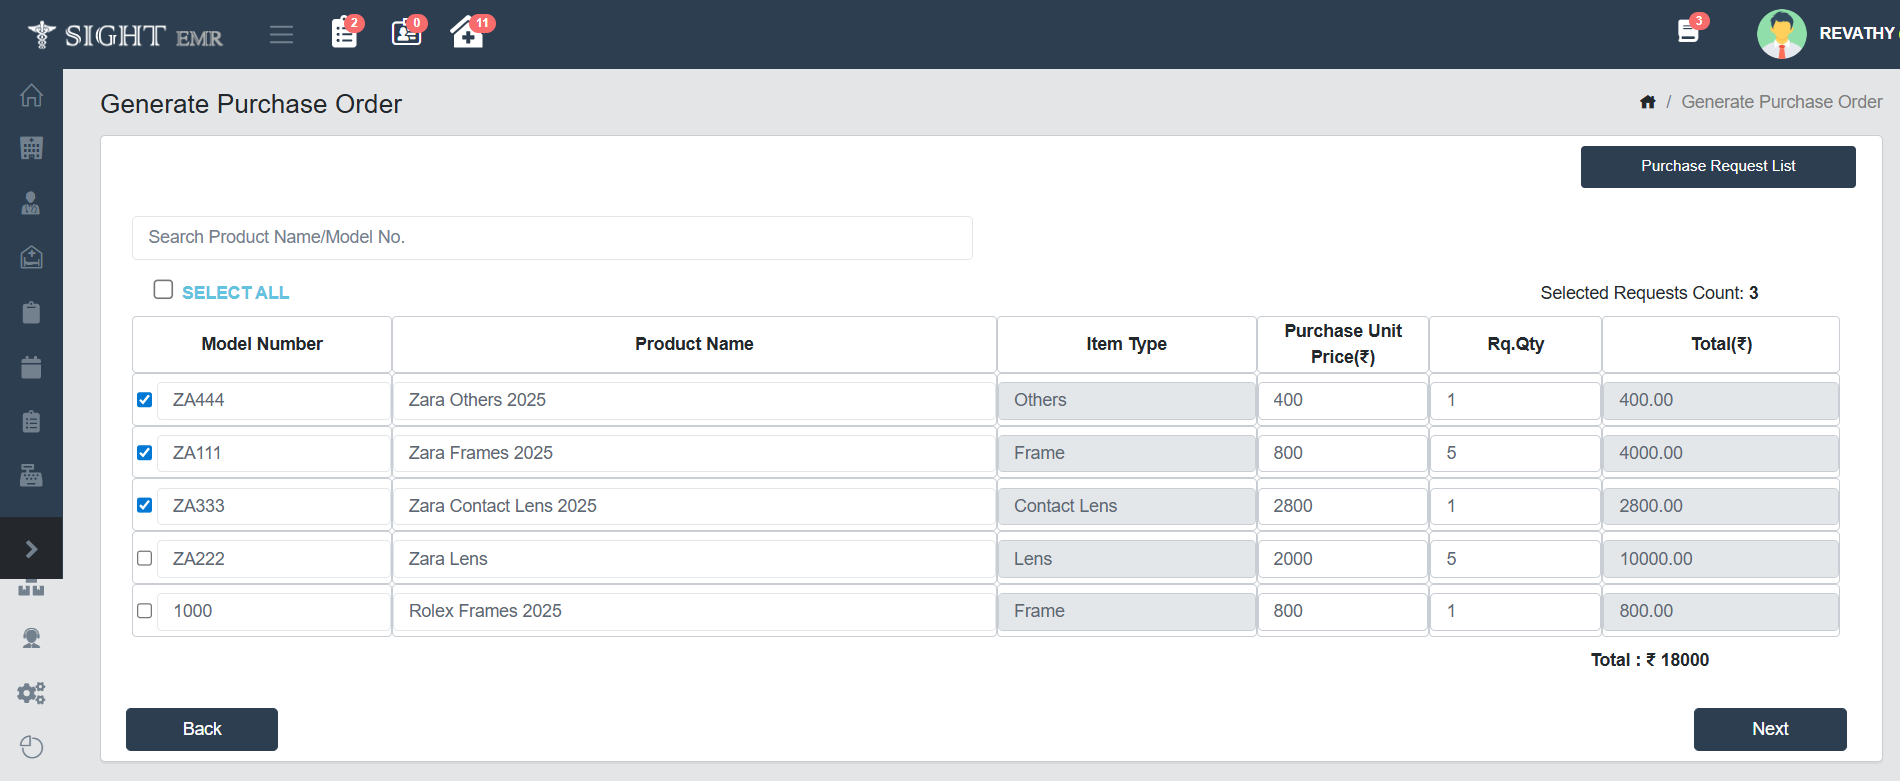
- Select the products you want to include by checking the boxes next to their model numbers.
- You can search the Product by Product Name/Model Number.
- You can edit Model Number, Product Name, Purchase Unit Price and Required Quantity.
- The Total Price will be auto calculated according to the entries.
- Navigation Tips
- Purchase Request List: Click Purchase Request List at the top right of the screen to go back the Request List screen.
- Search Bar - Quickly find products by entering Model Number or Product Name.
- Select All Option - Use this to include or exclude all items in bulk.
- Back Button - Returns you to the previous screen.
- Next: Click Next button to Generate Purchase Order.
- Enter or confirm the following details:
- Supplier Name: Search Supplier Name and select from the list.
- Supplier Address: It will be auto-filled while selecting Supplier Name.
- Phone Number: It will be auto-filled while selecting Supplier Name.
- Shipping Recipient Name
- Shipping Recipient Phone Number
- Shipping Address
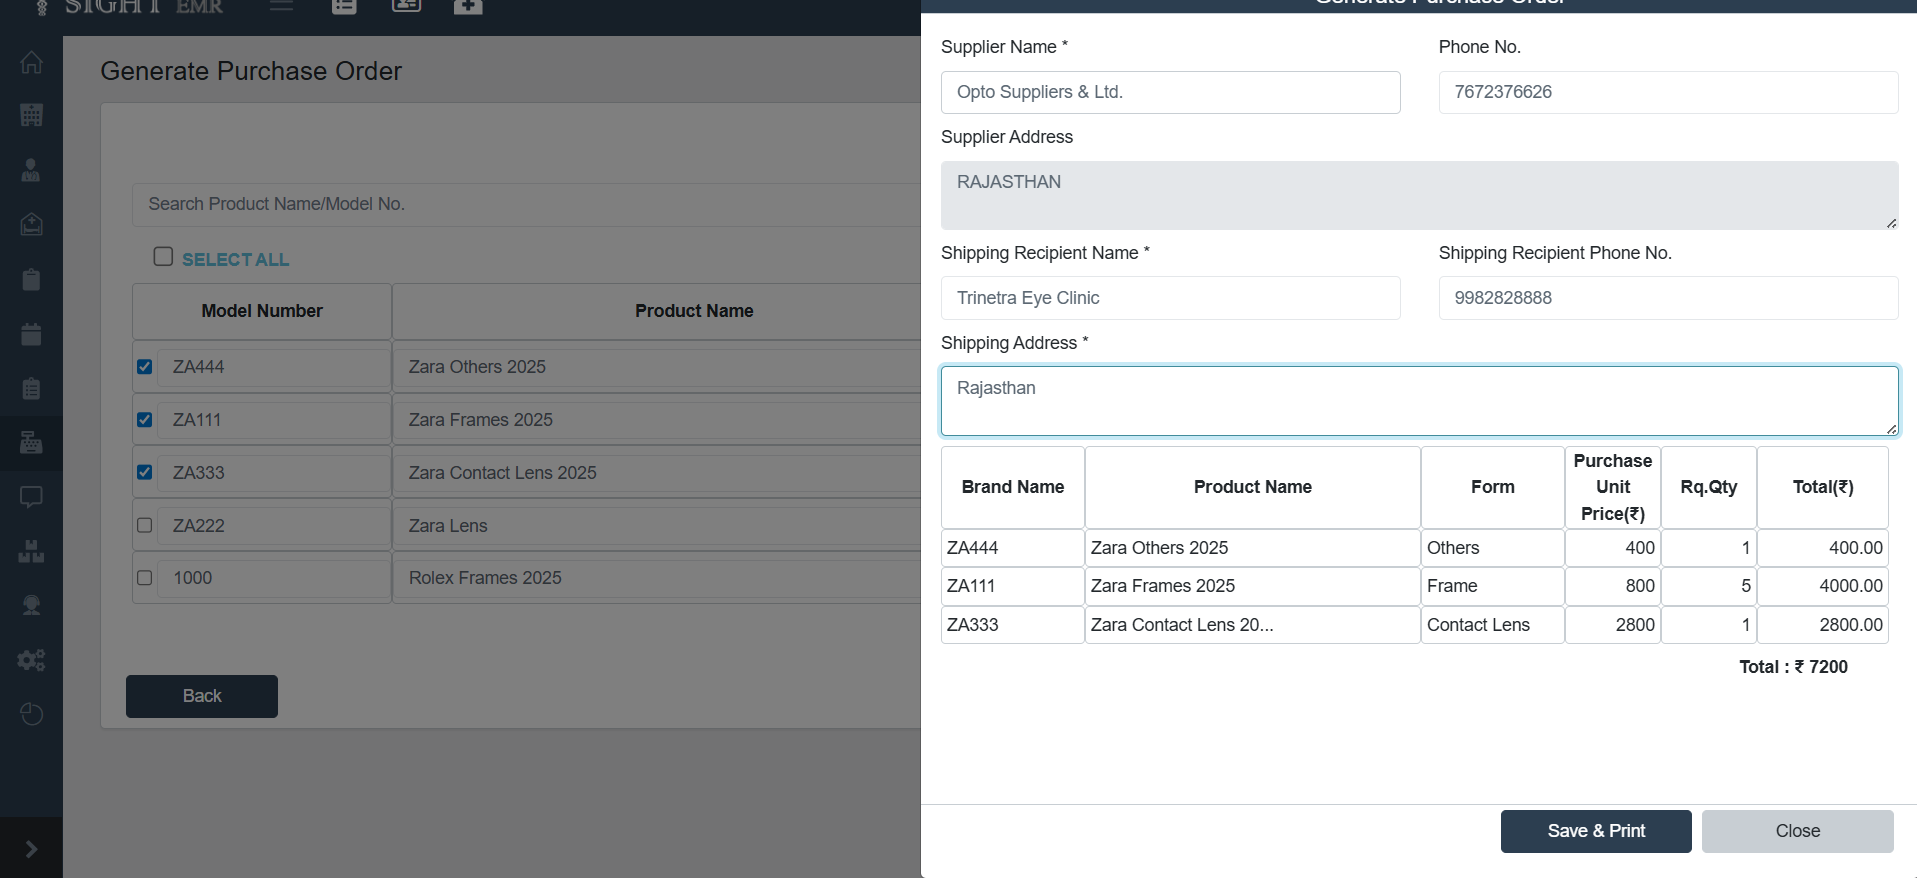
- The system will display the selected items along with:
- Product Name
- Item Type
- Unit Price
- Requested Quantity
- Total Amount
- Verify the total amount shown at the bottom.
- Finalizing the Purchase Order
- Once details are verified, click Save & Print to generate the official Purchase Order.
- If you don’t want to proceed, click Close to exit without saving.
- Generated Purchase Orders (Purchase order Report) can be printed and sent to suppliers for processing.
Purchase Order List
- Shows all generated purchase orders.
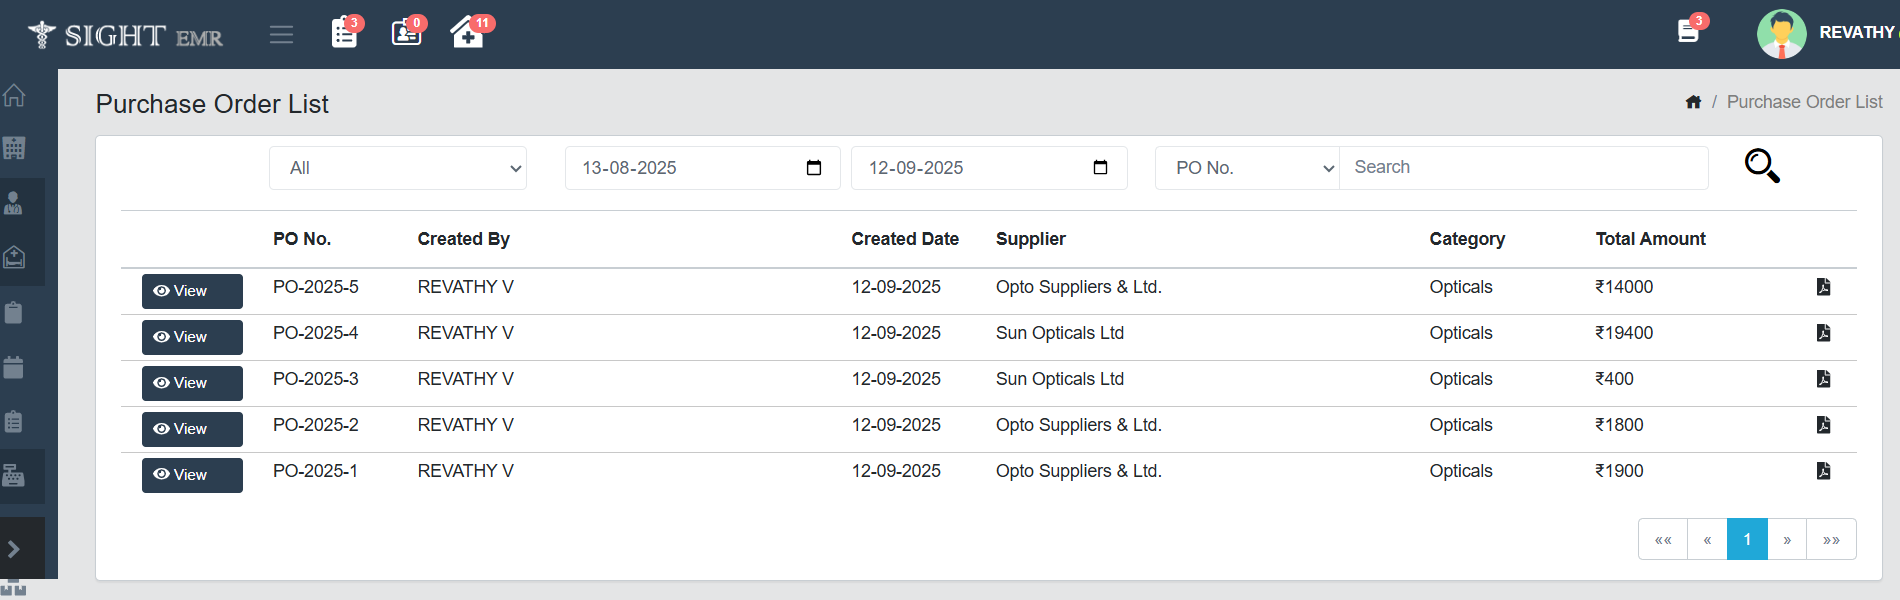
- Columns include:
- PO No. – Unique Purchase Order number.
- Created By – User who generated the PO.
- Created Date – Date when PO was created.
- Supplier – Supplier linked to the PO.
- Category – Related category (Opticals/ Pharmacy).
- Total Amount – Net order value.
- Search By Category (Opticals/Pharmacy), PO No./ Supplier Name, and Date is available.
- Use the View button to check PO details.
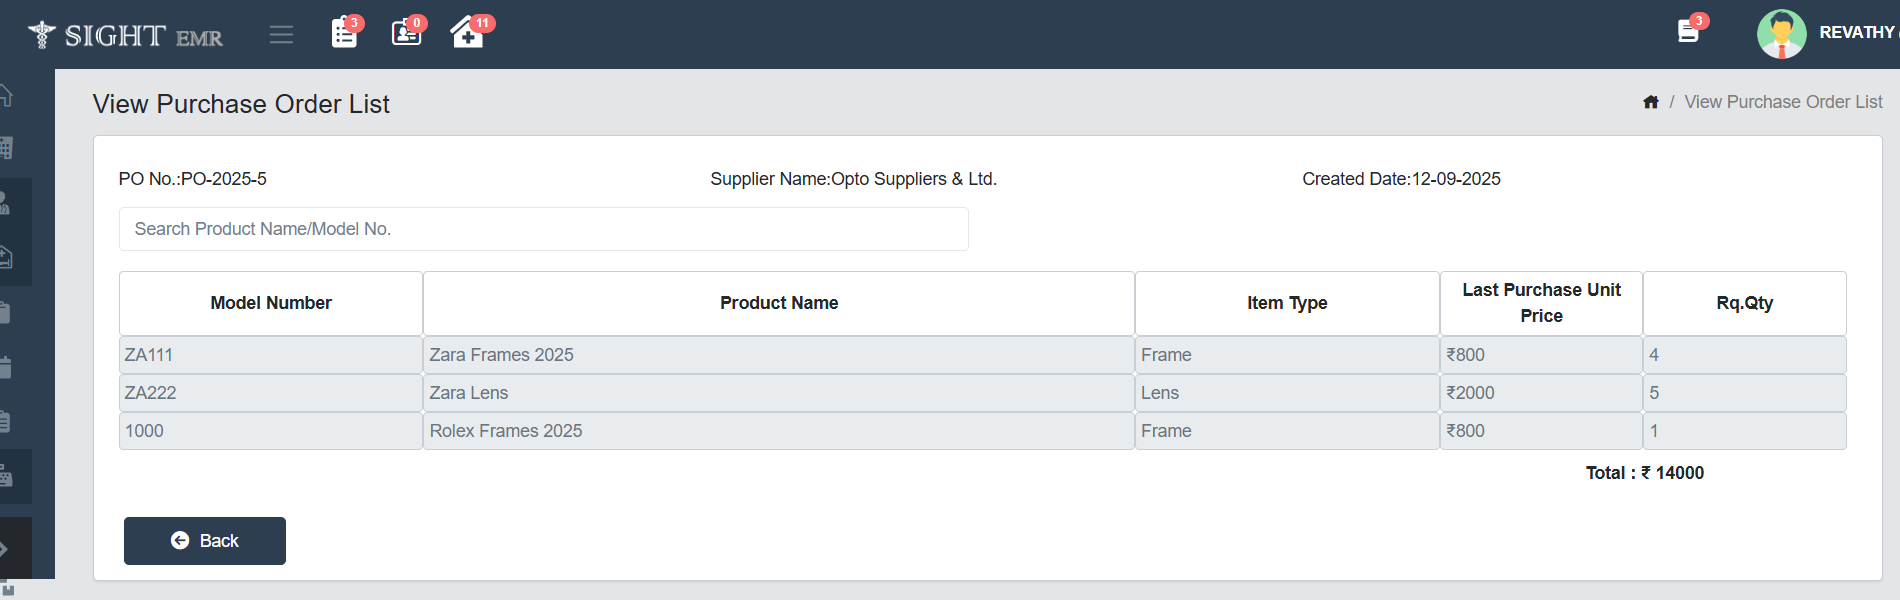
- It displayes the Purchase order list of the corresponding orders with PO No.,Supplier Name, Created Date, Model Number, Product Name, Item Type, Last Purchased Unit Price and required Quantity.
- Total Amount will be disaplayed at the bottom of the table.
- Search the product by Product Name/ Model Number.
- Click Back Button to return to the previous page.
- Download the order in PDF format using the Download icon.
Bill List
View/ Edit Bill List
- You can View/ Edit (Date/Address/Phone no./Amount and GST) - Bill list / Optical Invoice List/ Pharmacy Invoice List and Downloads available.
Void Advance
- Admin can void Optical and Inpatient Advances.
Void Bill
- You can void all invoices -Clinic Bill list /Optical invoice list/Pharmacy invoice list
Refund
- Refund receipt can be generated for patients and customers in optical store and clinic after the advance or invoice is voided.
- A Red circle will appeared at the right side of the Invoice Number with a Tool tip of Voided date to indicate that the bill is to be refunded.
- Voided/Cancelled Bill PDF will be displayed in Red Colour.
- Download Option is available for Bills (Clinic Bill/Optical/Pharmacy) and Voided Report.
Insurance
New Insurance
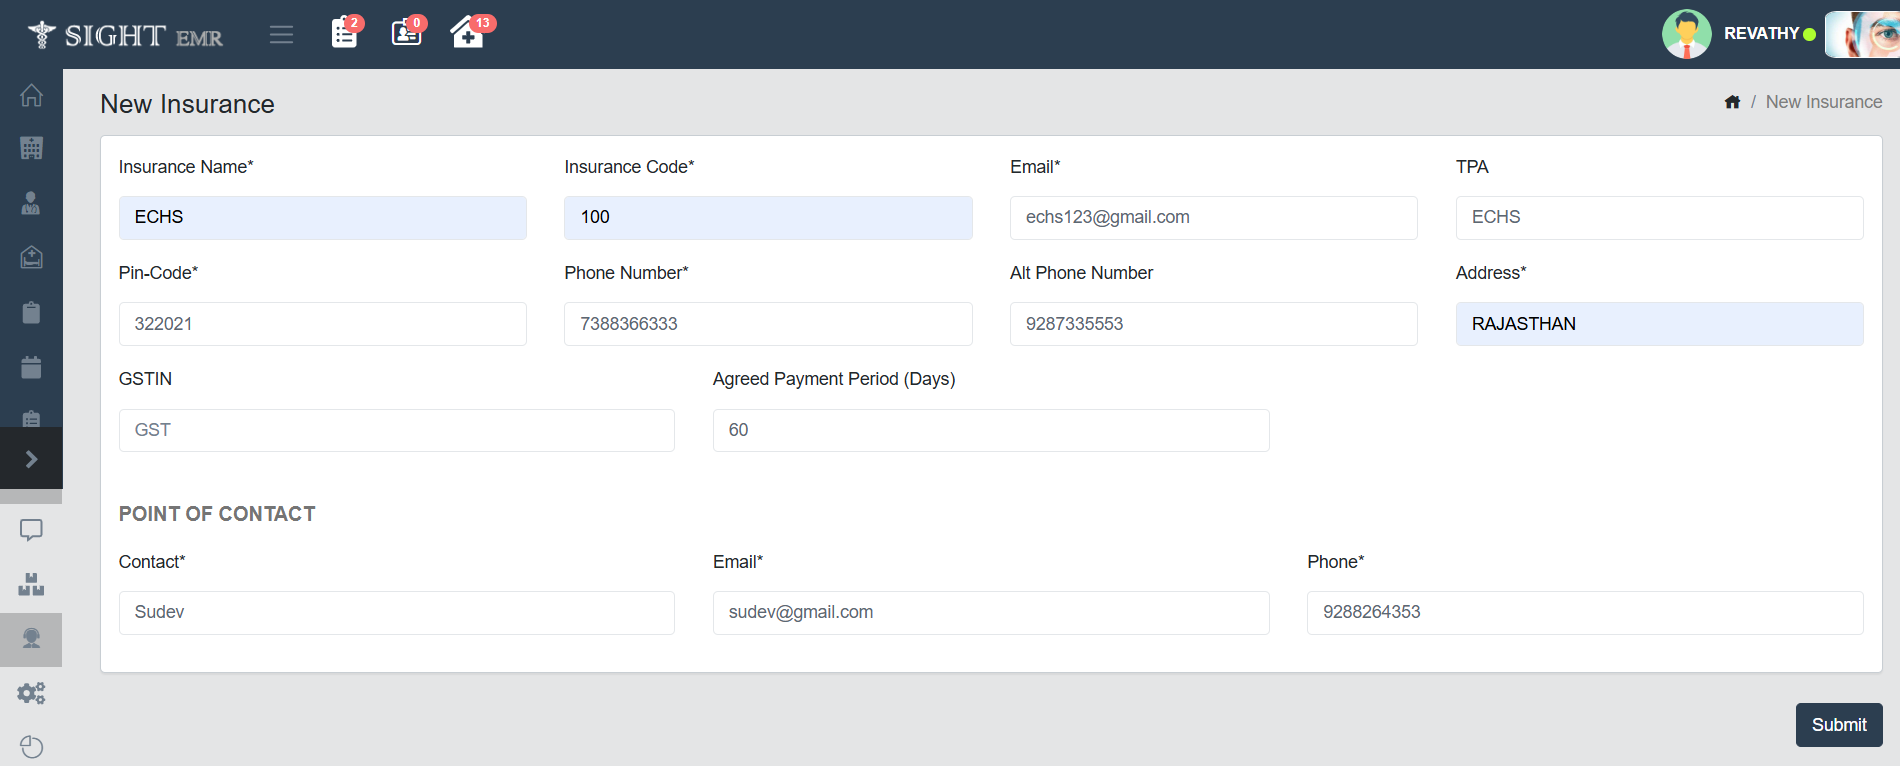
To add a new insurance company into the system, follow these steps:
- Accessing the Insurance Module
- From the left side navigation bar, click on the Insurance icon.
- Select New Insurance from the submenu.
- Enter Insurance Details
- Insurance Name*: Enter the name of the insurance provider.
- Insurance Code*: Input the code used internally for identifying the insurance.
- Email*: Provide the official email ID of the insurance provider.
- TPA: Type in the Third-Party Administrator associated (optional).
- Contact Information
- Pin-Code*: Enter the pin code of the insurance provider's address.
- Phone Number*: Add the primary contact number.
- Alt Phone Number: If available, provide an alternate phone number.
- Address*: Enter the address.
- Additional Fields
- GSTIN: Input the GST number if applicable.
- Agreed Payment Period (Days): Define the number of days agreed upon for payments.
- Point of Contact
- Contact*: Name of the representative or contact person.
- Email*: Contact person’s email address.
- Phone*: Contact person's phone number.
- Submit
- After completing all mandatory fields (marked with *), click the Submit button at the bottom-right to save the insurance record.
Insurance List
This screen displays all the insurance providers added to the system. It allows users to view, edit, delete, and search insurance entries.

- Accessing the Insurance List
- From the left navigation menu, click the Insurance icon.
- Then select Insurance List to view all the available insurance records.
- Viewing the List
- Each row shows the following:
- Insurance Name
- Pin Code
- Phone Number
- POC (Point of Contact)
- The list is displayed in a paginated view, and navigation buttons appear at the bottom.
- Each row shows the following:
- Editing an Entry
- To update details, click the Edit button next to the corresponding insurance.
- It opens the New Insurance form populated with existing data for editing.
- Deleting an Entry
- Click the 🗑️ (delete icon) next to any entry to remove it.
- A confirmation dialog may appear before final deletion.
- Searching
- Use the search bar at the top-right.
- First, choose the field (Insurance Name), then type the keyword and click the search icon.
- The list will filter based on the search input.
- Sorting
- Columns like Insurance Name, Email, Pin Code, POC and Phone Number can be sorted by clicking the small arrow icons next to each heading.
Asset Management
Add Asset
-
To add a new asset to the EMR system:
- Navigate to the Asset section from the left-side menu and click on Add Asset.
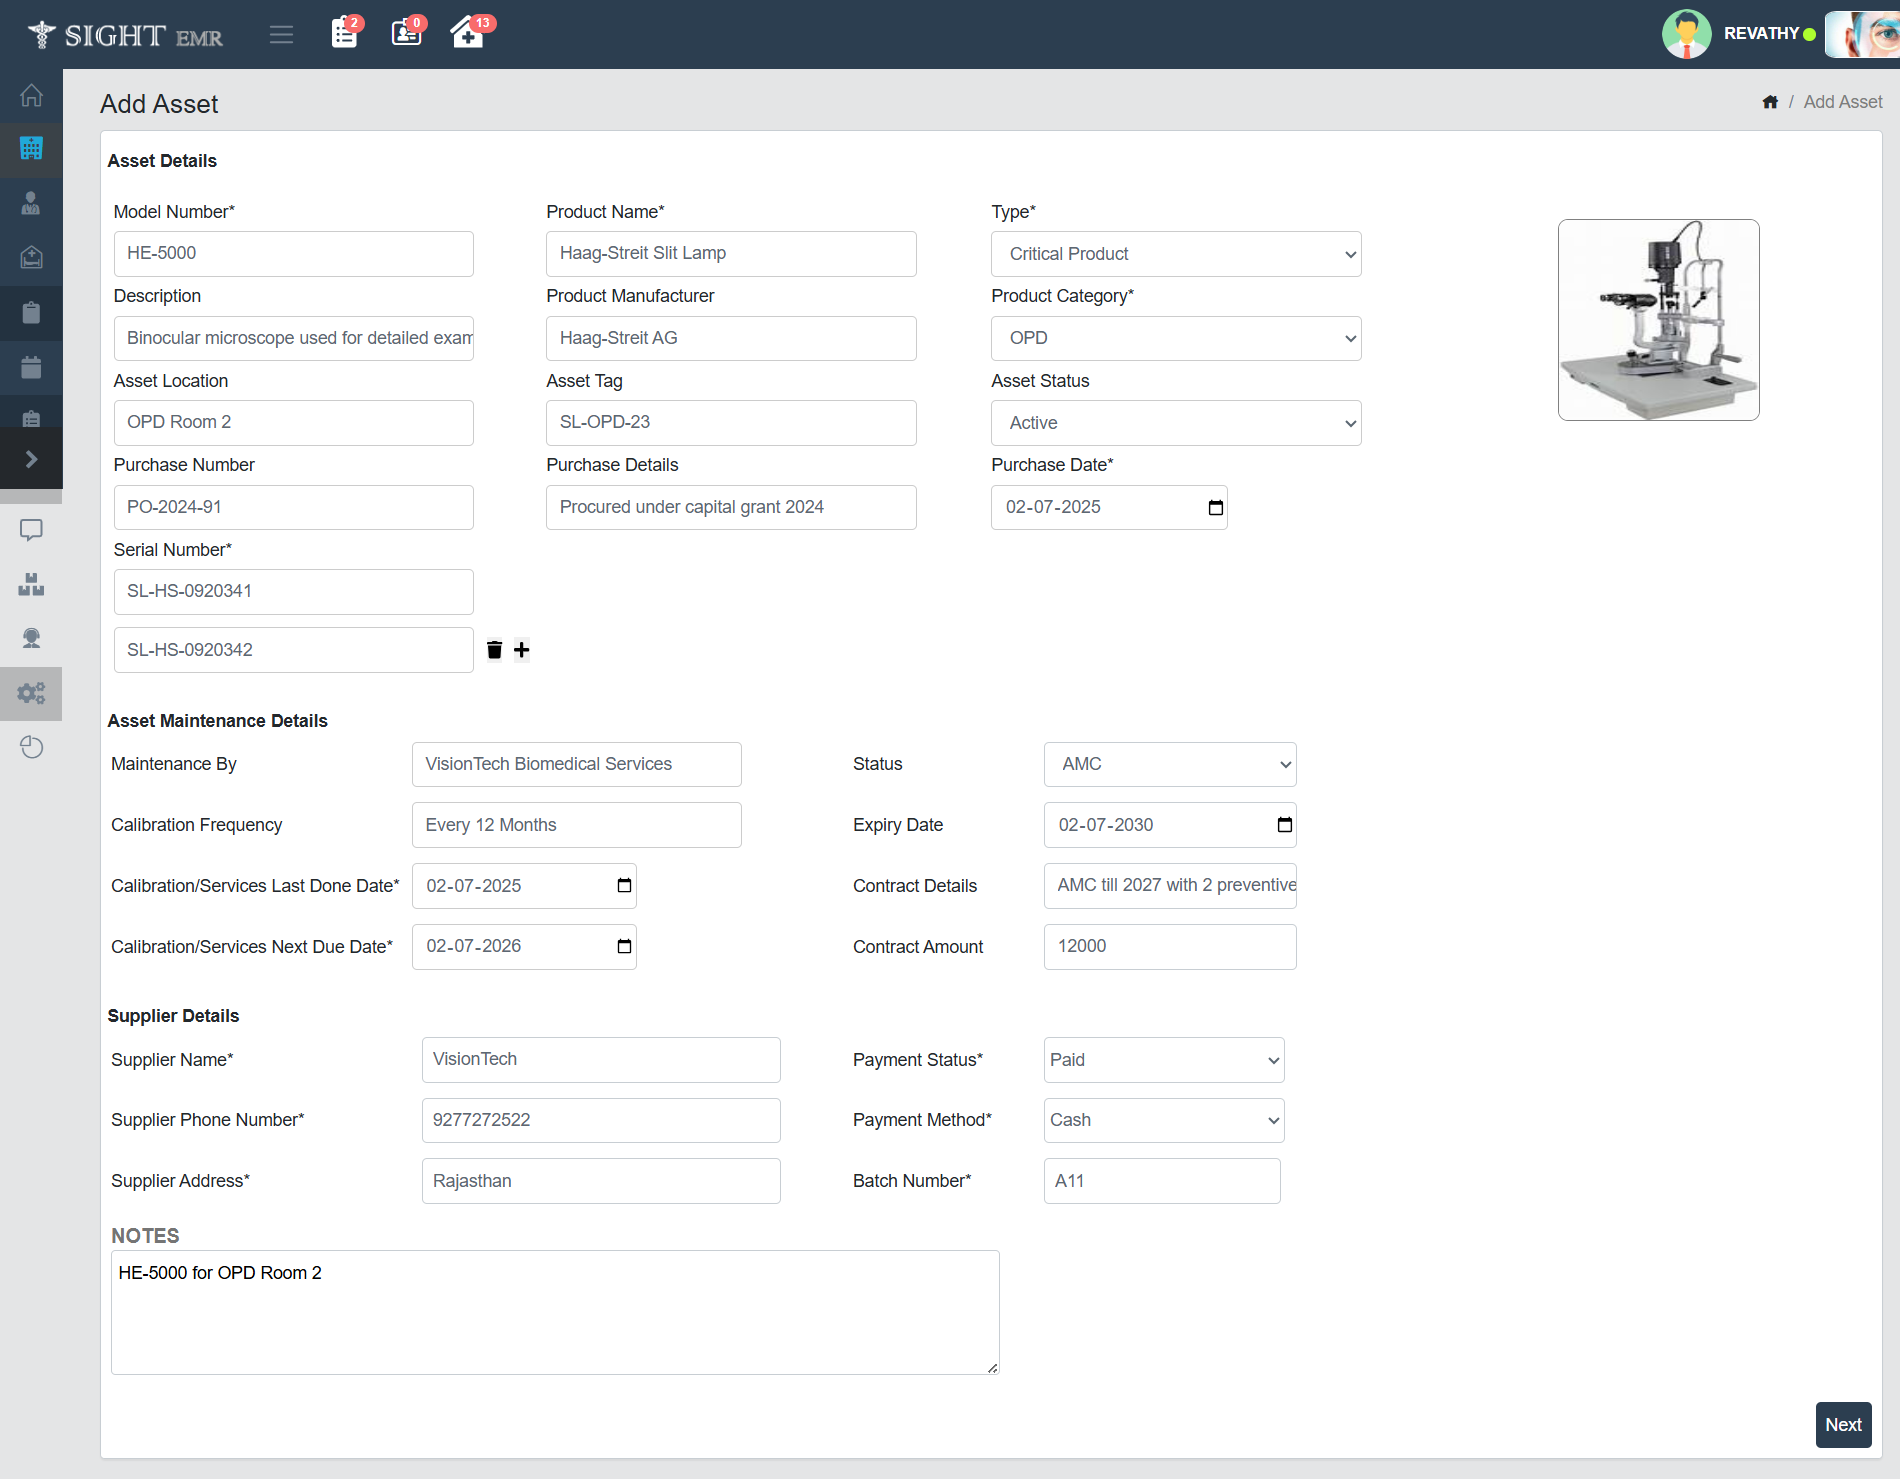
- Fill in the Asset Details:
- Model Number: Enter the asset’s model ID.
- Product Name: Specify the name of the equipment
- Description: Provide a brief description of the equipment’s use.
- Product Manufacturer: Enter the manufacturer name.
- Asset Location: Mention where the equipment is installed.
- Asset Tag: Assign a tracking label.
- Type: Choose Critical Product or Non-Critical Product.
- Product Category: Select the category such as OPD, OT, or Optic Store.
- Asset Status: Set the asset as Active or Inactive.
- Purchase Number: Enter the internal purchase reference number.
- Purchase Details: Describe the procurement method.
- Purchase Date: Select the date the asset was purchased.
- Add Serial Number(s):
- Serial Number: Enter the serial number(s) for the equipment.
- Use the + button to add multiple serial numbers if the same model is purchased in bulk.
- Enter Asset Maintenance Details:
- Maintenance By: Specify who will maintain the equipment.
- Calibration Frequency: Choose how often the equipment is calibrated.
- Calibration/Services Last Done Date: Enter the most recent service/calibration date.
- Calibration/Services Next Due Date: Enter the next expected service date.
- Status: Select the maintenance type such as AMC or CMC.
- Expiry Date: Mention the end date of AMC or CMC.
- Contract Details: Describe any service agreement.
- Contract Amount: Enter the agreed contract cost.
- Enter Supplier Details:
- Supplier Name: Name of the supplier.
- Supplier Phone Number: Contact number of the supplier.
- Supplier Address: Address/location of the supplier.
- Payment Status: Choose Paid or Unpaid.
- Payment Method: Select the payment mode used.
- Batch Number: Internal reference batch number.
- Add Notes (Optional): Use the Notes section to include any special remarks or tracking info.
- Finalize: Click Next button to proceed and complete the asset entry process.
New Asset
- This page displays Supplier Name, Supplier Phone Number, Supplier Address, Item No., Product Name, Quantity, Price, GST, Purchased Details, Supplier Details and Notes added in Add Asset screen.
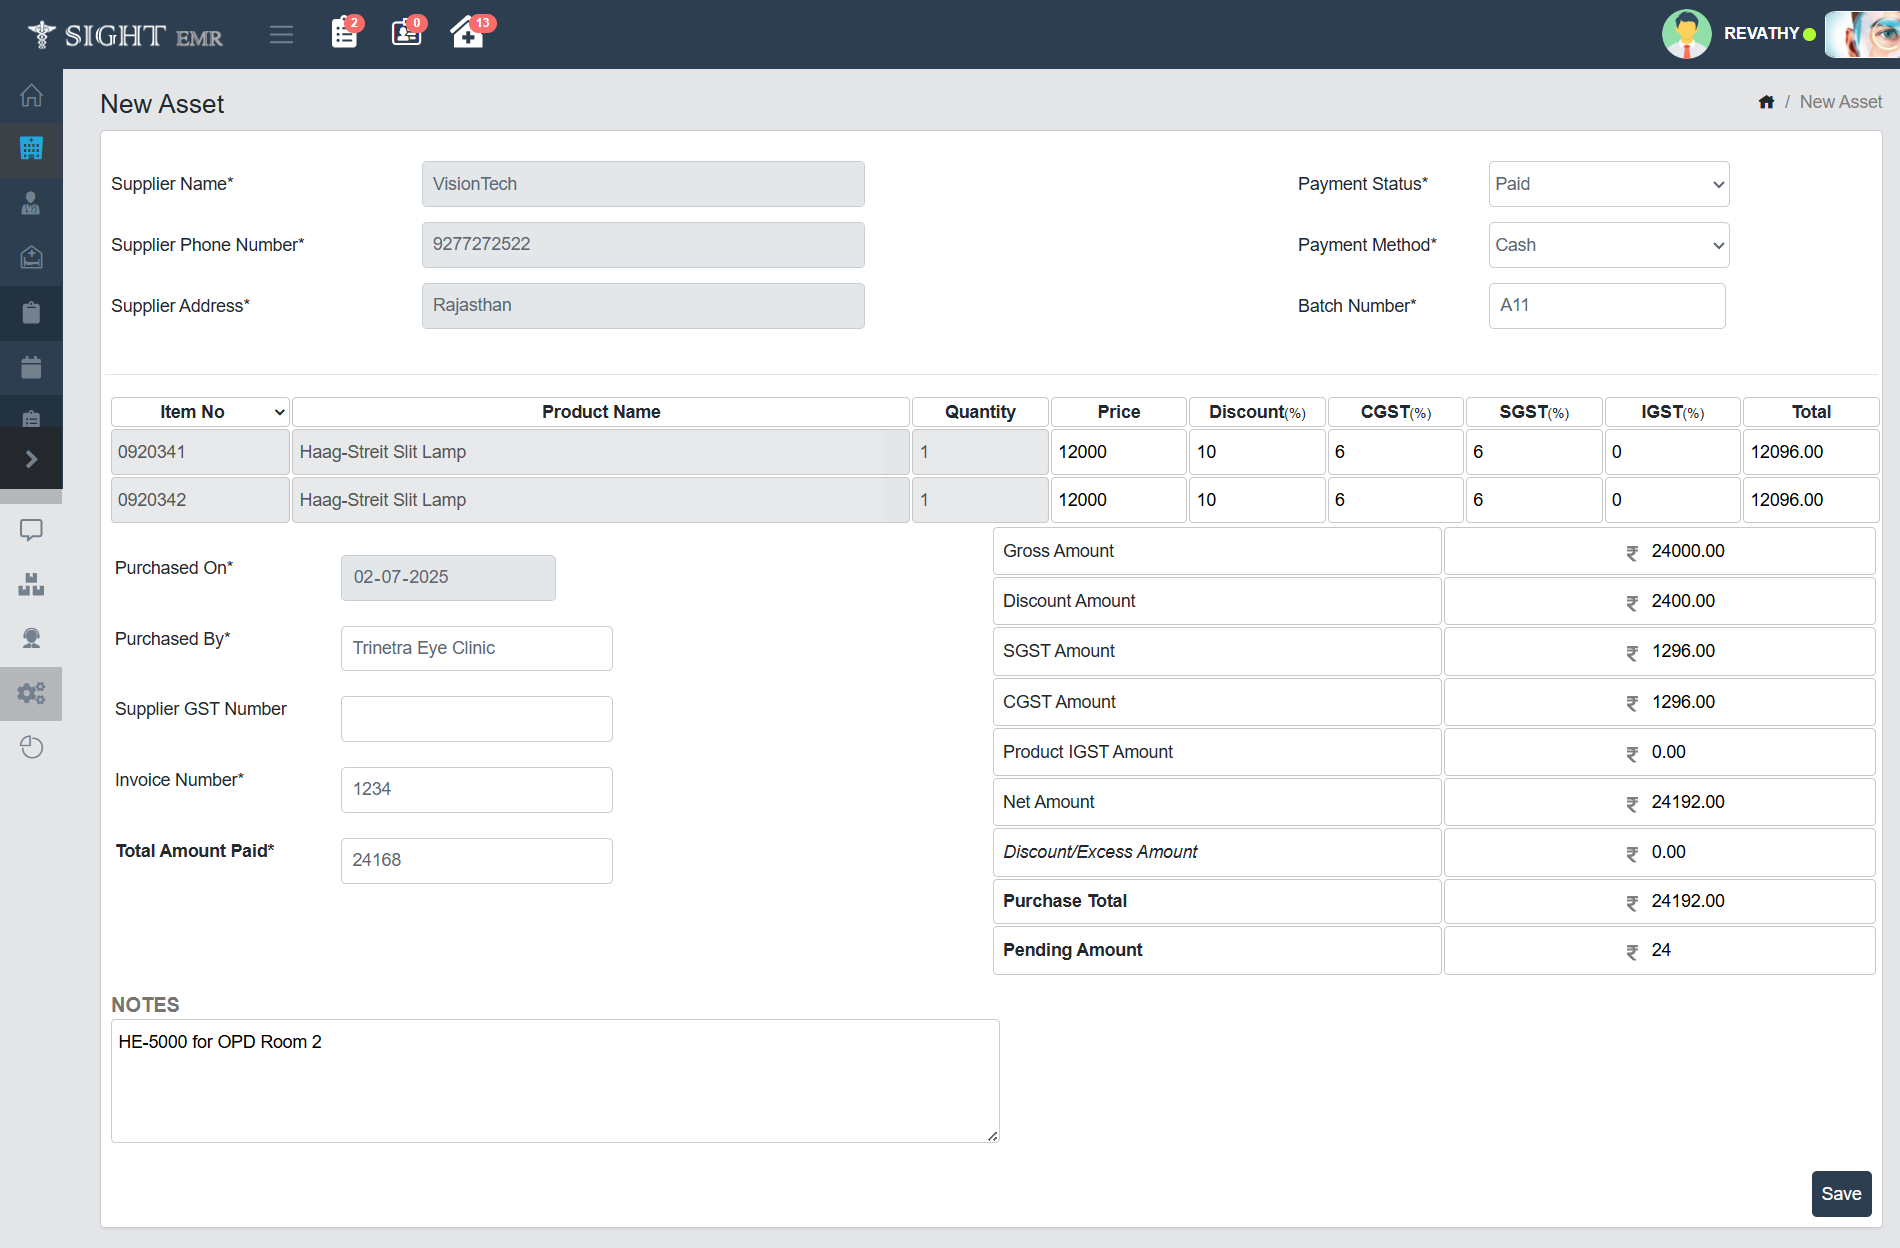
- Can Edit Price , Discount , GST, Purchased By, Supplier GST Number, Invoice Number.
- Total Amount Paid field will be auto-calculate based on price details.
- Click Save button to complete and record the asset purchase.
Asset List
The Asset List section allows users to view, search, and manage all the assets (equipment or items) purchased and categorized within the organization.
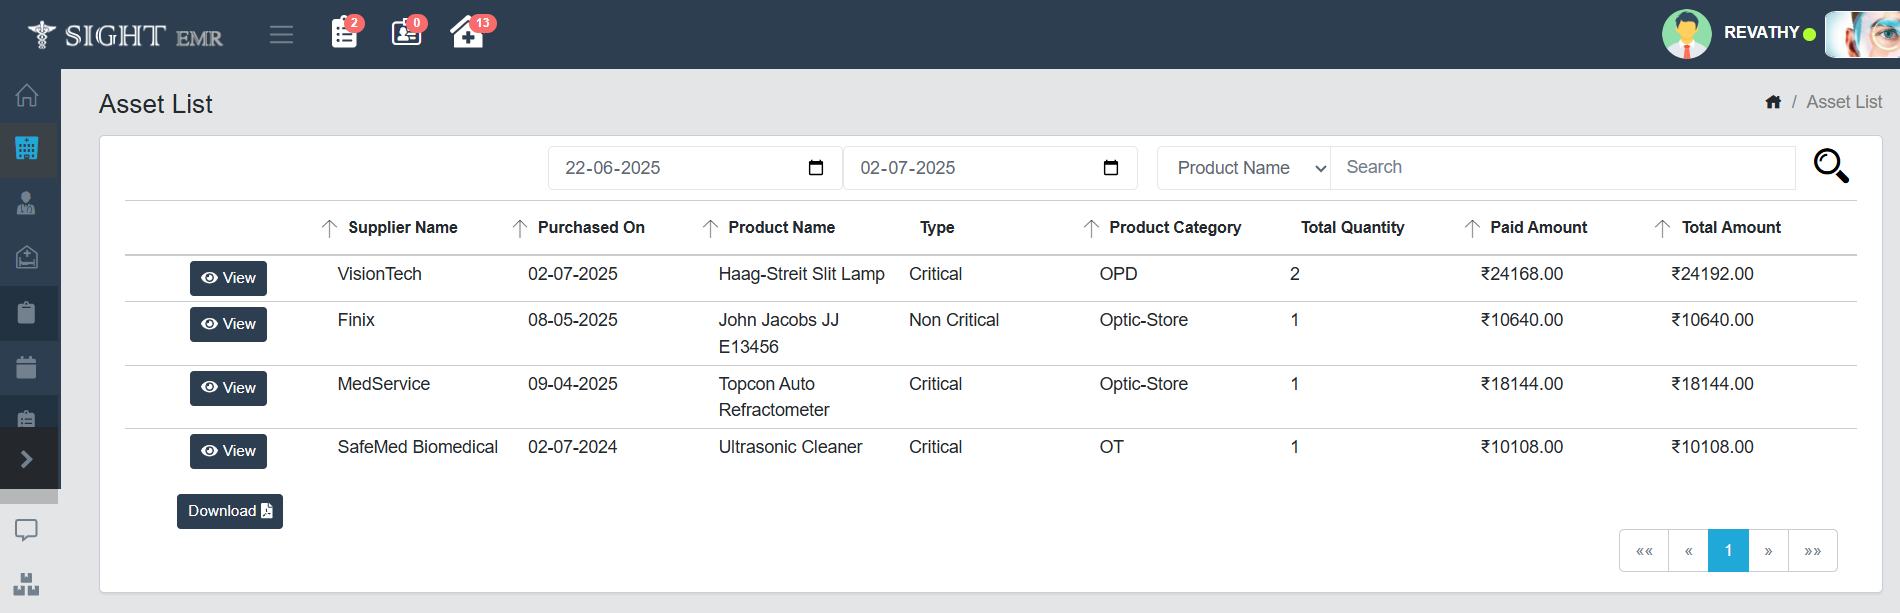
- Accessing the Asset List:
- Navigate to the Asset section from the left-side menu and click on Asset List.
- Date Filter:
- Use the From Date and To Date fields at the top to filter assets by the purchase date.
- Click the calendar icons to select date ranges.
- Search and Filter:
- Use the dropdown for Product Name/ Supplier Name/ Type and Search box to locate specific assets.
- Asset Table Columns:
- Supplier Name: Name of the asset supplier.
- Purchased On: Date when the asset was bought.
- Product Name: Name/model of the product.
- Type: Indicates if the product is Critical or Non-Critical.
- Product Category: Department or store where asset belongs.
- Total Quantity: Total number of units purchased.
- Paid Amount: Amount paid during purchase.
- Total Amount: Total cost for the quantity mentioned.
- View Button: Click the View button to see detailed information about each asset.
- Download Option: Use the Download button at the bottom left to export the current asset list as a PDF or Excel document.
- Pagination: Use the navigation arrows at the bottom-right to move between multiple pages of asset records.
Feedback
Add SightEMR Feedback
- This screen allows users to submit feedback regarding the SightEMR system.
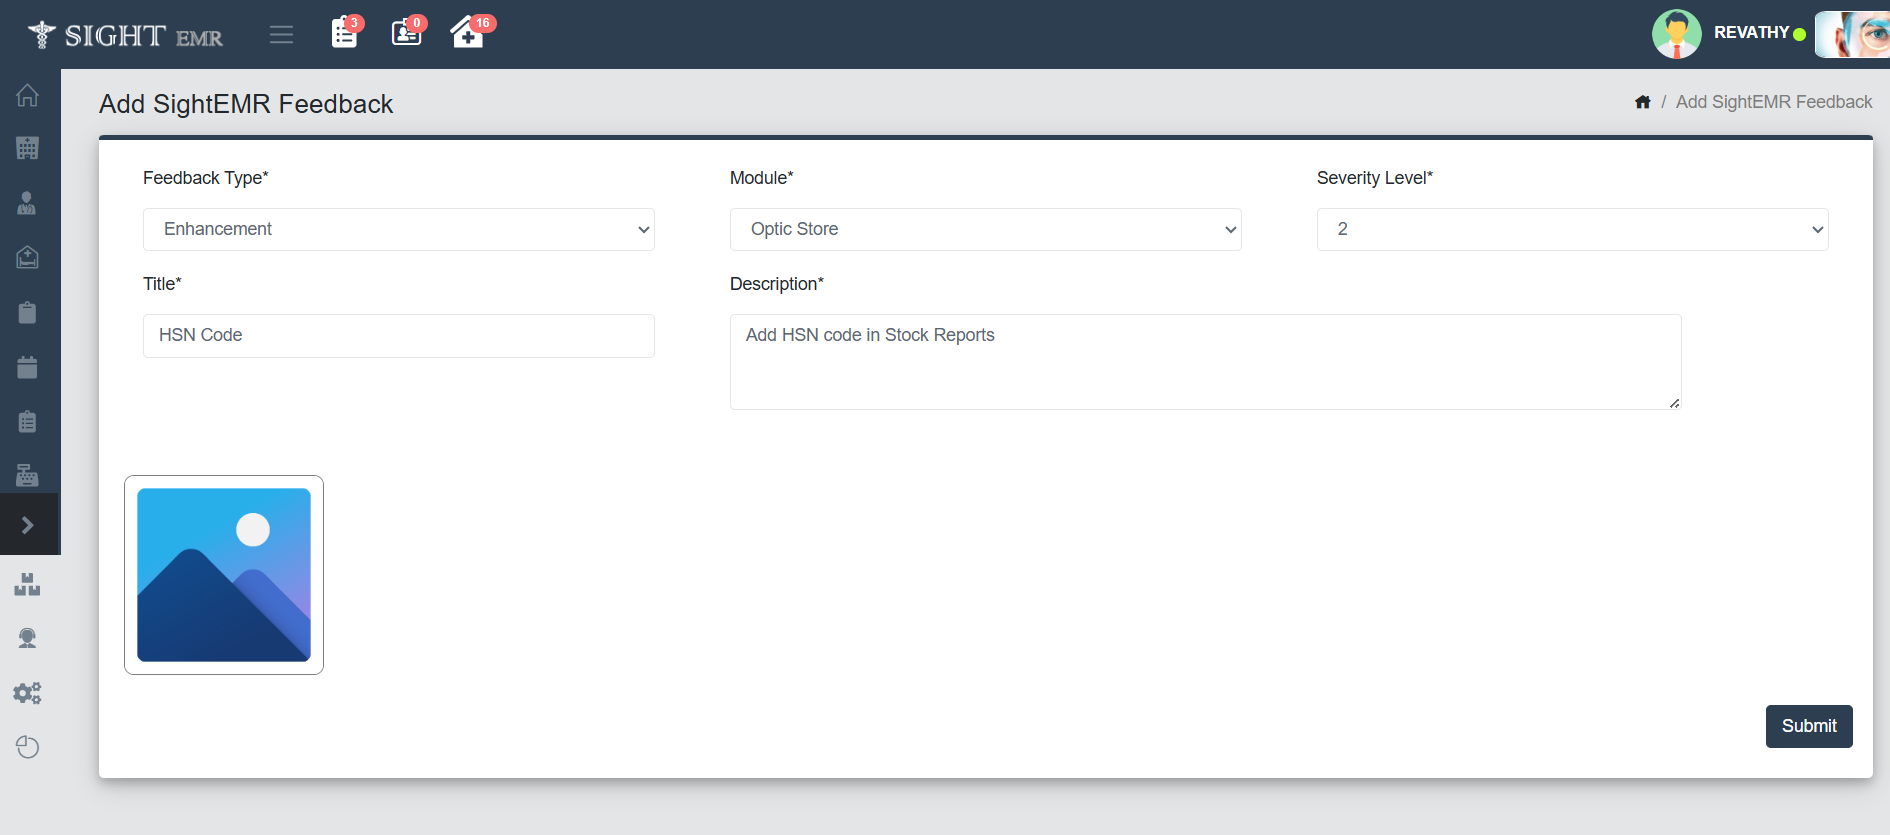
- Fill the following fields:
- Select Feedback Type: Enhancement/Bugs
- Select Module: Optic Store/ Pharmacy/ Clinic Admin
- Select Security Level: 1 to 5
- Add Title.
- Add Description.
- Add Image at the left bottom of the screen if any.
- Click Submit button to save the feedback.
Sight EMR Feedback List
- This screen displays a list of all submitted feedback items for tracking and management.
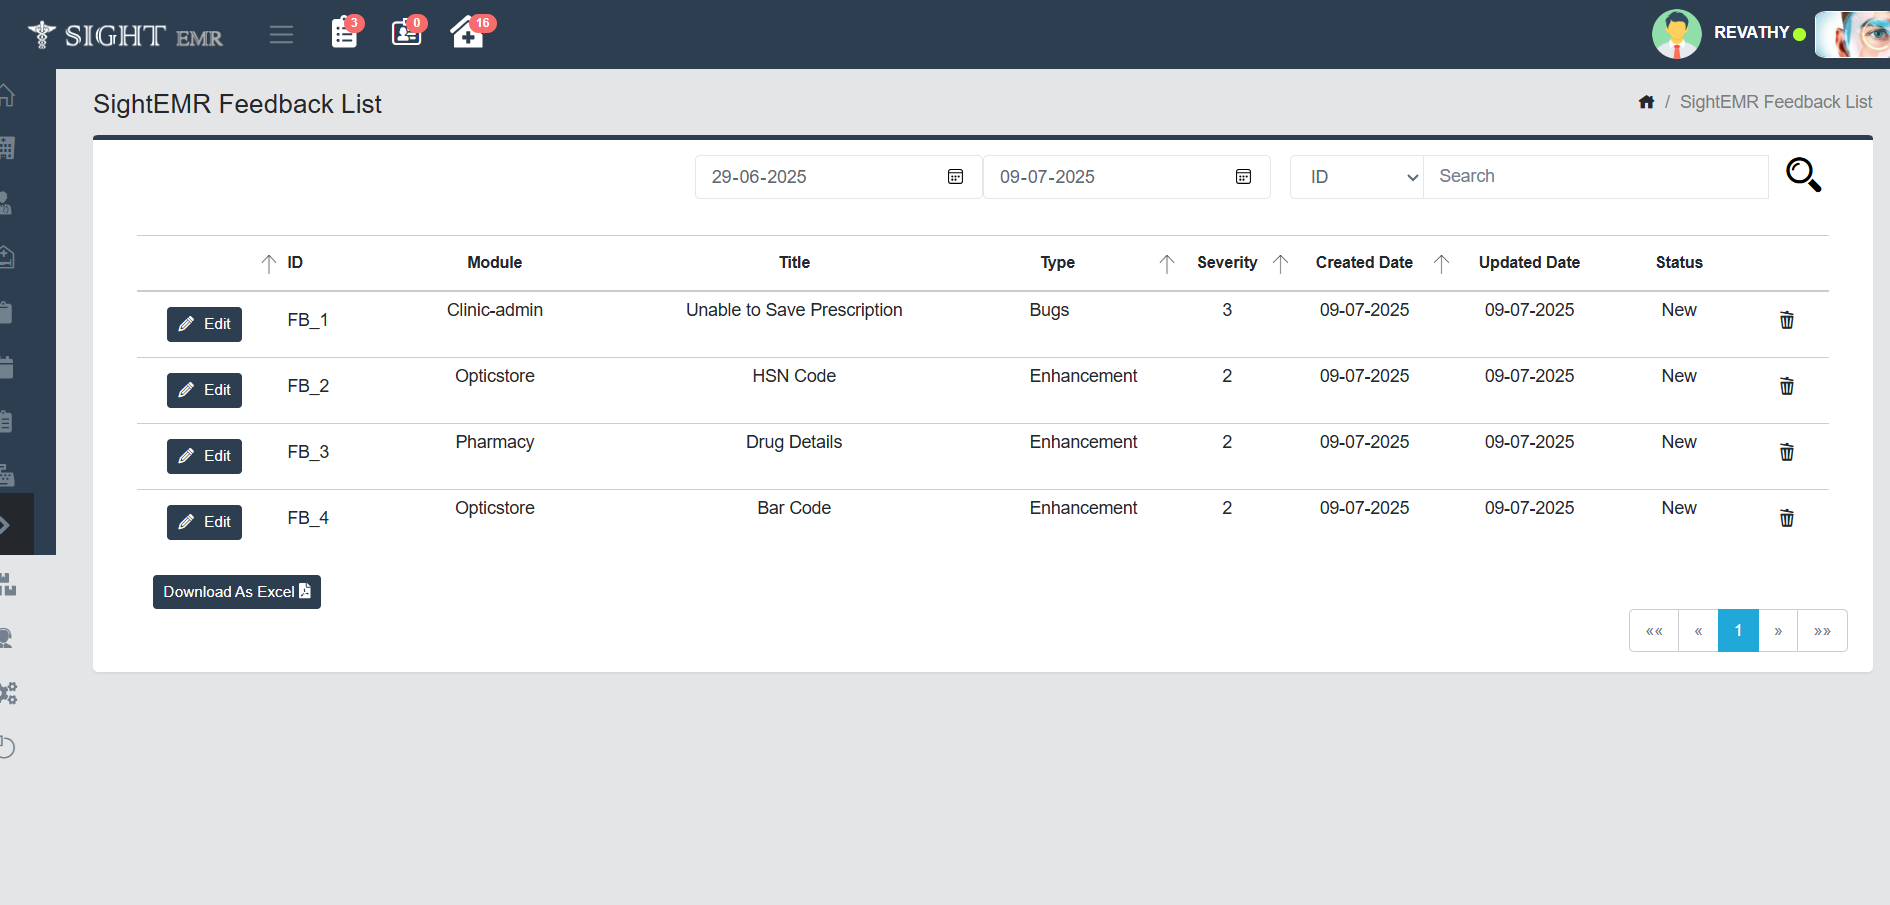
- Filter Options:
- Date wise filter
- Dropdown for ID/Severity Level/Type
- Features of the Feedback List Screen
- ID: Auto-generated Feedbak ID.
- Module: Module to which the feedback belongs.
- Title: Title of the feedback.
- Severity: Numerical Severity Level.
- Created Date: Date on which feedback was submitted.
- Updated Date: Last modified Date.
- Status: Current Status (New/Inprogress/Resolved etc.)
- Actions:
- Edit: Click Edit button at the left of the corresponding entry to modify the feedback and click Update button to update the entry.
- Delete: Click Delete button to delete the corresponding entry.
- Download: To download the feedback list as Excel.
Patient Feedback
- The Patient Rating screen allows staff to record patient feedback regarding their experience with various departments during their visit. This helps the hospital monitor service quality and improve patient care.
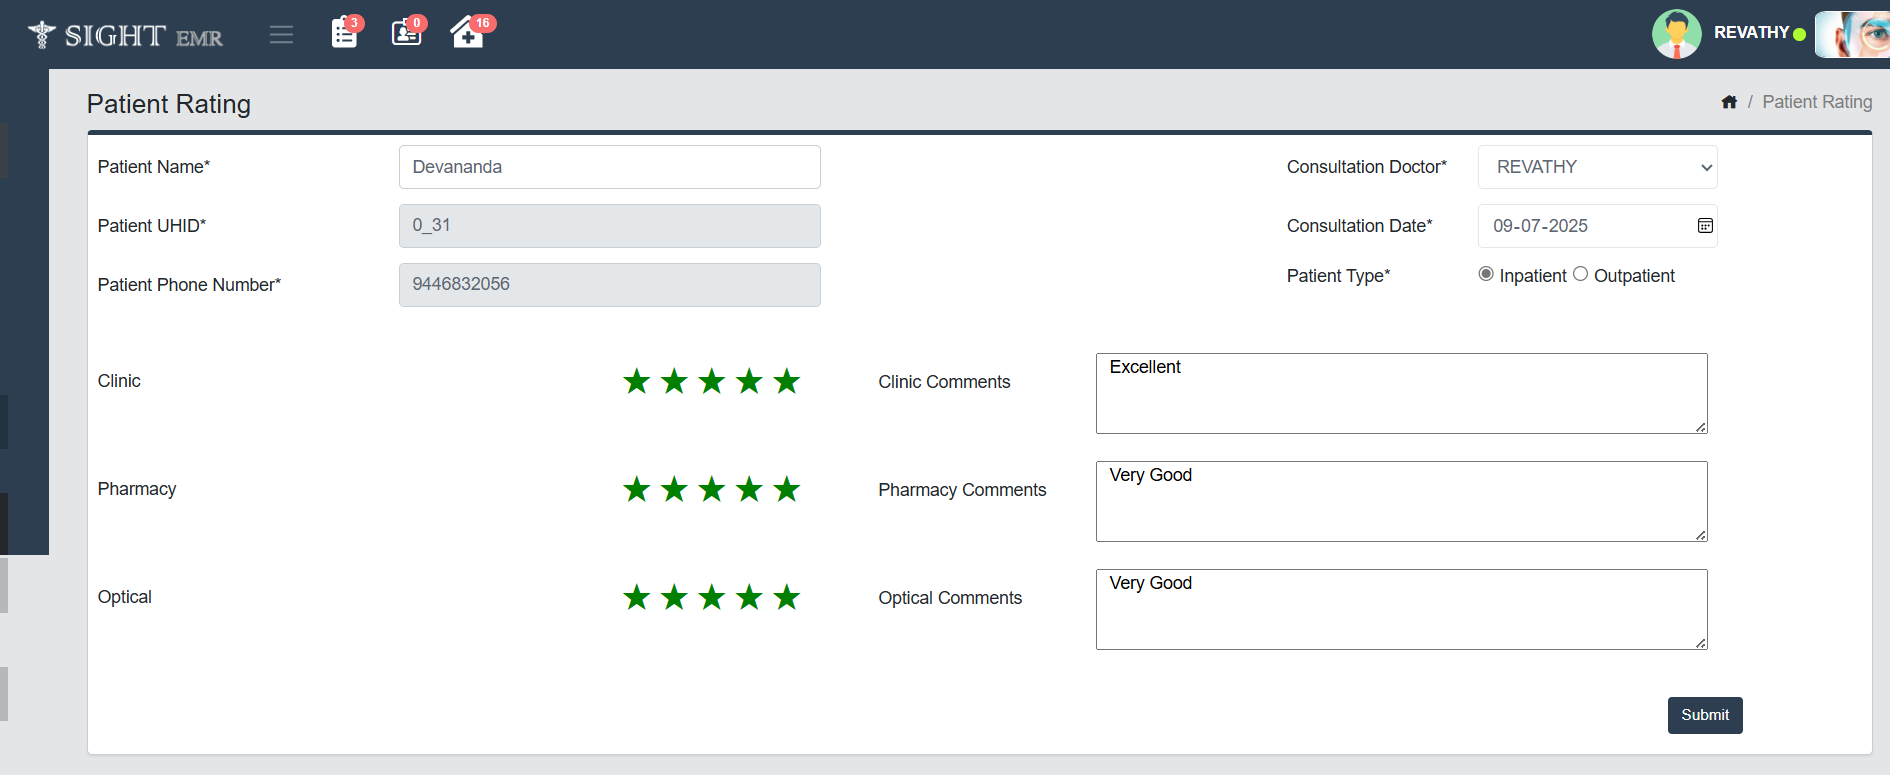
- Enter Patient Information: Search patientby entering the Patient's Name. The system will auto-populate the UHID and Phone number of the patient.
- Consultation Doctor: Select the consulting doctor from the drop-down list.
- Consultation Date: Choose the date of consultation.
- Select Patient Type: Choose whether the patient is Inpatient or Outpatient by selecting the appropriate radio button.
- Rate Each Department: Click on the star rating based on the patient's experience about Clinic/ Pharmacy/ Optical.
- Enter Comments: For each department (Clinic, Pharmacy, Optical), enter the patient’s feedback or any remarks in the text box beside the star rating.
- Submit the Rating: After all required fields are completed and ratings/comments are entered, click the Submit button at the bottom right corner.
Patient Feedback List
- The Patient Feedback List screen provides an overview of all submitted patient ratings and allows staff to review and monitor feedback department-wise for quality assurance.
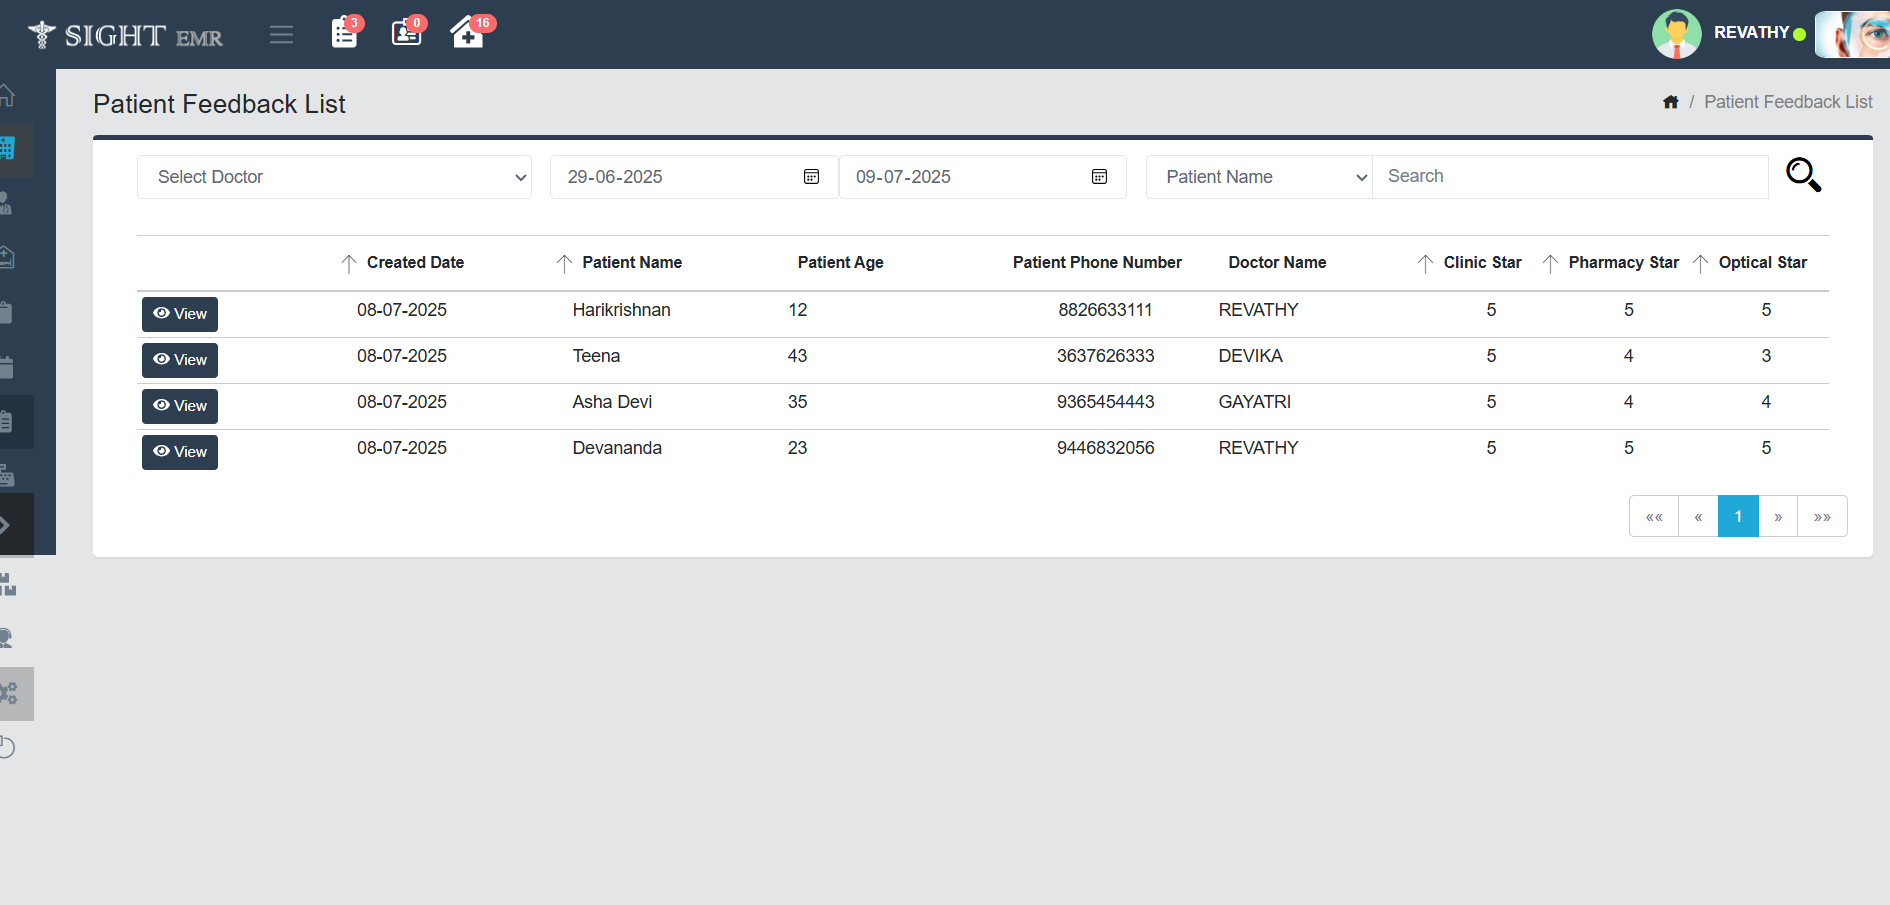
- Filter Options:
- Filter by Doctor
- Date wise filter
- Dropdown for Patient Name/ Patient UHID/ pastient Phone Number
- View Patient Feedback: Click the View button next to each entry to open full feedback details including clinic, pharmacy, and optical comments, along with the star ratings.
- Feedback Details Displayed:
- The list displays the date feedback was submitted, patient name, age, phone number, and consulting doctor.
- Star ratings for Clinic, Pharmacy, and Optical departments are shown as numeric values (1 to 5), where 5 is the highest rating.
- Navigate Pages: If there are multiple entries, use the pagination control at the bottom to navigate between pages.
Employee Feedback
- The Employee Rating screen is designed to capture feedback from staff about their work environment, satisfaction levels, and opportunities for growth.
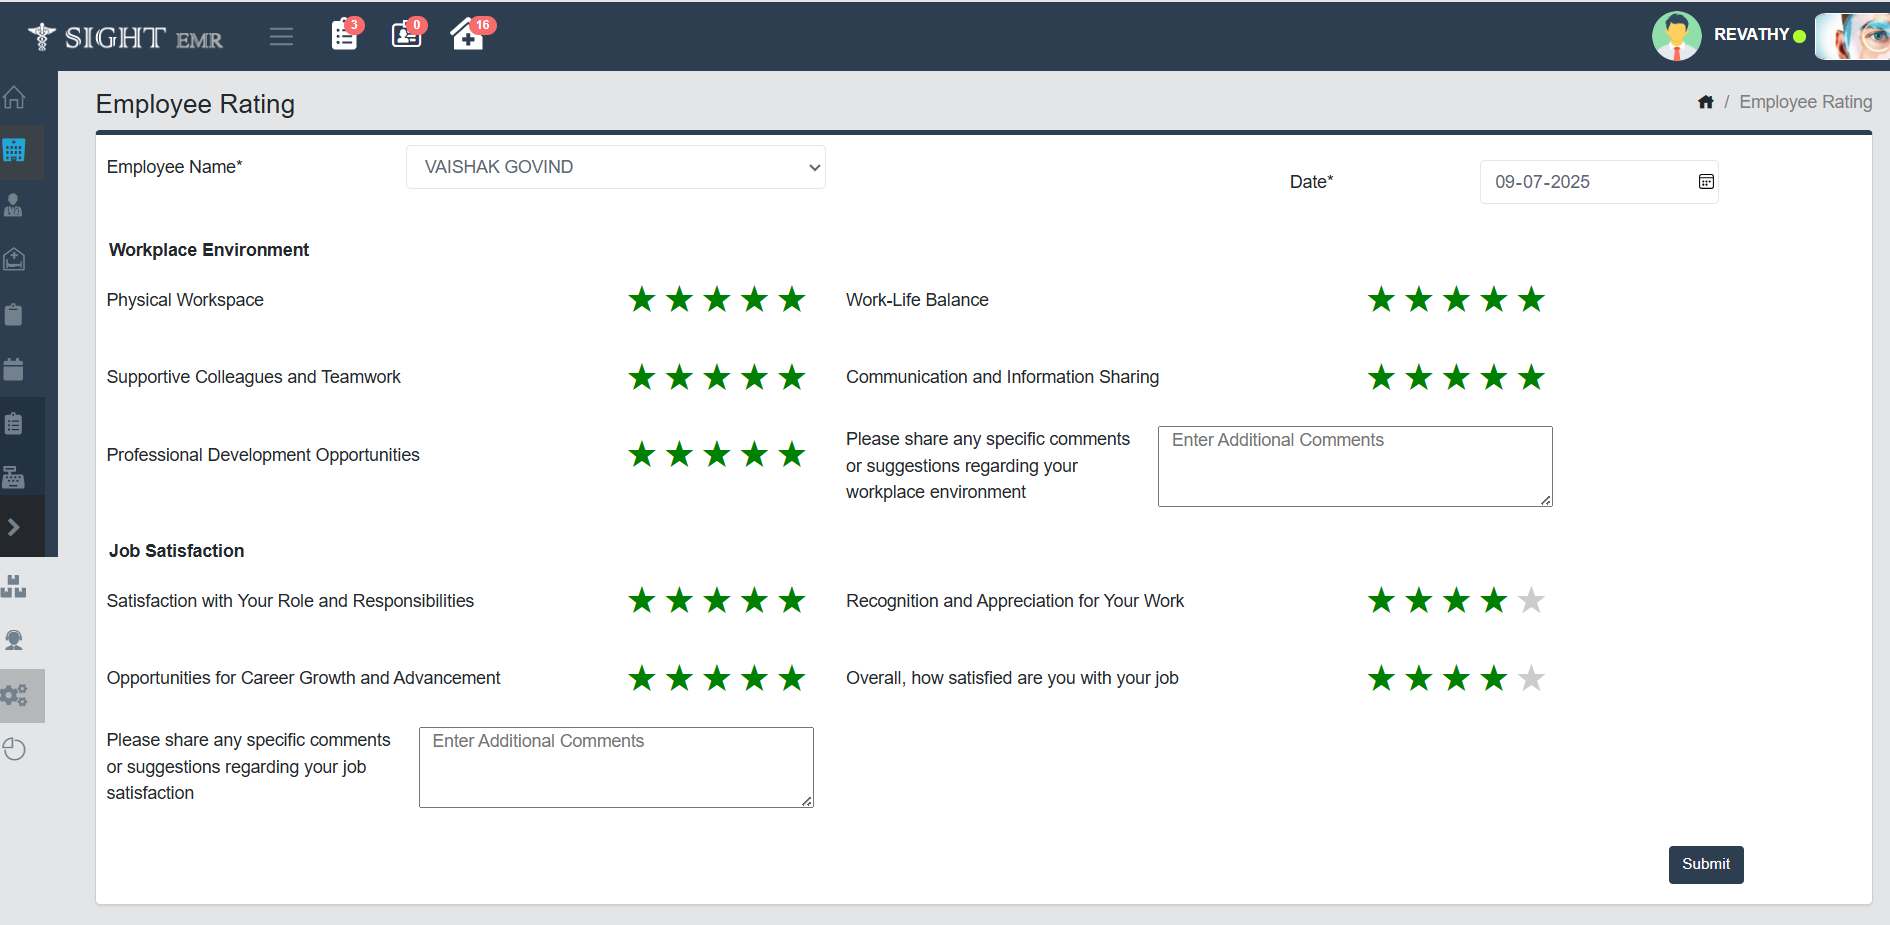
- Select the Employee Name: Use the dropdown to select the employee who is being evaluated.
- Enter the Evaluation Date: Choose the date of feedback entry using the date picker on the right side.
- Workplace Environment Feedback: Evaluate the employee's workplace experience by giving star ratings (1 to 5) for the following:
- Physical Workspace
- Supportive Colleagues and Teamwork
- Professional Development Opportunities
- Work-Life Balance
- Communication and Information Sharing
- You can also add any specific comments or suggestions in the text box provided for this section.
- Job Satisfaction Feedback: Rate job-related satisfaction in the following areas:
- Satisfaction with Role and Responsibilities
- Opportunities for Career Growth and Advancement
- Recognition and Appreciation for Work
- Overall Job Satisfaction
- A second text box is available to write any additional comments or feedback regarding the employee’s job satisfaction.
- Submitting the Feedback: Once all required fields are filled and ratings/comments are given, Click the Submit button at the bottom-right corner to save the feedback.
Employee Feedback List
- The Employee Feedback List screen displays all feedback submissions made for employees over a selected date range. This view helps administrators and HR personnel track and review employee feedback entries efficiently.
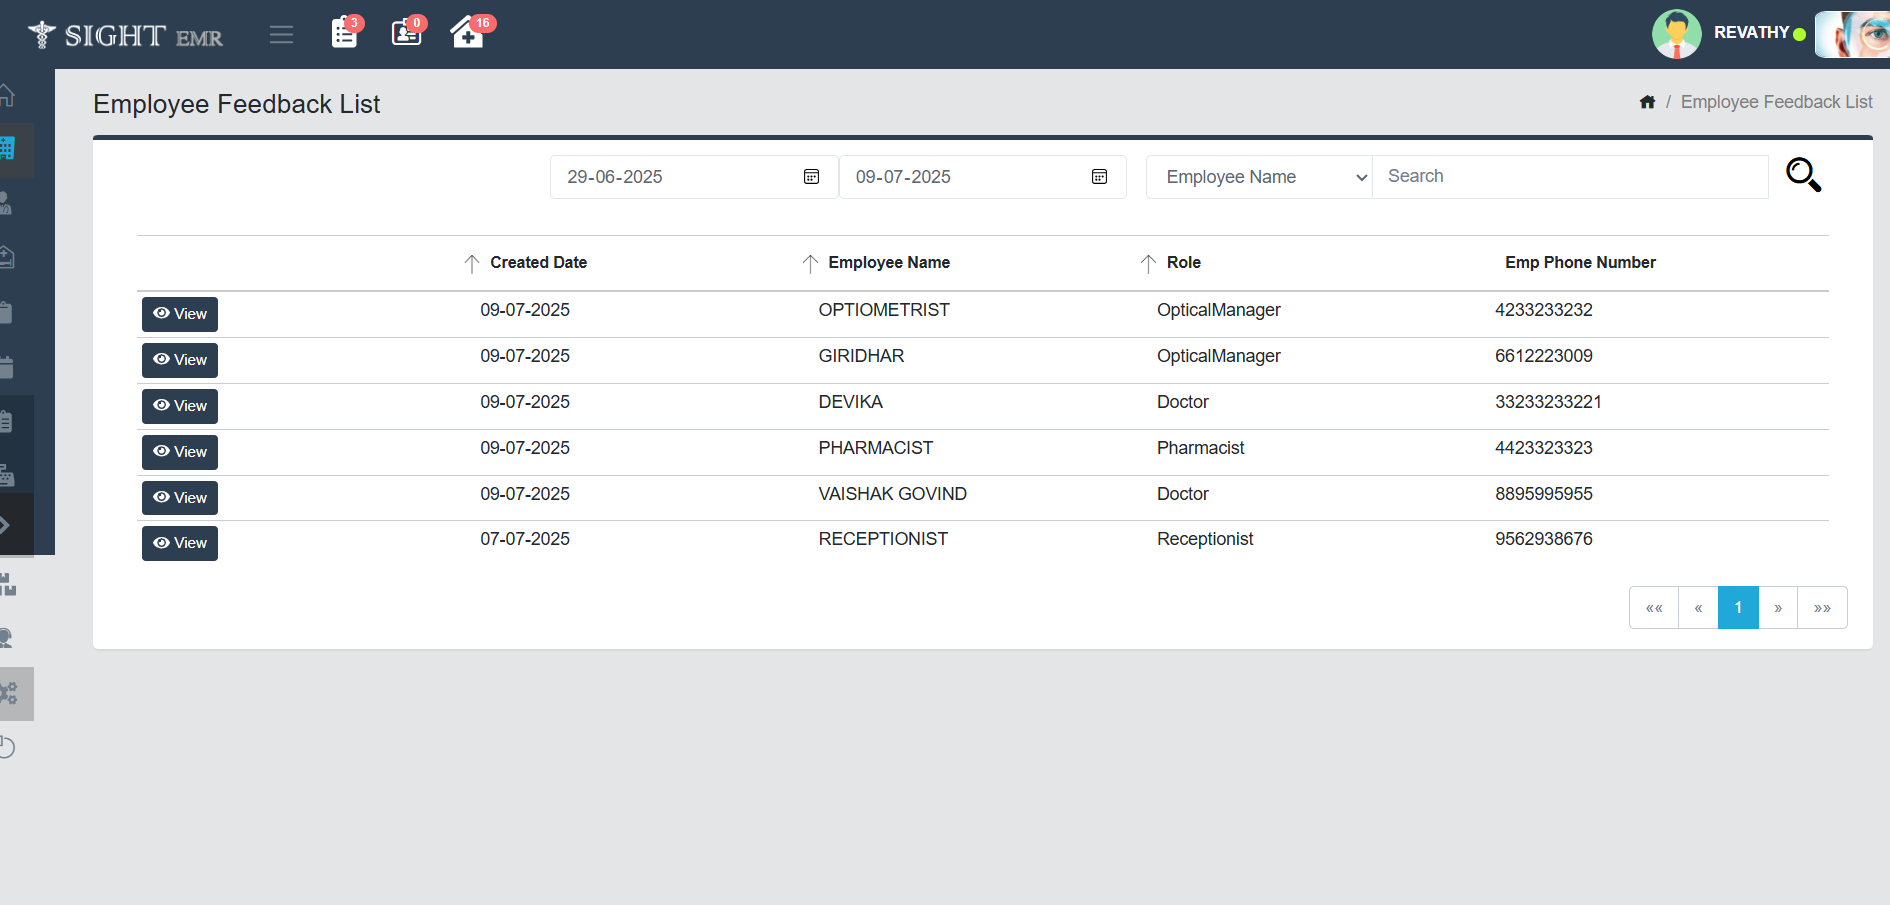
- Filter Options: Date wise filter and dropdown for Employee Name/ Employee Phone number.
- Review Feedback: Each feedback entry shows Created Date, Employee Name, Role, Employee Phone Number
- Click the View button next to any row to open the full feedback form submitted for that employee.
- Pagination: If there are multiple pages of feedback entries, use the navigation controls at the bottom right to switch pages.
Data Download
- The Download Records screen allows users to access, view, and download a variety of clinical, operational, and inventory-related reports.
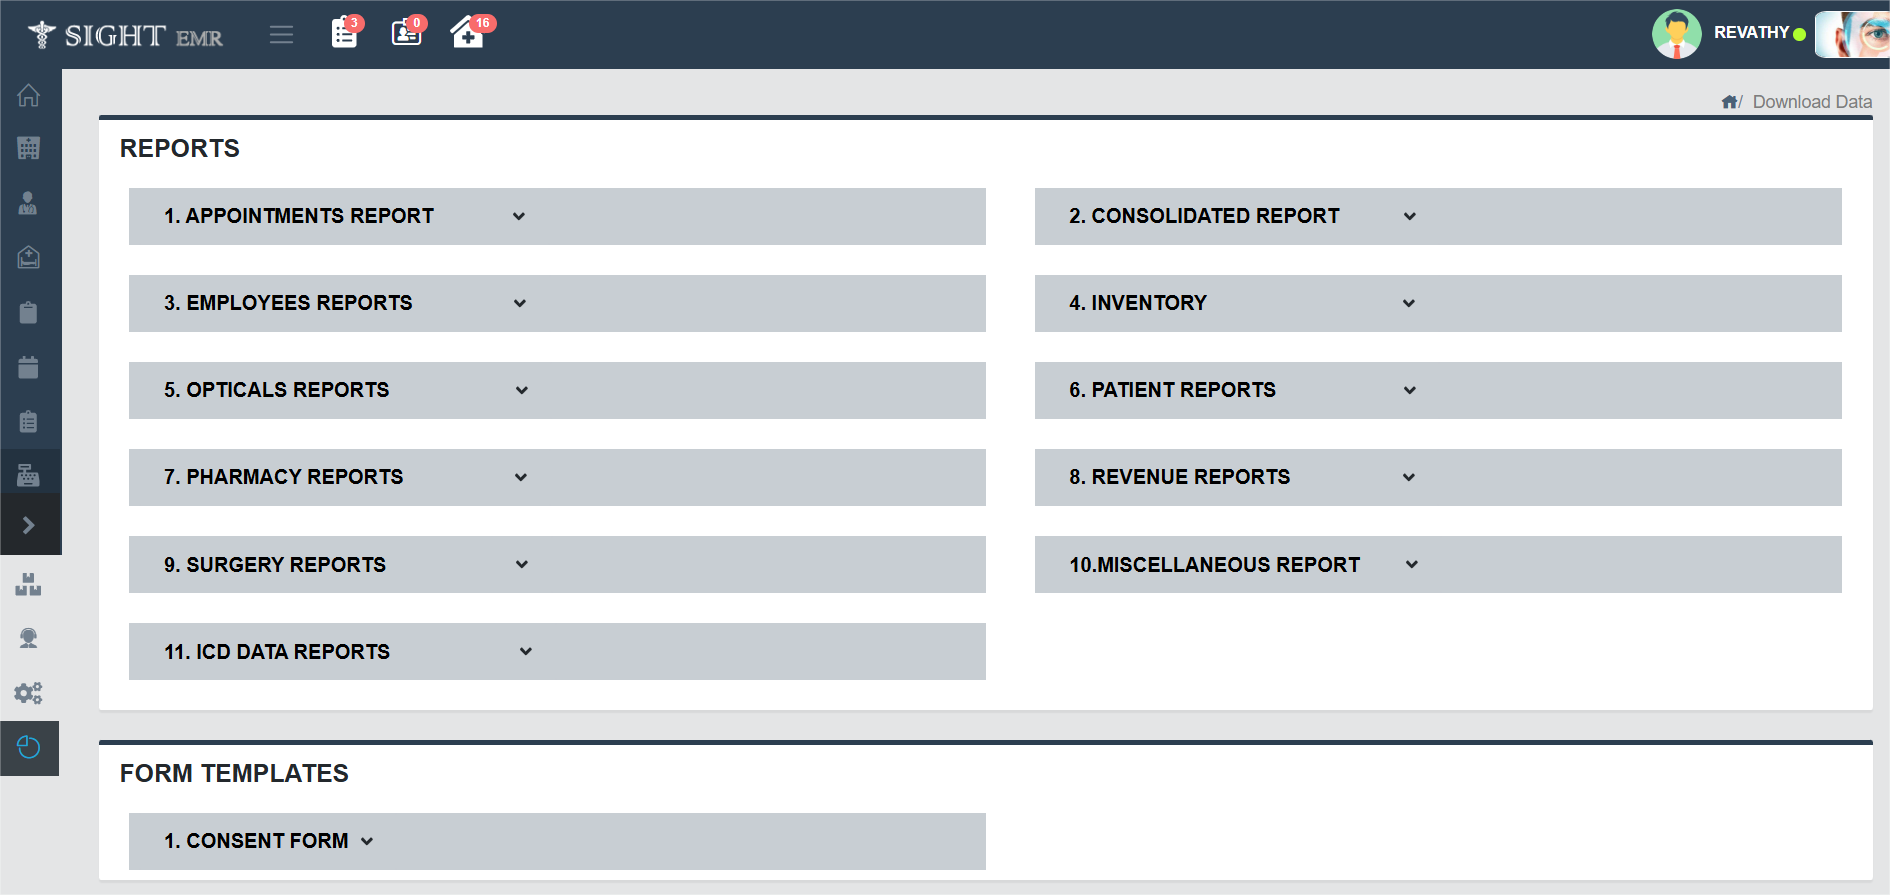
- Key Features of the Screen
- Reports Section: This section is organized into 11 expandable categories. Click on any section to view and download specific reports under that category.
Appointment Reports
- Outpatient Appointments
- OP Appointments No Show
- Post OP Pateints Review Schedule
- Surgery Appointments
- Surgery Appointments No Show
Consolidated Report
- Consolidated Summary Report
- Branch-Wise Report
Employees Reports
- Counselors Performance
- Leave Report
- Performance Metrics
Inventory
- Asset Report
- Optical Stock
- Pharmacy Stock
- Surgery Stock
Optical Reports
- Booking Summary Report
- Optical Damaged Stock
- Optical Store Tax
- Optical Stock
- Optical Statements
- Sales Conversion Rate
- Return Damaged Frame Report
- Sales Report
- Optical Revenue Report
- Optical Voided Report
- Ordered Lens Report
Patient Reports
- New Diagnosis By Month
- OP Patient Count
- Patient Data
- Patient Age Wise Report
- Patient Pincode Wise Report
- Patient Locality Wise Report
- Referral Report
- Refraction Queue Report
- Referrence Source Summary
- Waiting List
- Patient TAgs Report
- Patient Log Report
- Patient Wallet Report
Pharmacy Reports
- Day Close Report
- Drug Unavailability Log
- Pharmacy Statements
- Pharmacy Stock
- Pharmacy Tax
- Schedule Drug
- Emergency Drug Report
- Surgery Stock
- Pharmacy Revenue Report
- Pharmacy Voided Report
Revenue Reports
- Doctor Wise Revenue
- Drill-Down Report
- Inpatient Revenue
- Inpatient Voided
- Insurance Revenue
- Outpatient Revenue
- Outpatient Voided
- Optical Revenue Report
- Optical Voided Report
- Pharmacy Report
- Pharmacy Voided Report
- Pending Claim Report
- Receivables Report
- Reconciliation Report
- Waiver Report
Surgery Reports
- Insurance Aging Report
- Pending Claim Report
- Surgery List Report
- Scheduled Surgery
- Inpatient Revenue
- Inpatient Voided
Miscellaneous Reports
- Procedure List Report
- Investigation List Report
ICD Data Reports
- ICD Data Report
- Form Templates
- Can Upload multiple Consent Forms and click Save button to save the form. It will be displayed in the Surgery Confirm Screen. You can also download the uploaded consent form and delete the same.