Doctor
Key Tasks
- Create New Patient (Step 1 to 5) and pick for Consultation directly.
- Edit /View the patient details from Patient List and pick for consultation.
- Schedule a New/Existing patient.
- Reschedule/Cancel the Scheduled Appointment from Schedule List.
- Create/Edit/View Care Plan Template.
- Go to Care Plan Template (Side Nav).
- Select Create Template.
- This module allows Doctor to create standardized care templates based on diagnosis. It simplifies treatment planning by predefining Investigations, Procedures, Prescriptions, and Advice.
Care Plan Template
Field Descriptions
| Field | Description |
|---|---|
| New Template Name* | Enter a unique name for the care plan template. |
| Search for Diagnosis* | Search and select the primary diagnosis for which the care plan is created. |
| Investigation | Click to add relevant investigations/tests. Use the search box to locate tests. |
| Procedure | Add any procedures associated with the diagnosis. |
| Prescription | Enter medications. You can enable Pharm Search for medicine auto-suggest. |
| Advice (optional) | Provide general or specific advice related to the diagnosis. |
- Summary Panel (Right Side):
- The Summary of Template displays a live preview of the selected items: Diagnosis, Investigations, Prescription, Procedure and Advice.
- Each section will update dynamically as you enter details, helping you review before submission.
- Click Sumbit button to save the Care Plan Template.
- The submitted Care Plan Template will be Listed in Template List.
Template List
- This screen displays existing templates (with Template Name, Diagnosis, Investigation, Medicine, Procedure) and allows editing.
- Click Edit button to update the Existing Care Plan Template.
Update Care Plan Template
- The update screen functions like the creation screen with the ability to:
- Modify the name, diagnosis, or any clinical element.
- Add or remove entries using the X button or Trash icon 🗑️.
- Click Delete button to permanently remove the template.
- Click Submit button to save changes.
Color Tags: Added elements (Investigations, Medicines) are shown as colored tags with a close ❌ option for removal.
- Waiting Queue: Pick the patient from waiting Queue.
Doctor Screen
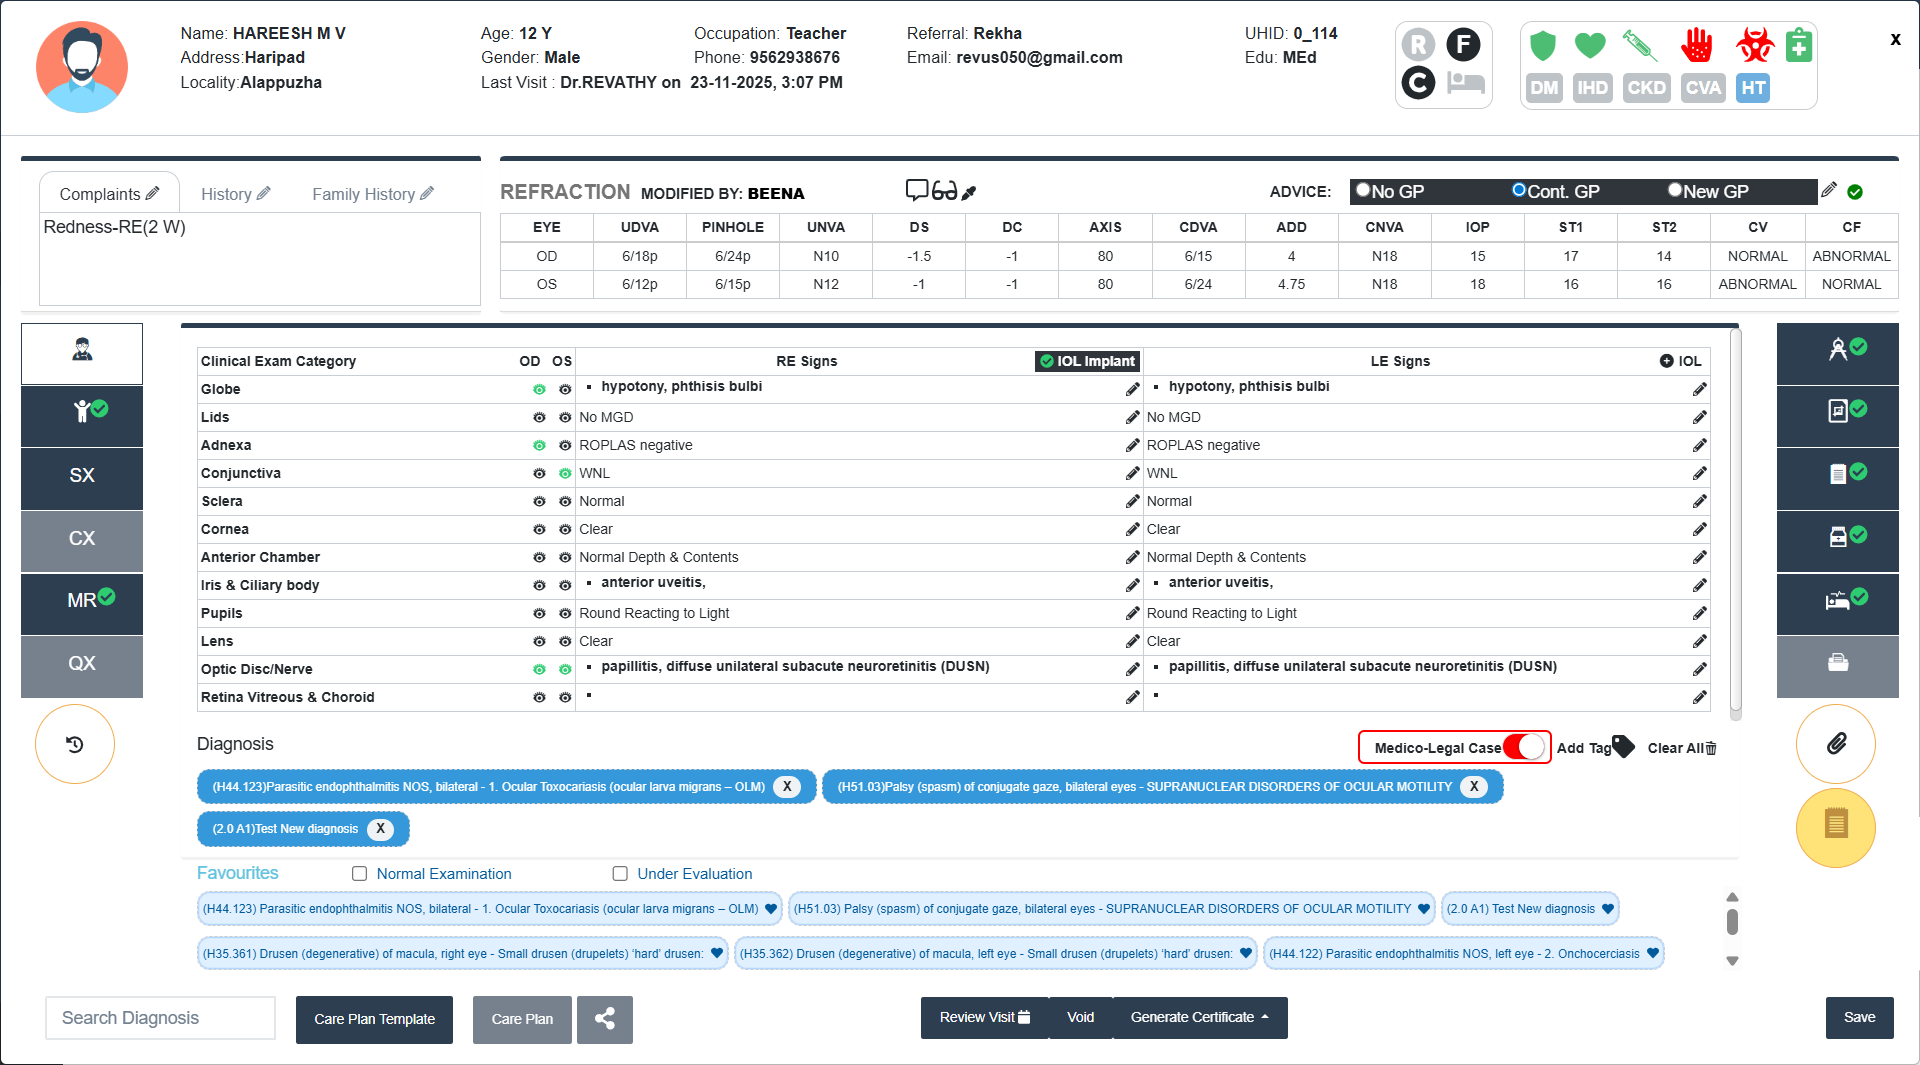
Patient Information Panel
Located at the top of the screen.
- Name, Age, Gender: Displays basic demographic details.
- Phone, Occupation, UHID: Essential contact and ID information.
- Referral, Education, Last Visit: Tracks referral source, education, and visit history.
- Icons: Visual indicators for medical history-added at Receptionist at the time of Registeration (Heart Disease/ Renal Disease/ Diabetes/ Stroke/ Blood Pressure).
Tabs Section
Located just below patient information.
- Complaints, History, Family History Tabs: Click the pencil icon ✎ to edit or add relevant details under each section.
Refraction Section
The Refraction section is used to record and manage the refractive status and visual acuity of both eyes (OD-Right Eye, OS-Left Eye), including detailed parameters.
- Refraction Data Entry (Top Section): This section reflects the summary of key Refraction values (EYE, UDVA, PINHOLE, UNVA, DS, DC, AXIS, CDVA, ADD, CNVA, IOP, STI/ST2, CV, CF).
- Advice Options (Top Right)
- No GP: No Glass Prescribed
- Cont.GP: Continue Existing Glasses
- New GP: New Glass prescription
- Advice Options (Top Right)
- Soft alerts and tick mark to let the Doctor know that if the Refraction status is either New GP or Cont GP, the Refraction data has to be saved separately to list the patient in the Optical Store.
- Detailed Refraction Entry
- Tabs available
- REFRACTION: View/Edit the Latest Refraction Values (Dropdown) for both Right Eye and Left Eye (OD/OS).
- PGP: Can Add/Edit latest PMT Values from Dropdown.
- Dilated/Cyclopegic: Can Separately add/edit the latest Dilated/Cyclopegic values.
- PMT: Can Add/Edit latest PMT Values from Dropdown and also added to the Day Summary
- Refraction comments Drop-down: It allows clinicians to quickly select pre-written advice or warnings to be shown to the patient These are added to the patient record and may also appear on printouts or prescriptions.
1.Scroll or type key words in the Search bar.
2.Tick the check boxes to select the advice to be added.
3.Selected items appear as tags below the drop-down.
4.To Remove a tag, click the ‘x’ icon on the tag.
5.Click Save to retain your selections in the record.
- BIOMETRY
- RETINOSCOPY
- BASIC SQUINT EVAL
- EOM
- BSV ASSESSMENT
- INVESTIGATION FINDINGS: For Hold Patients, there is an option to add Investigation Findings by Refractionist and it can be edited by Doctor. Each section supports detailed manual input.
- REFRACTION: View/Edit the Latest Refraction Values (Dropdown) for both Right Eye and Left Eye (OD/OS).
- Tabs available
- Can add Comments for Refraction, PGP and PMT separately.
- Use drop-downs for each input field. Fields are mostly standardized, ensuring consistent entry.
- When a patient is placed on hold for dilatation, both the dilatation medicine and eye details will be automatically reflected in the Day Summary.
- Controls and Tools
- Reset Button: Clears all entered data in the current section.
- Navigation Arrows: Used to scroll between multiple saved records.
- Save Button: Saves the refraction data entered.
- Comment Box: Free-text area for entering relevant notes or clinician’s observations for all sections.
Side bar Icons (Left Side)
-
Clinical Examination Panel: Located in the central part of the screen.
- Clinical Examination Categories
- Includes categories like Globe, Lids, Adnexa, Conjunctiva, etc.
- Each row shows OD (Right Eye) and OS (Left Eye) observations.
- Enter Observations:
- Click into the OD/OS box next to each label.
- Type in numerical values or text findings.
- Use up/down arrows on dropdowns to select predefined grades.
- Save Findings: Click the Save icon at the bottom to store the examination.
- View Mode: Use the eye toggle to preview or hide the image.
- RE/LE Signs
- Click the Pencil icon next to any field.
- A diagnosis editor box pops up at the top of the screen includes ICD Code, Diagnosis Name, Diagnosis Category.
- This pop-up allows users to add or modify diagnosis entries(diagnosis category).
- After entering Details, click the Save button.
- IOL (RE) and IOL (LE)
- IOL (RE) - Enter IOL details for the Right Eye.
- IOL (LE) - Enter IOL details for the Left Eye.
- Clicking either button will open the IOL Implant Details form.
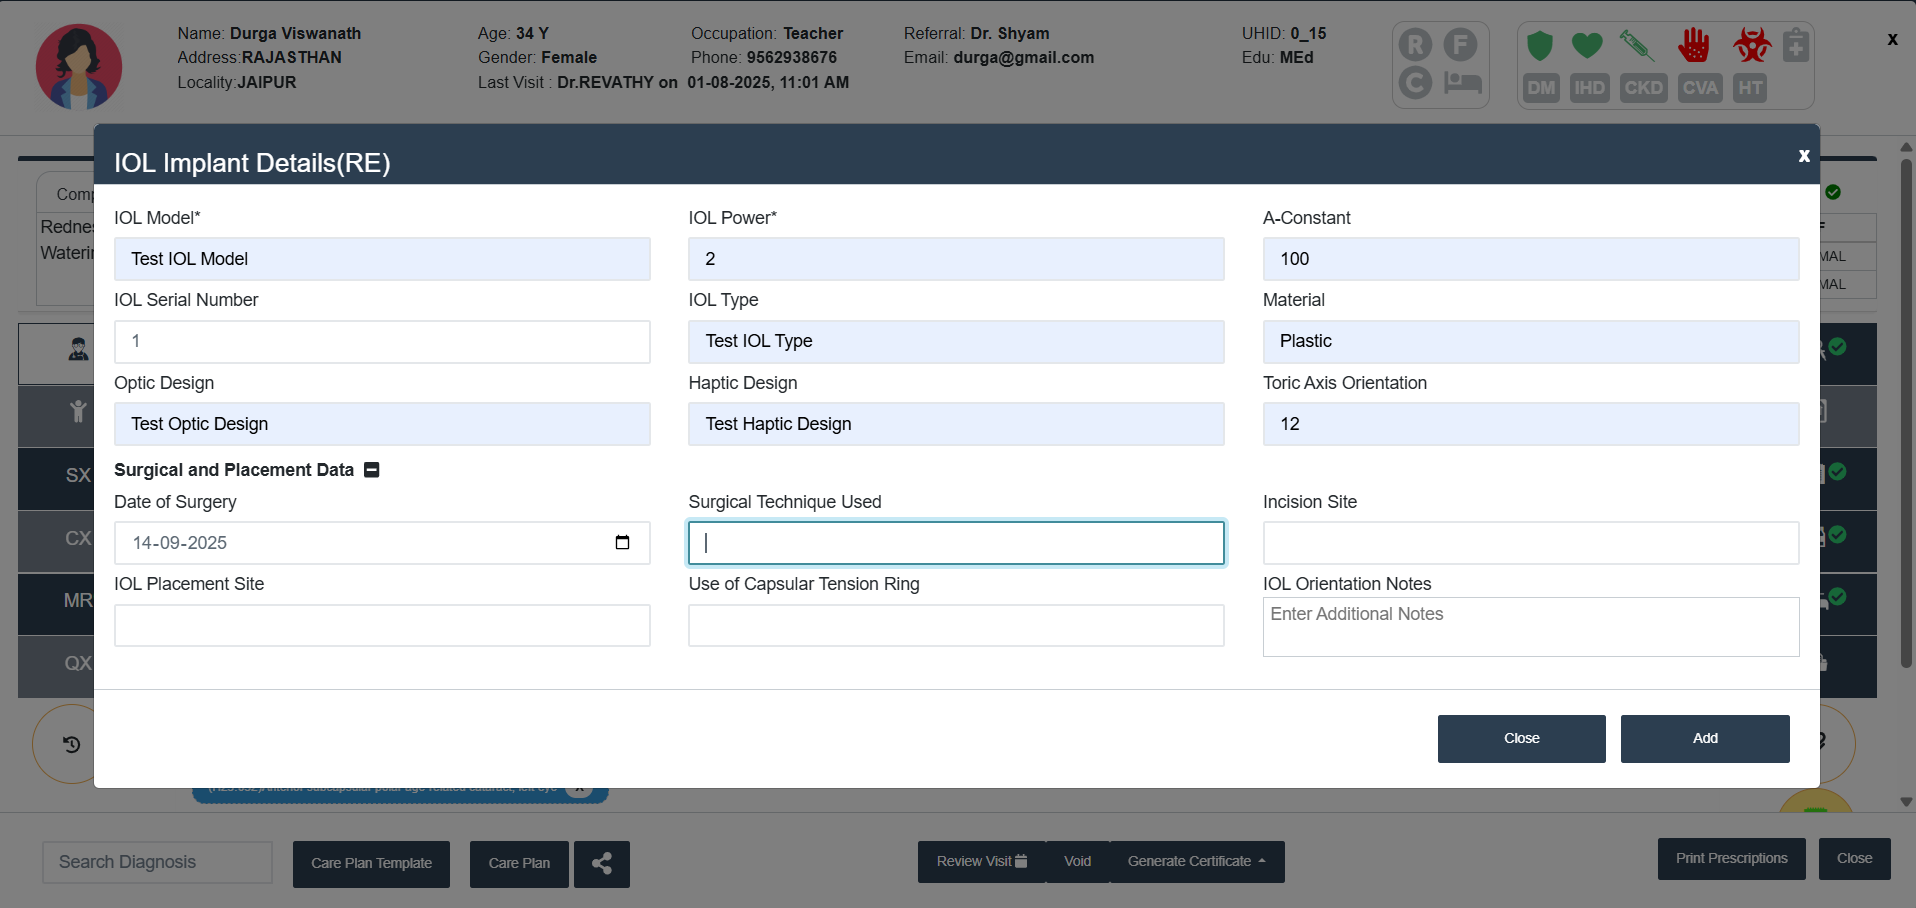
- When opened, the following fields are available:
- Lens Information
- IOL Model* - Select/enter Intraocular lens model (Mandatory).
- IOL Power* - Enter the calculated lens power (Mandatory).
- IOL Serial Number - Enter unique lens serial number.
- Optic Design - Select lens optic design.
- IOL Type - Select Type.
- Haptic Design - Select Haptic Design used for fixation.
- A-Constant - Enter A-Constant.
- Material - Lens material.
- Toric Axis Orientation - Mention axis.
- Surgical and Placement Data
- Date of Surgery - Select Date of Surgery from Date Picker.
- IOL Placement Site - Mention site.
- IOL Location - Specify detailed location of implantation.
- Surgical Technique Used - Enter Surgical method.
- Use of Capsular Tension Ring
- Incision Site - Record site of surgical incision.
- IOL Orientation Notes - Add extra Remarks if needed.
- Lens Information
- Action Buttons
- Add - Saves all details entered.
- Close - Closes form without saving.
- Clinical Examination Categories
- If Data is there in any of the IOL Implant, it will be visible in black colour (Ref image).
- The data can be updated any time by clicking on the IOL Implant Button.
- Can Add/Update IOL Implant details from Surgery Confirming Screen also.
-
Functional Vision Assessment
- The Functional Vision Assessment module helps doctors record and evaluate a patient’s vision functionality for both the right eye and left eye.
- The form also provides quick options to save or print the assessment.
- For each category, findings can be entered separately for the right eye and the left eye.

- The categories include the following with some default entries:
- Pupil Examination - NORMAL (Text area)
- Extra Ocular Movements - NORMAL (Text area)
- Pursuits - NORMAL/ABNORMAL/CANNOT BE EXAMINED (Drop-down)
- Saccades - NORMAL/ABNORMAL/CANNOT BE EXAMINED (Drop-down)
- Fixation - CENTRAL STEADY MAINTAINED (Text area)
- Visual Differentiation of Objects - NORMAL/ABNORMAL/CANNOT BE EXAMINED (Drop-down)
- LEA Symbol Examination - Common Text area
- Picture and Letter Matching - NORMAL/ABNORMAL/CANNOT BE EXAMINED (Drop-down)
- Visual Field - NORMAL (Text area)
- Nystagmus - NIL (Text area)
- Strabismus - NIL (Common Text area)
- Colour Discrimination - NORMAL/ABNORMAL/CANNOT BE EXAMINED (Drop-down)
- Anterior Segment Examination - NORMAL (Text area)
- Dilated Fundus - NORMAL (Text area)
- Cycloplegic Retiniscopy - Text area
- Comments - Add Comments if any.
- Action Buttons
- Select Save to store the data in the patient’s record.
- Select Print to generate a report that can be handed over to the patient or kept for physical documentation.
- This feature is only visible for Patients below 18.
-
Surgery History: View/Print/Void the Discharge summary of the Patients.
-
Medical Records: View/Copy/Print/Void all the Medical Records (Patient Summary) of the Patient.
- Request For MR-Edit Button:
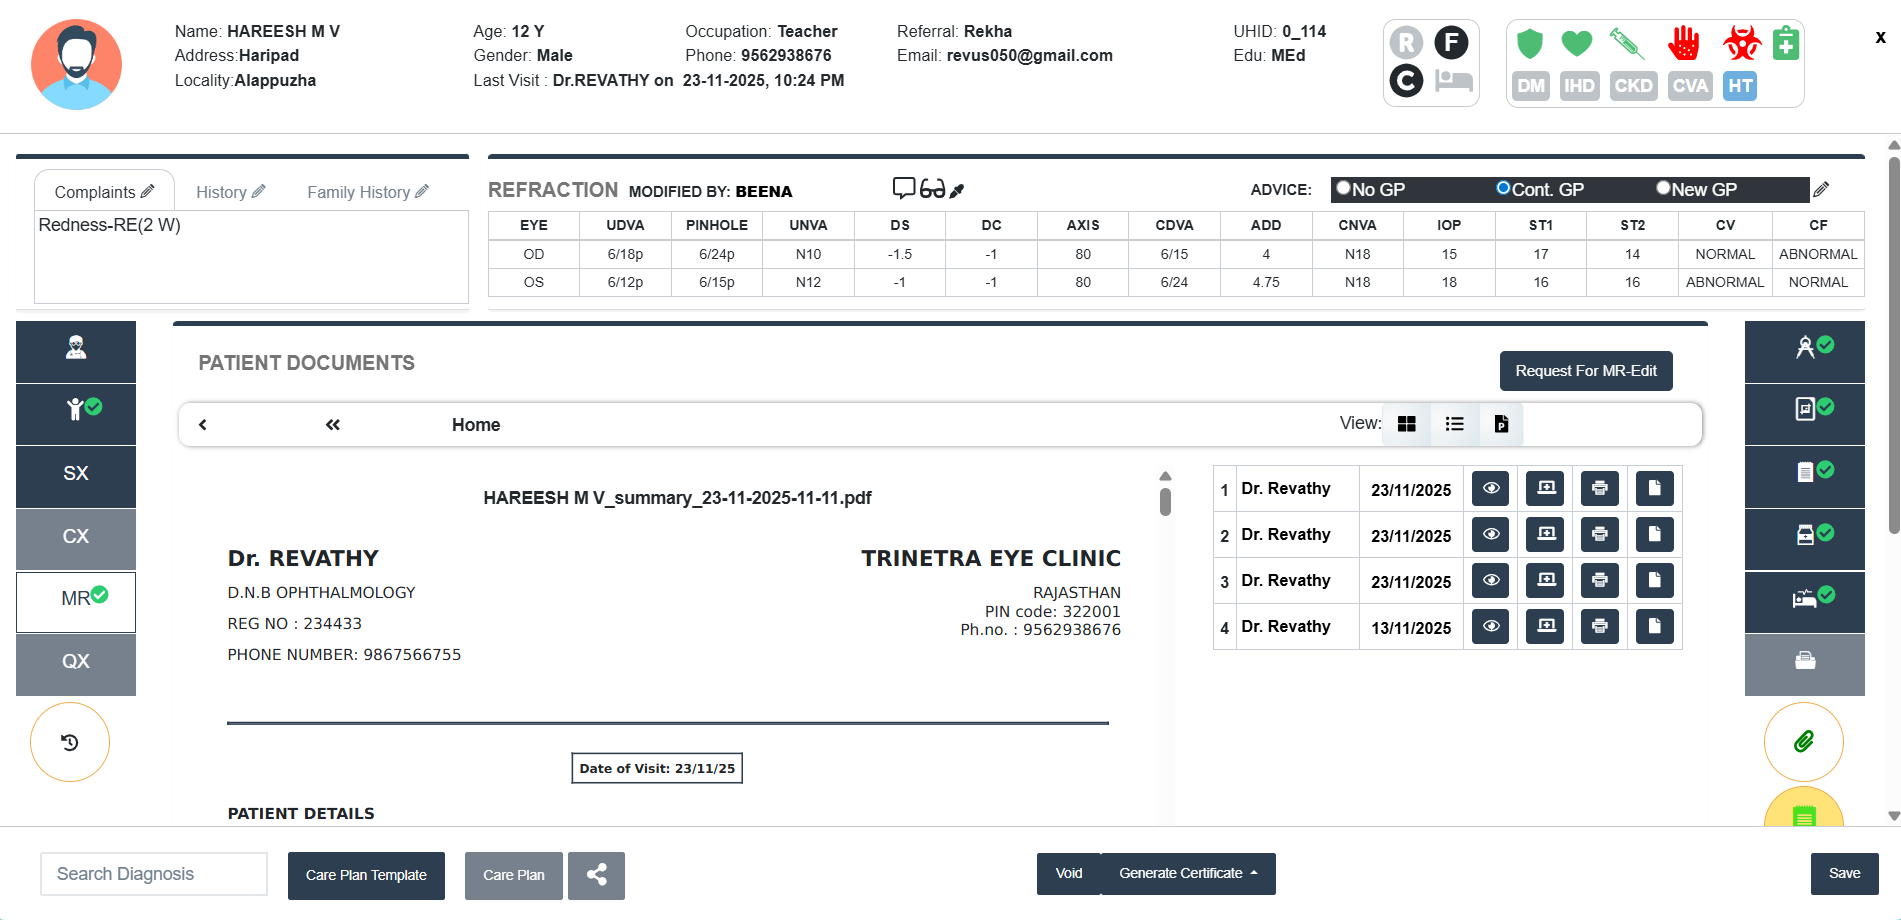
- Click Request for MR-Edit button at the top right of the MR screen to send request to the MR Edit Approver to edit the MR.
- Select the date of the MR which need to be edited, Enter the Reason and Click Request button to send the Request.
- Click Yes to confirm the request from the pop-up screen appeared. If not Click No
- Click Close button to close the Request page.
Side bar Icons (Right Side)
- Drawings
- EOMS: This interface allows for graphical documentation of extraocular muscle movements for both Right Eye (RE) and Left Eye (LE).
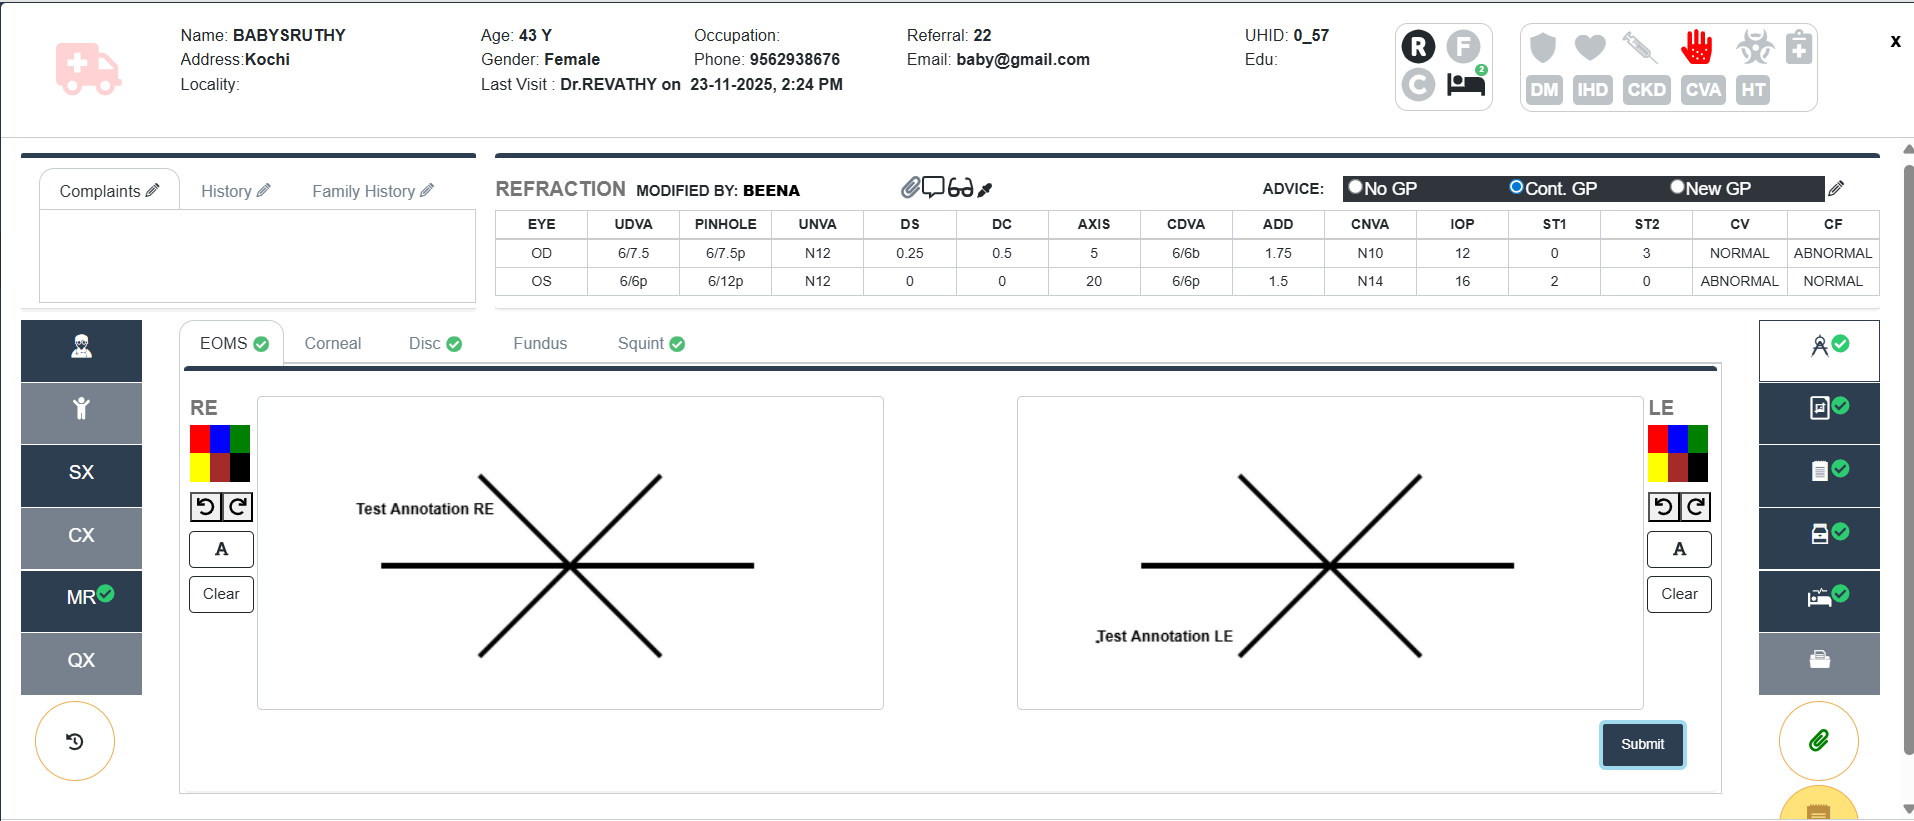
- Select Eye:
- Left Section: RE (Right Eye)
- Right Section: LE (Left Eye)
- Choose a Colour:
- Choose annotation colours (Red, Blue, Green, Yellow, Brown, Black).
- Draw Movement Patterns:
- Use your cursor to draw directly on the star-shaped 6-direction grid.
- Make Corrections:
- Use Undo or Redo buttons to step through edits.
- Press Clear to reset drawing for the respective eye.
- Submit Record:
- Click the Submit button once both RE and LE annotations are complete.
- CORNEAL: To document corneal pathologies or clinical signs using schematic diagrams for both the Right Eye (RE) and Left Eye (LE).
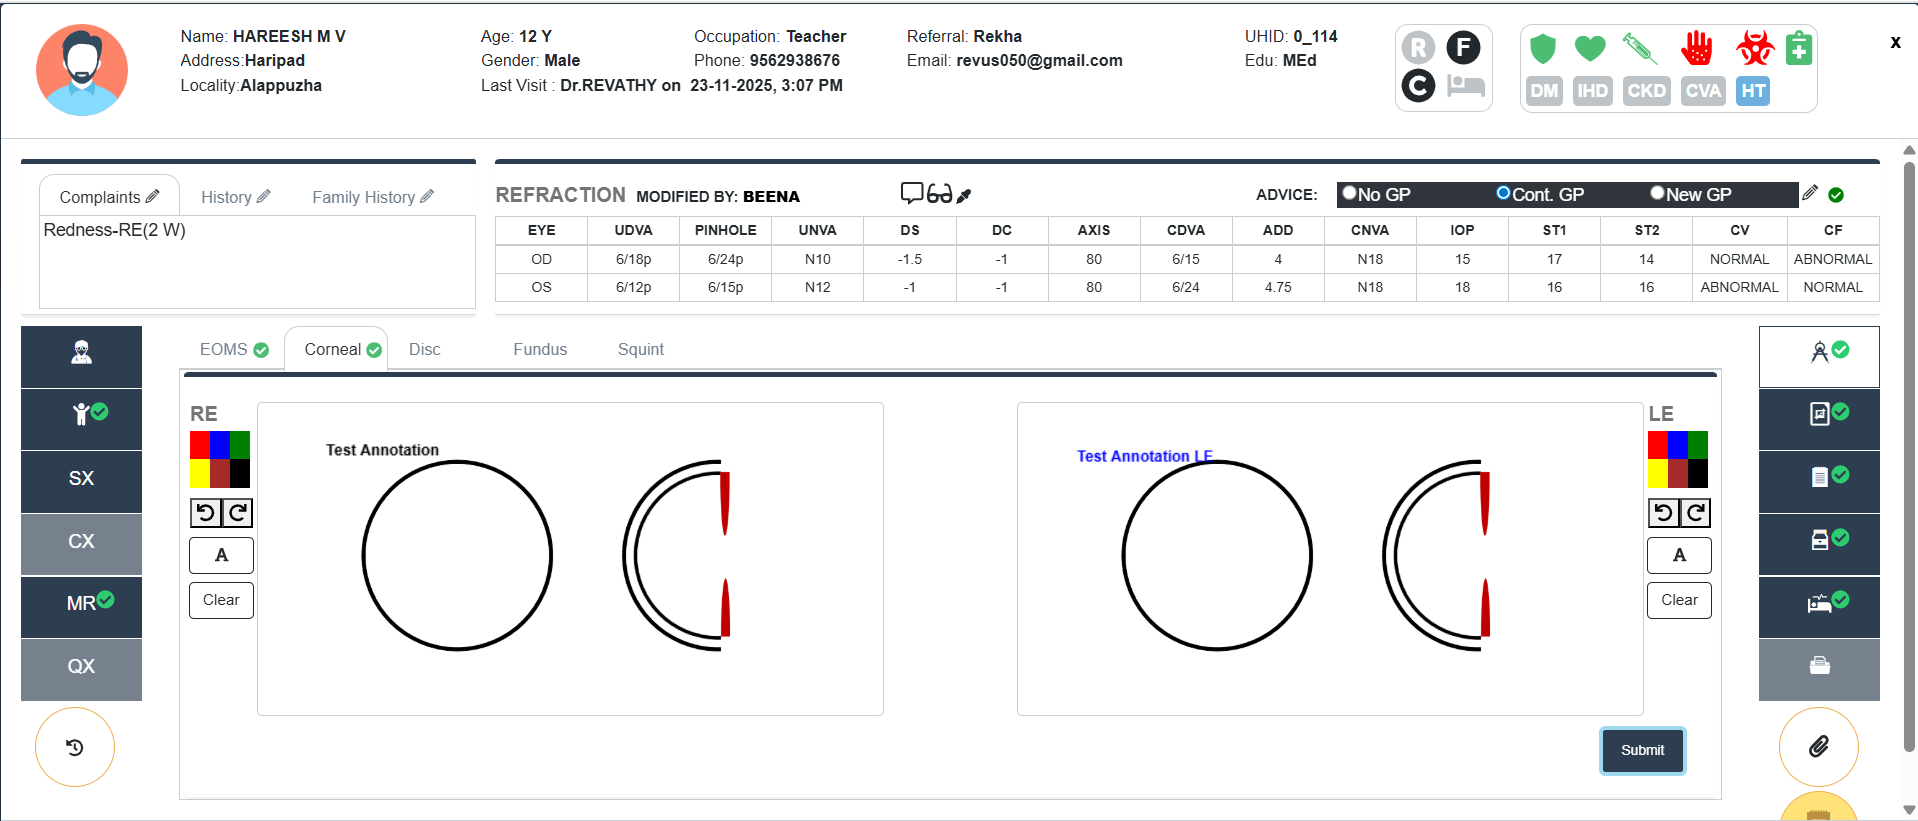
- Select Eye:
- Left Section: RE (Right Eye)
- Right Section: LE (Left Eye)
- Choose a Colour:
- Choose the appropriate colours (Red, Blue, Green, Yellow, Brown, Black).
- Draw Movement Patterns:
- Use your cursor to draw directly on the circular corneal template.
- Make Corrections:
- Use Undo or Redo buttons to step through edits.
- Press Clear to reset drawing for the respective eye.
- Submit Record:
- Click the Submit button once both RE and LE annotations are complete.
- DISC: To document and visually classify the optic disc morphology for both eyes.
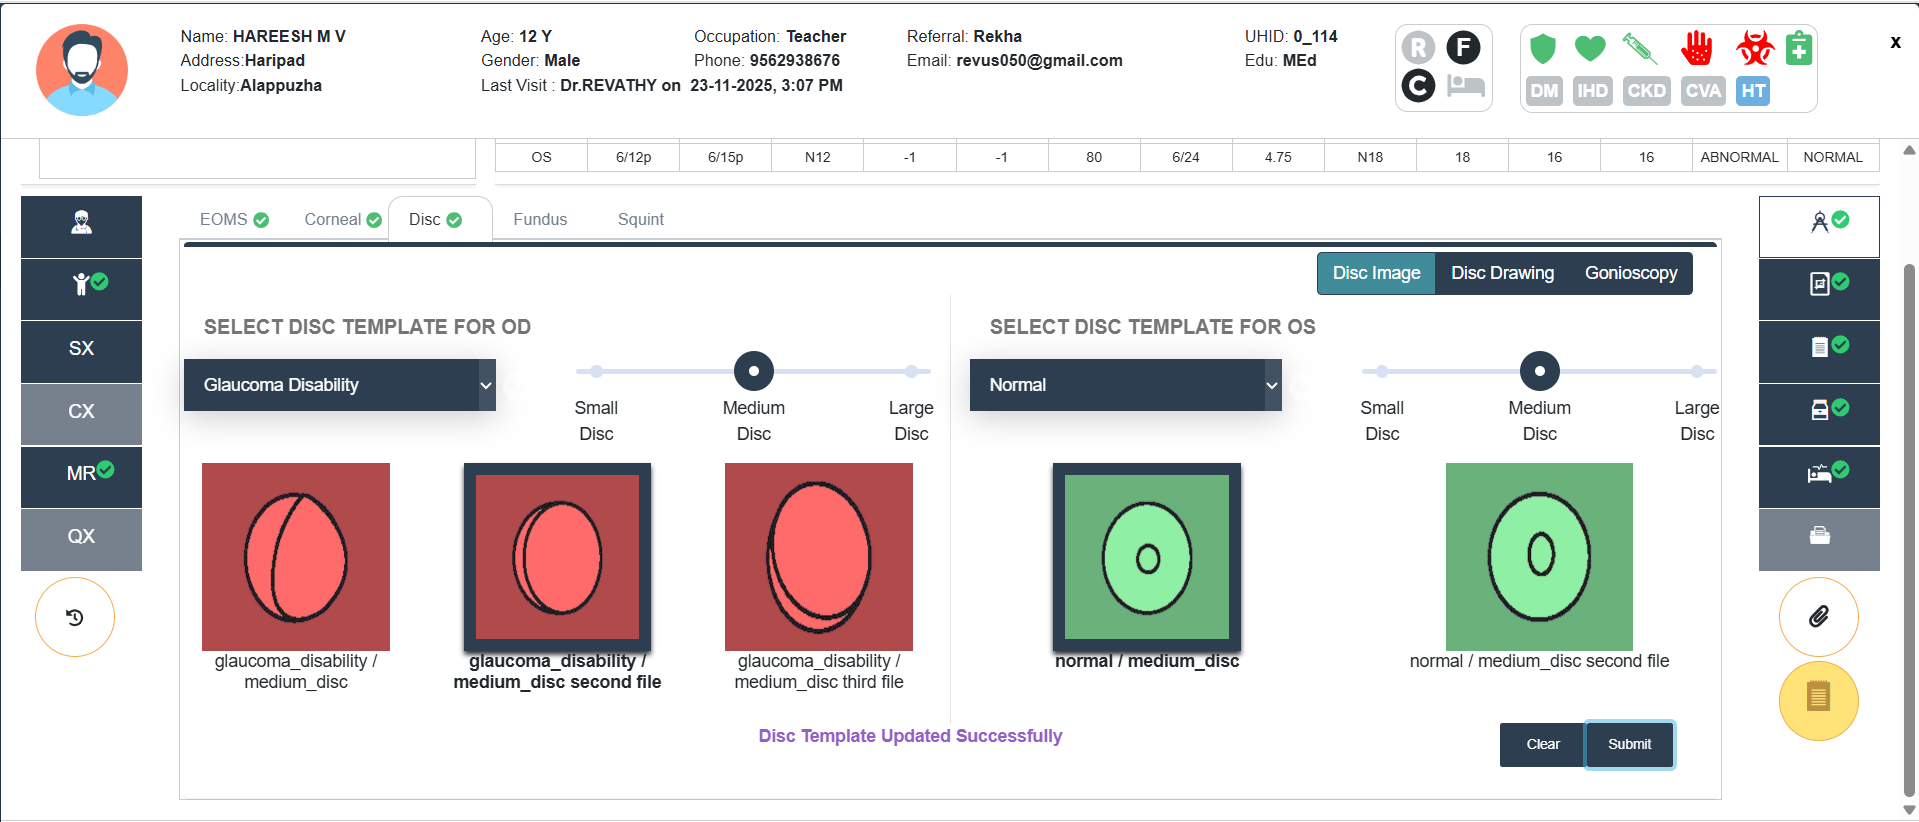
- Disc Image
- Select Disc Template for OD and OS:
- Choose the drop-down to choose the category (Normal, At Risk, Glaucoma Damage, Glaucoma Disability).
- Use the Slider to adjust the size (Small/Medium/Large).
- Preview the Selected Template (Normal- Green Background, At Risk-Yellow Background, Glaucoma Damage- Orange, Glaucoma Disability- Red Background).
- To select a disc, Double click on the corresponding Preview shown.
- Disc Drawing & Gonioscopy
- Follow the same steps of Corneal
- Fundus
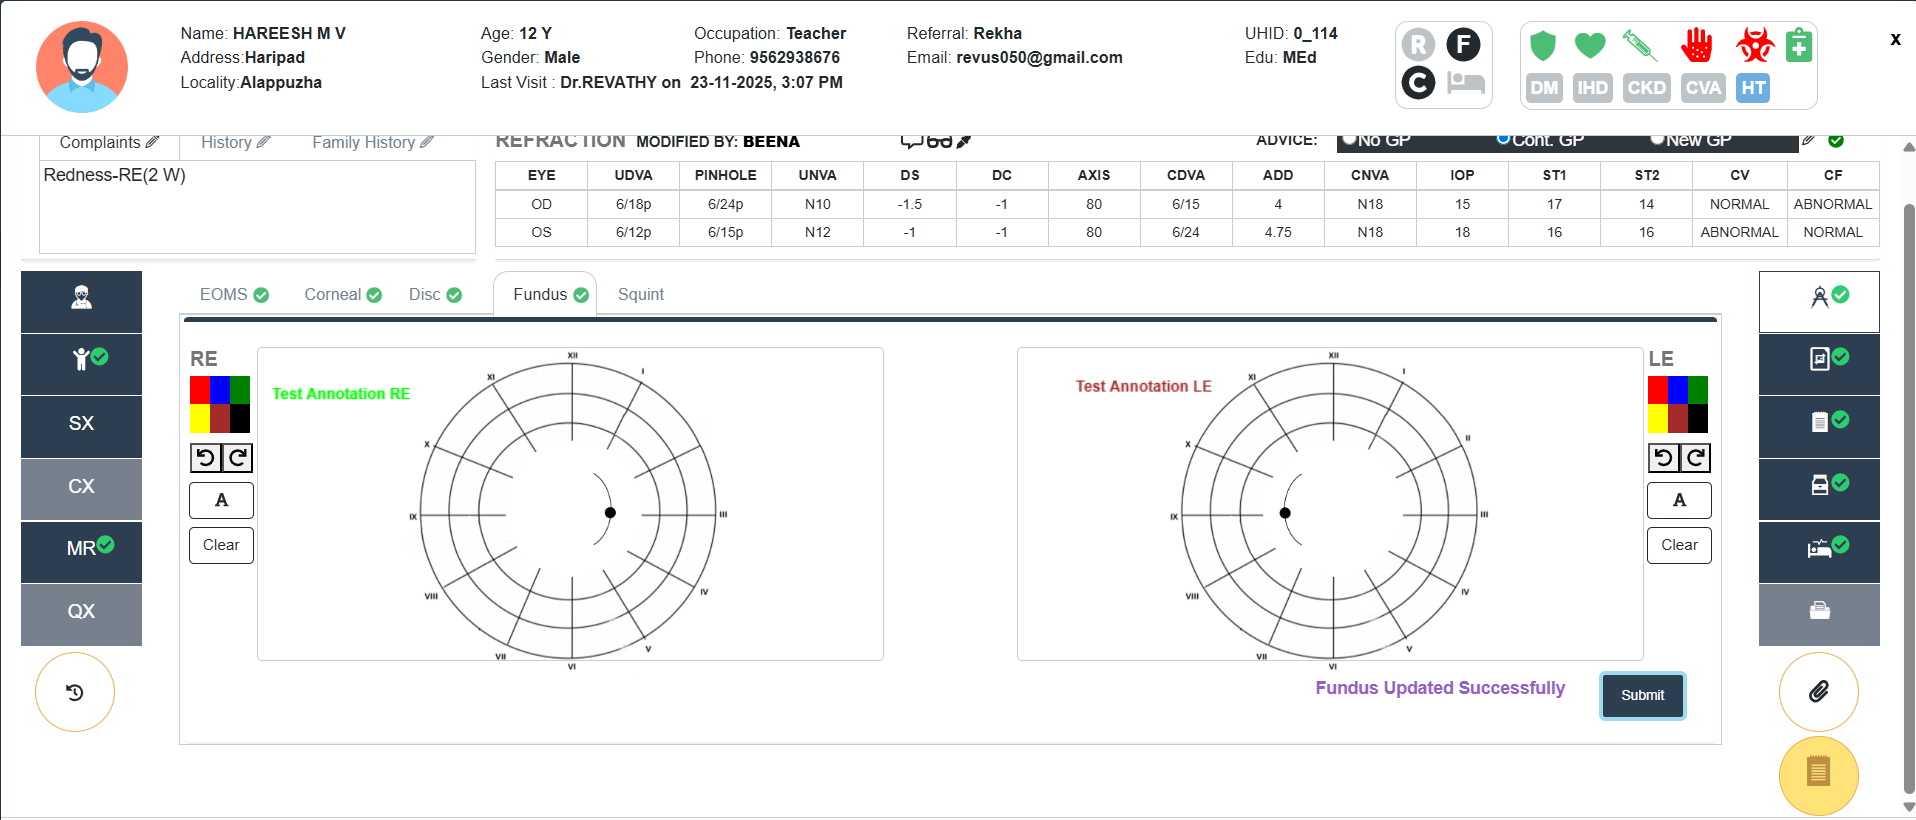
- This screen is designed to record and analyze extraocular muscle movements for both eyes – Right Eye (RE) and Left Eye (LE).
- Two circular motility diagrams represent RE (Right Eye) and LE (Left Eye).
- Follow the same steps of Corneal
- Squint
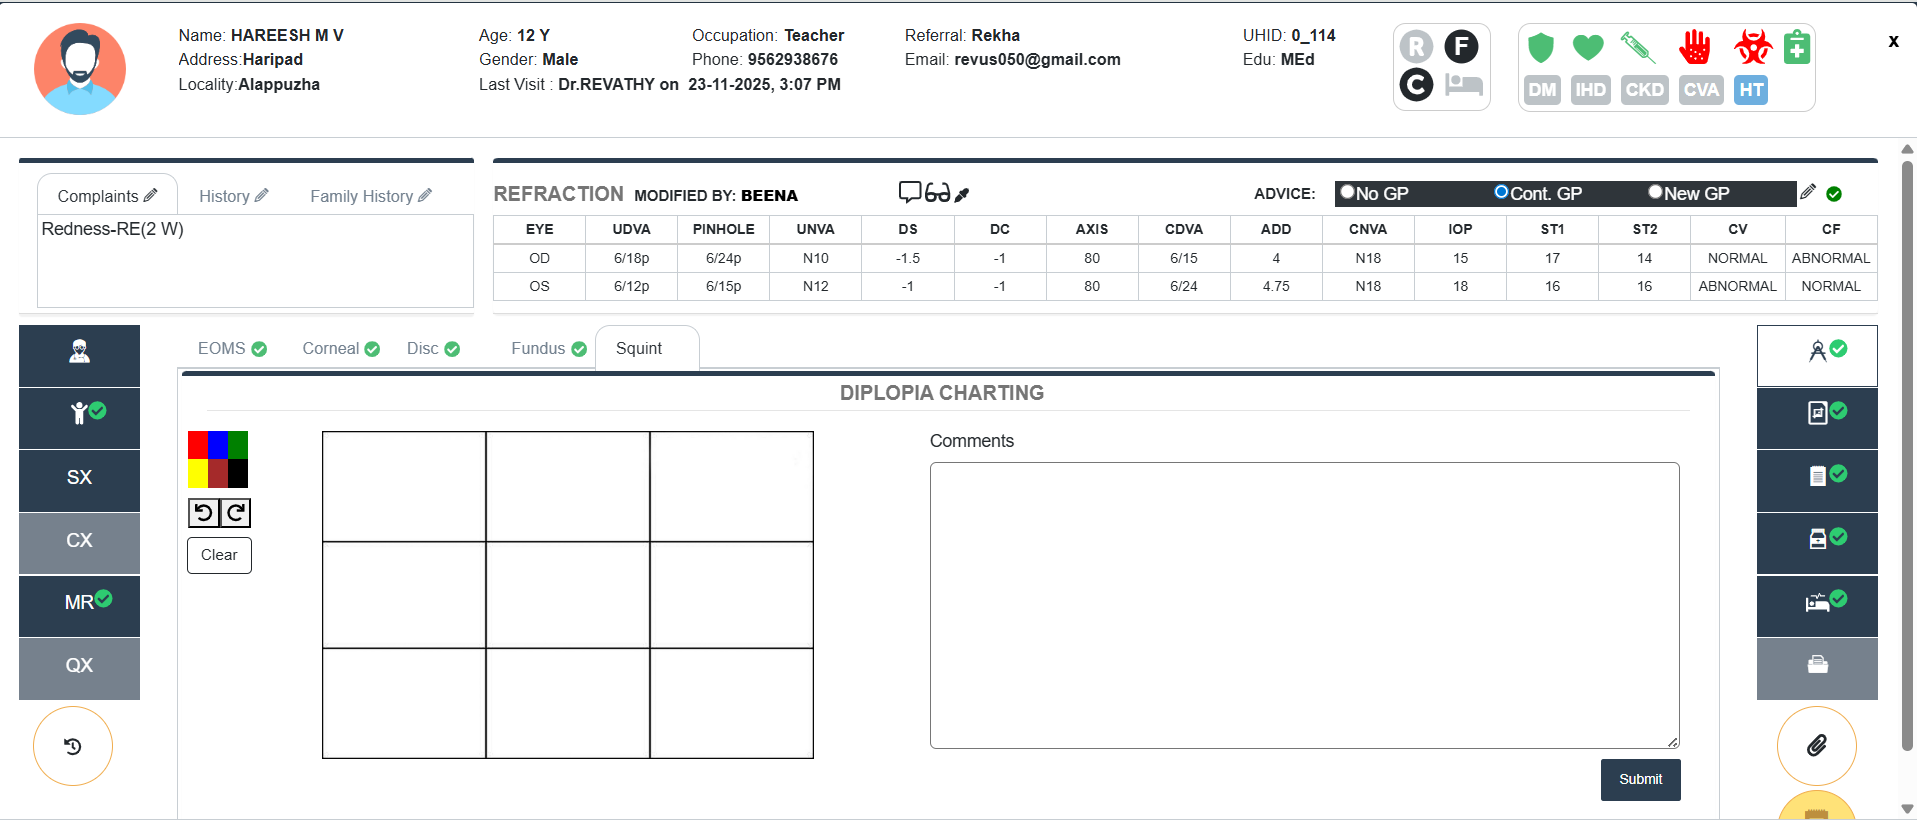
- A 3x3 Grid is shown on the left side.
- This grid is used to chart diplopia findings in different gaze directions.
- Follow the same steps of Corneal
- A large text box on the right is provided to enter clinical observations or interpretations related to the diplopia findings.
A green tick mark indictor is now shown on the tabs: EOMS, Corneal, Disc, Fundus and Squint when a drawing is present/saved.
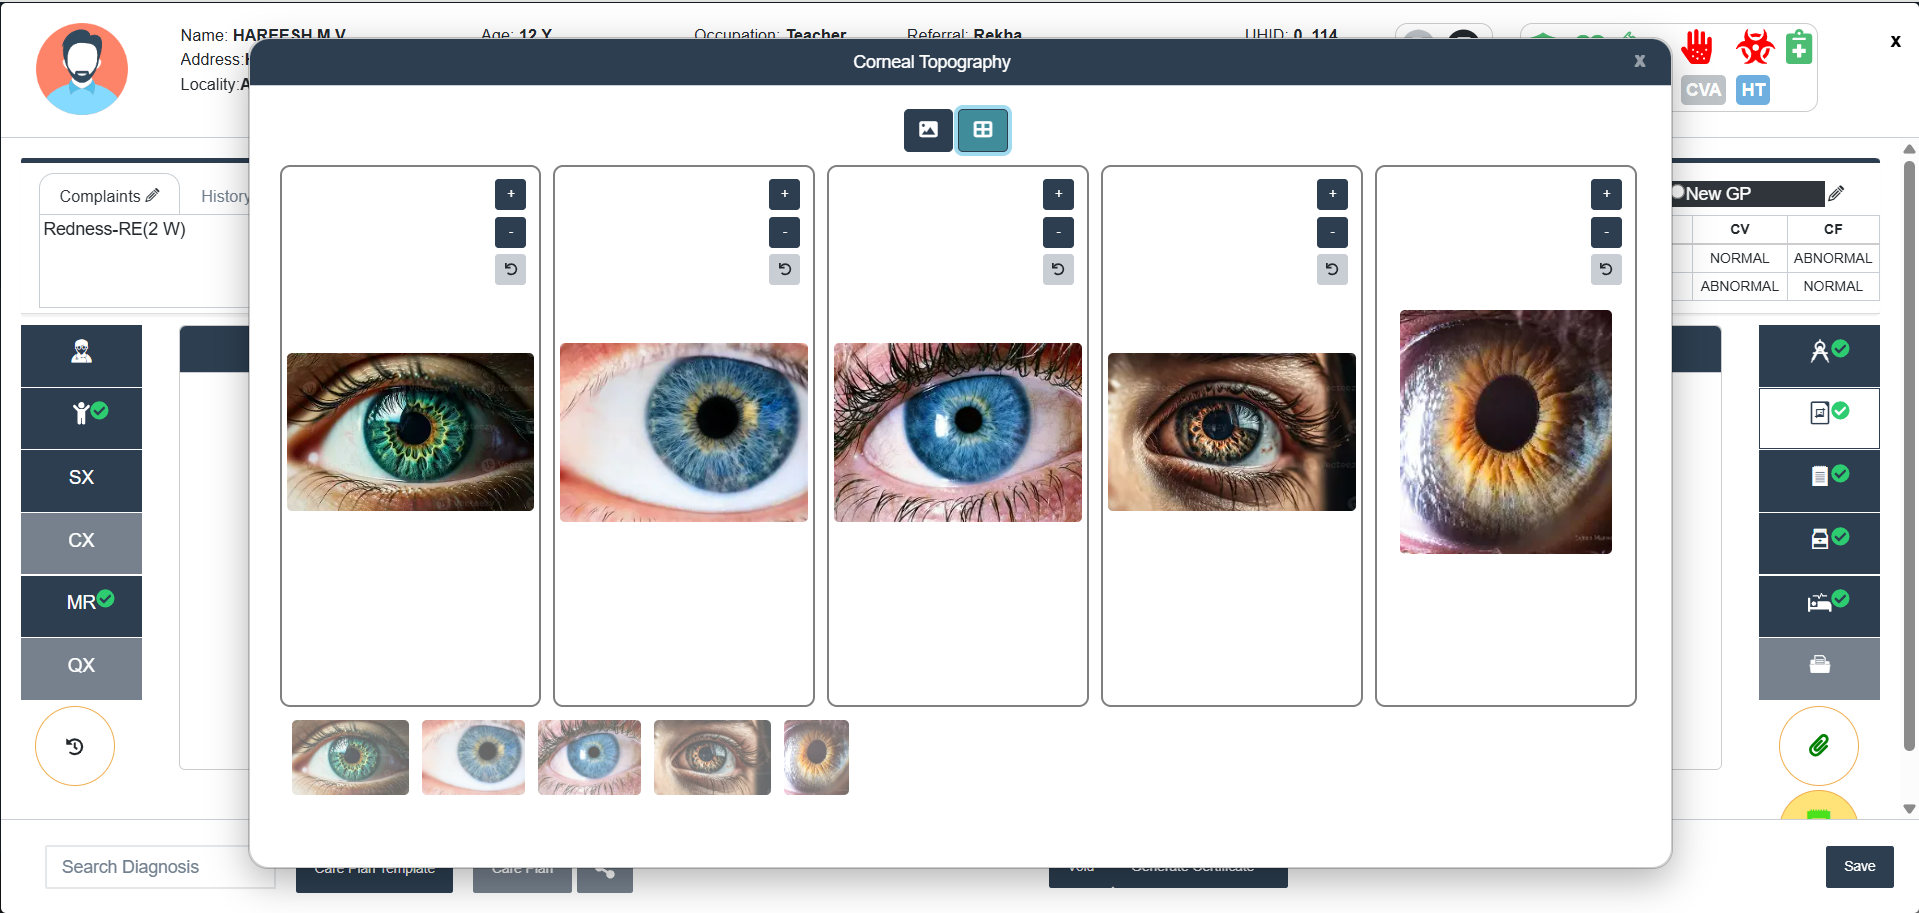
- Investigation Images
- Select Investigation Type. The categories under the Investigation type will be listed at the right side with a + Icon.
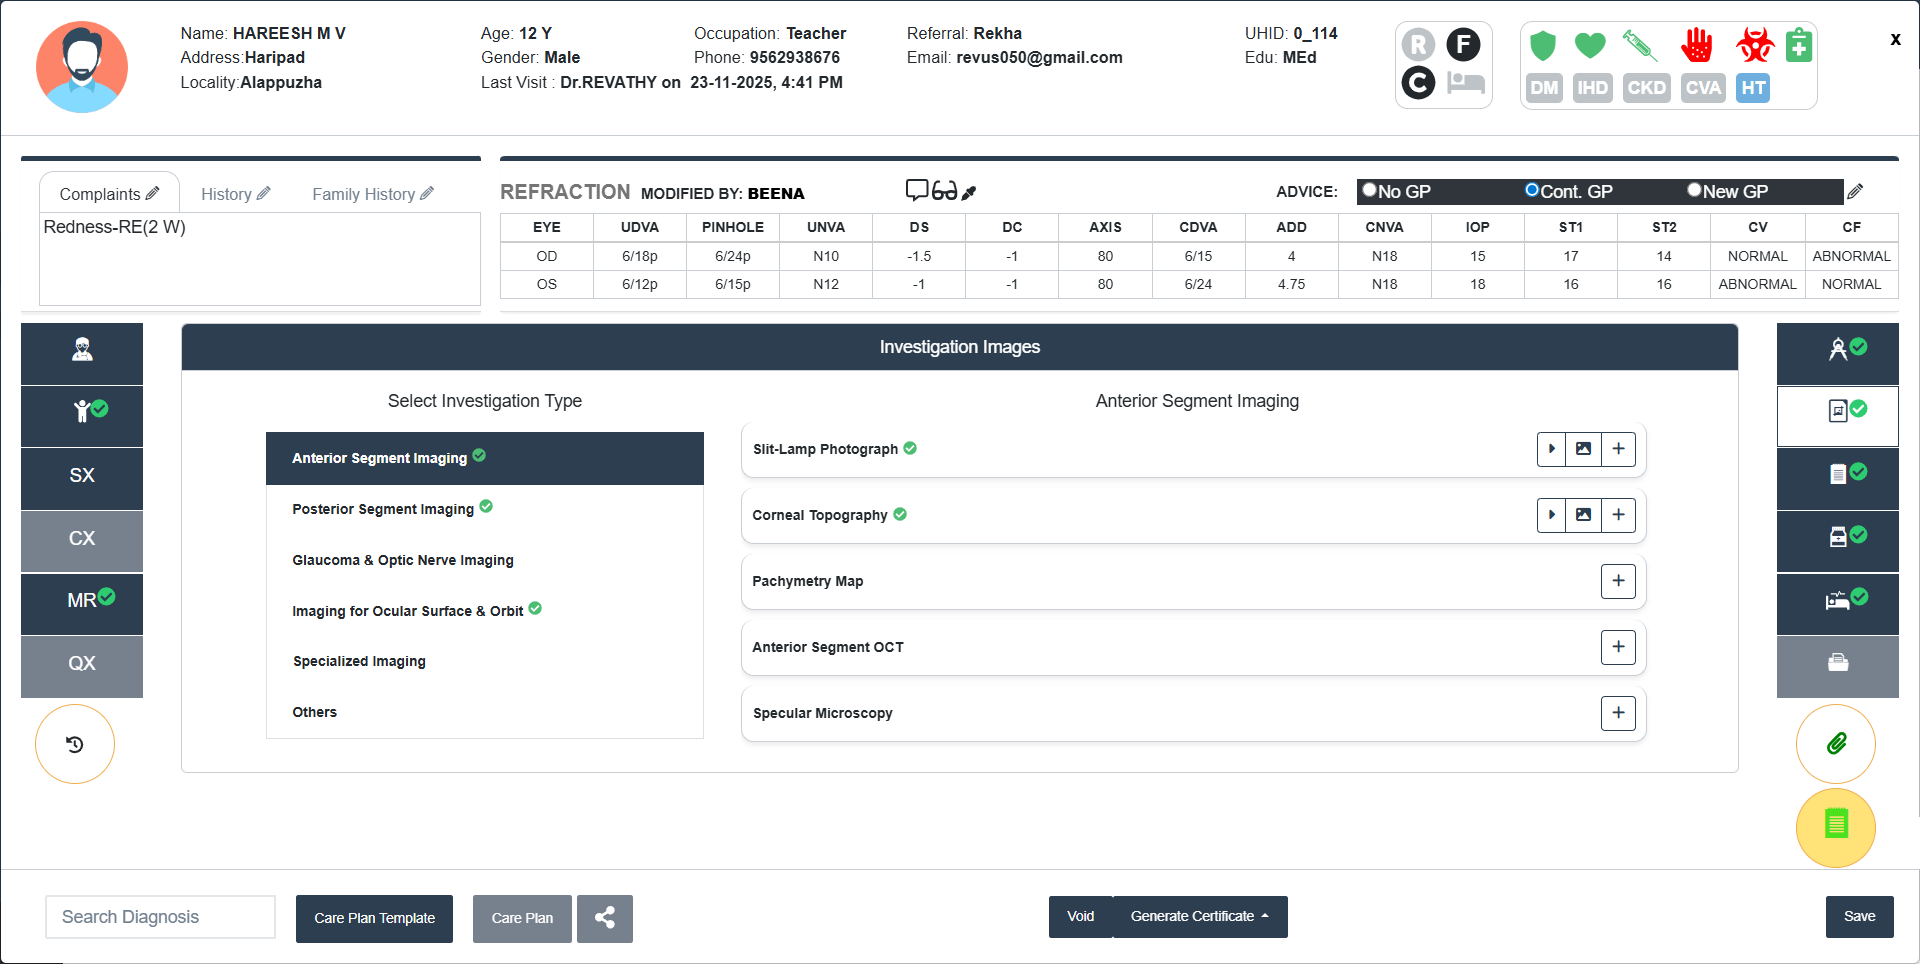
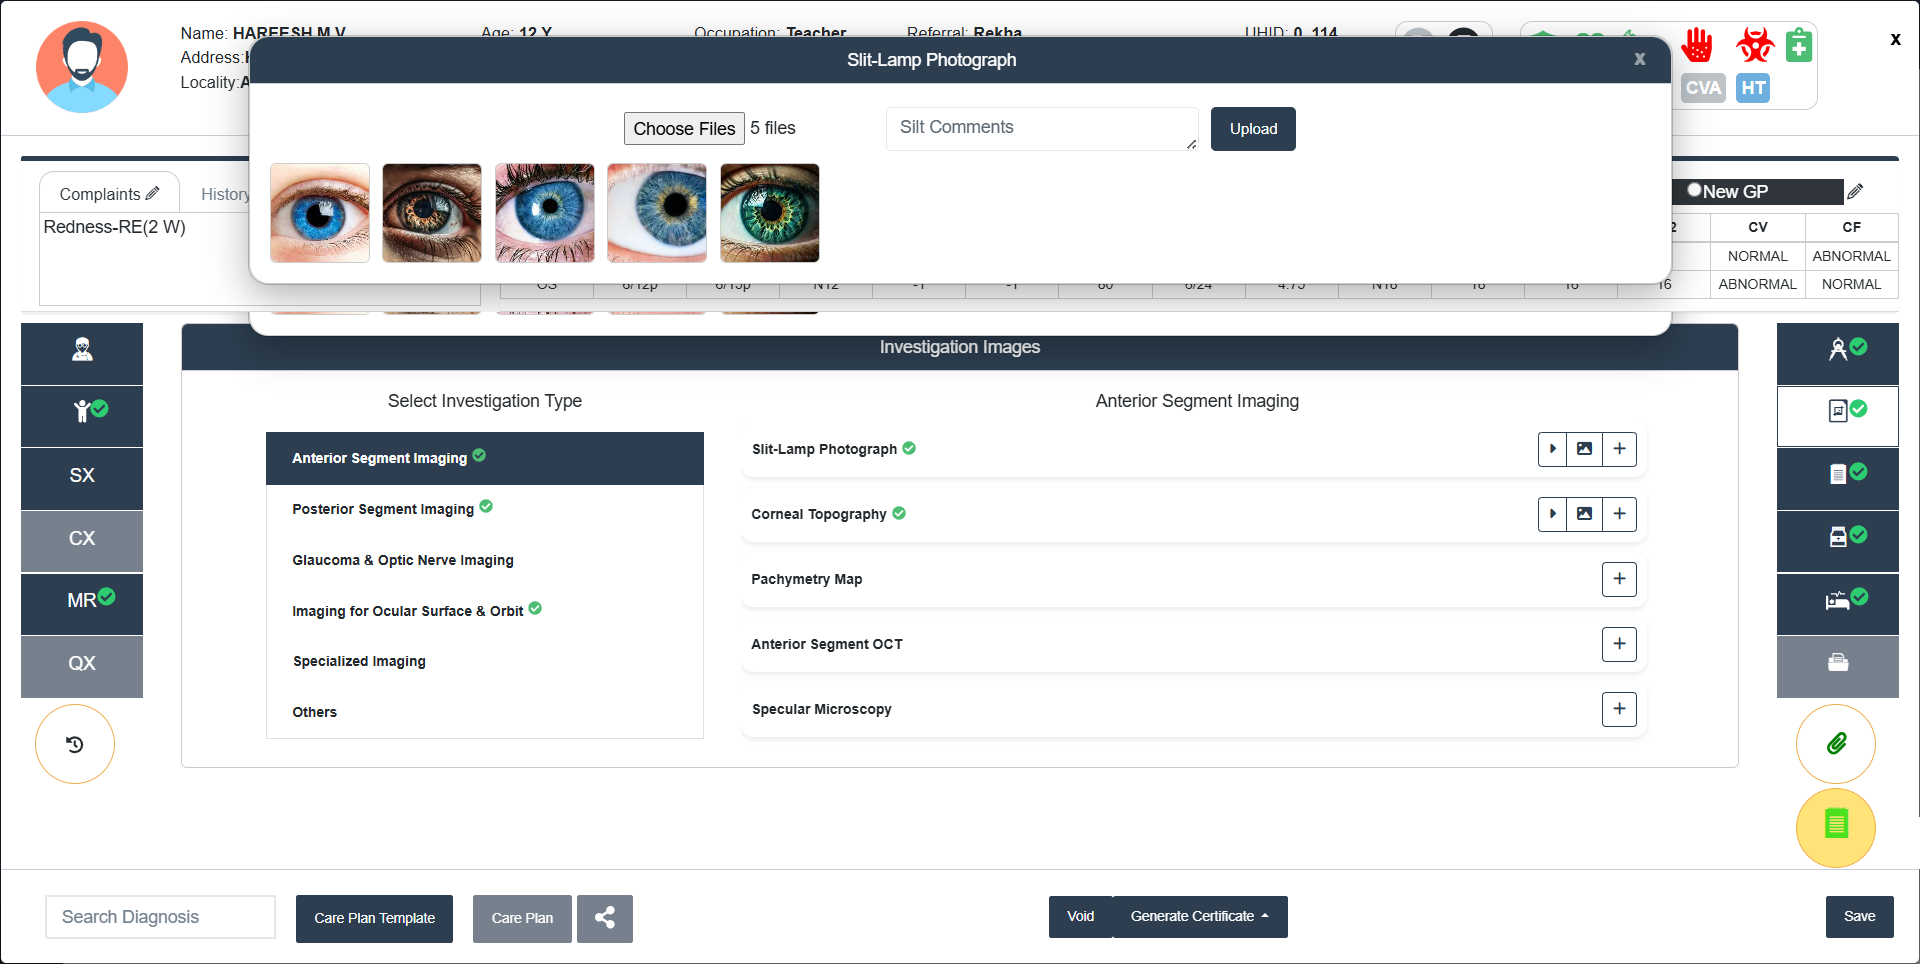
- Add Files:
- Click + icon at the right side of the Investigation Type Category.
- Choose File(s) from the Browser.
- Add Comments if any.
- Click Upload button to upload the selected files.
- A green tick will be appeared at the right side of the Investigation Type and Category after uploding file(s).
- List Files:
- Click the arrow (Play button) at the right side of the Investigation Type Category to list the files Uploaded.
- The files can be downloaded by cllicking on the corresponding image.
- The comments added at the time of uploading will be showed at the bottom of the image in a i hover.
- The files can be deleted by clicking the x button at the top right of the file(s).

- View Images:
- View Image icon will enable to view and compare images categorized into various tests.
- Normal View and Grid View is avialbel.
- Zoom In/Zoom Out/Undo Options are available for the enhanced view.
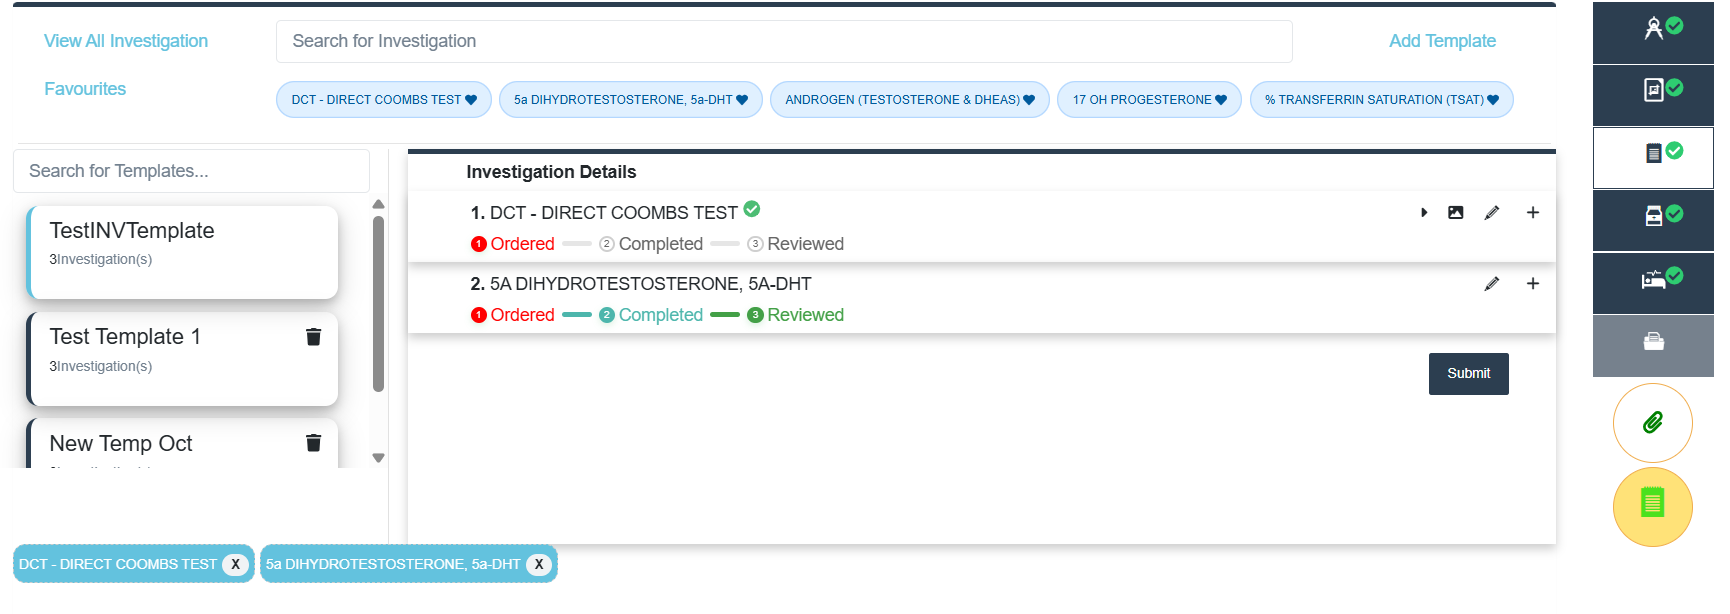
- Investigations
- View all Investigations(Including Price) by clicking the tab at the left top corner of the Investigation Screen. Tick the required Check boxes and then ‘Apply’. It will be listed in the Investigation details.
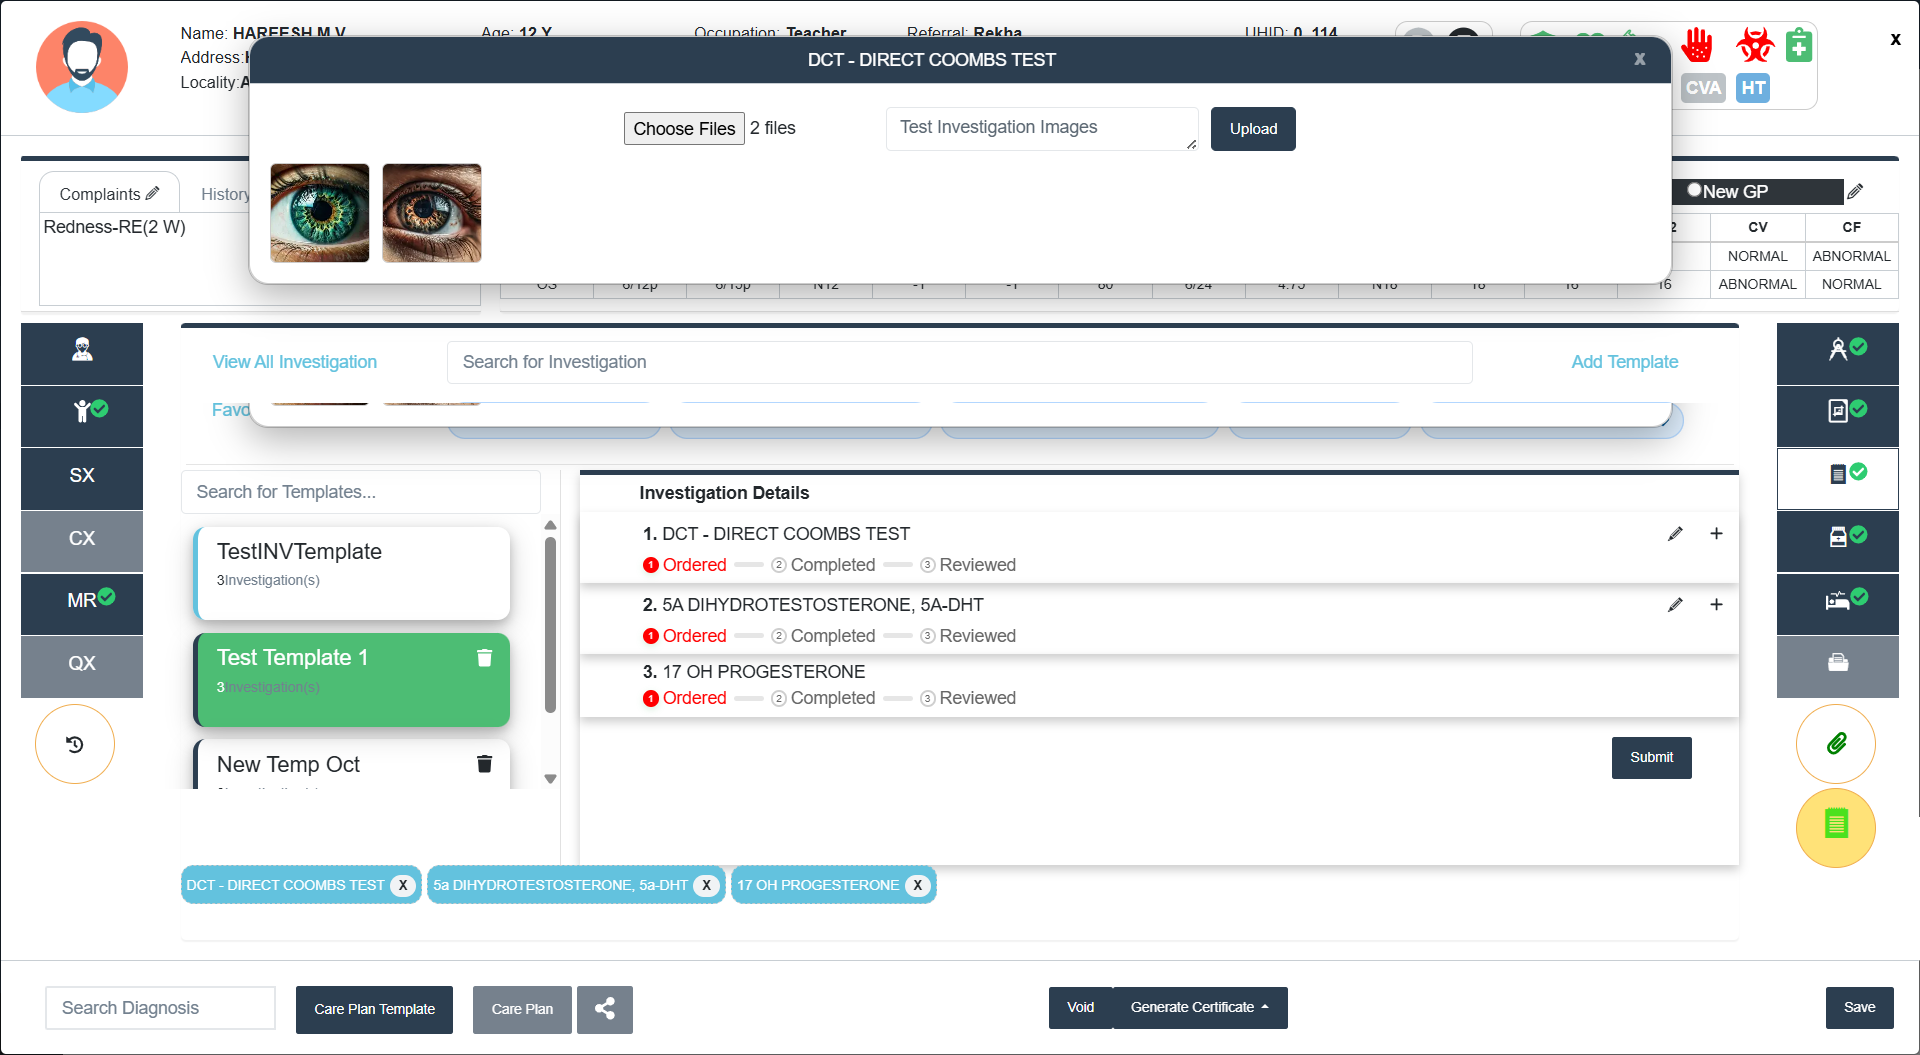
- There is an option to add Investigation Images by clicking + icon at the right side of the Investigation.
- A green tick indicator will be displayed at the corresponding investigation if any files are uploaded.
- List Files and View Images options will be available if any files are there in the Investigation.
- Save View:
- Investigation images can save to the Investigation Image Gallery.

- This option is availble in the View Image option.
- Click Save View button .
- Click Save to Image Gallery to save the image(s).
- It will be displayed under Investigation Images Section (Invetigation Type-Others).
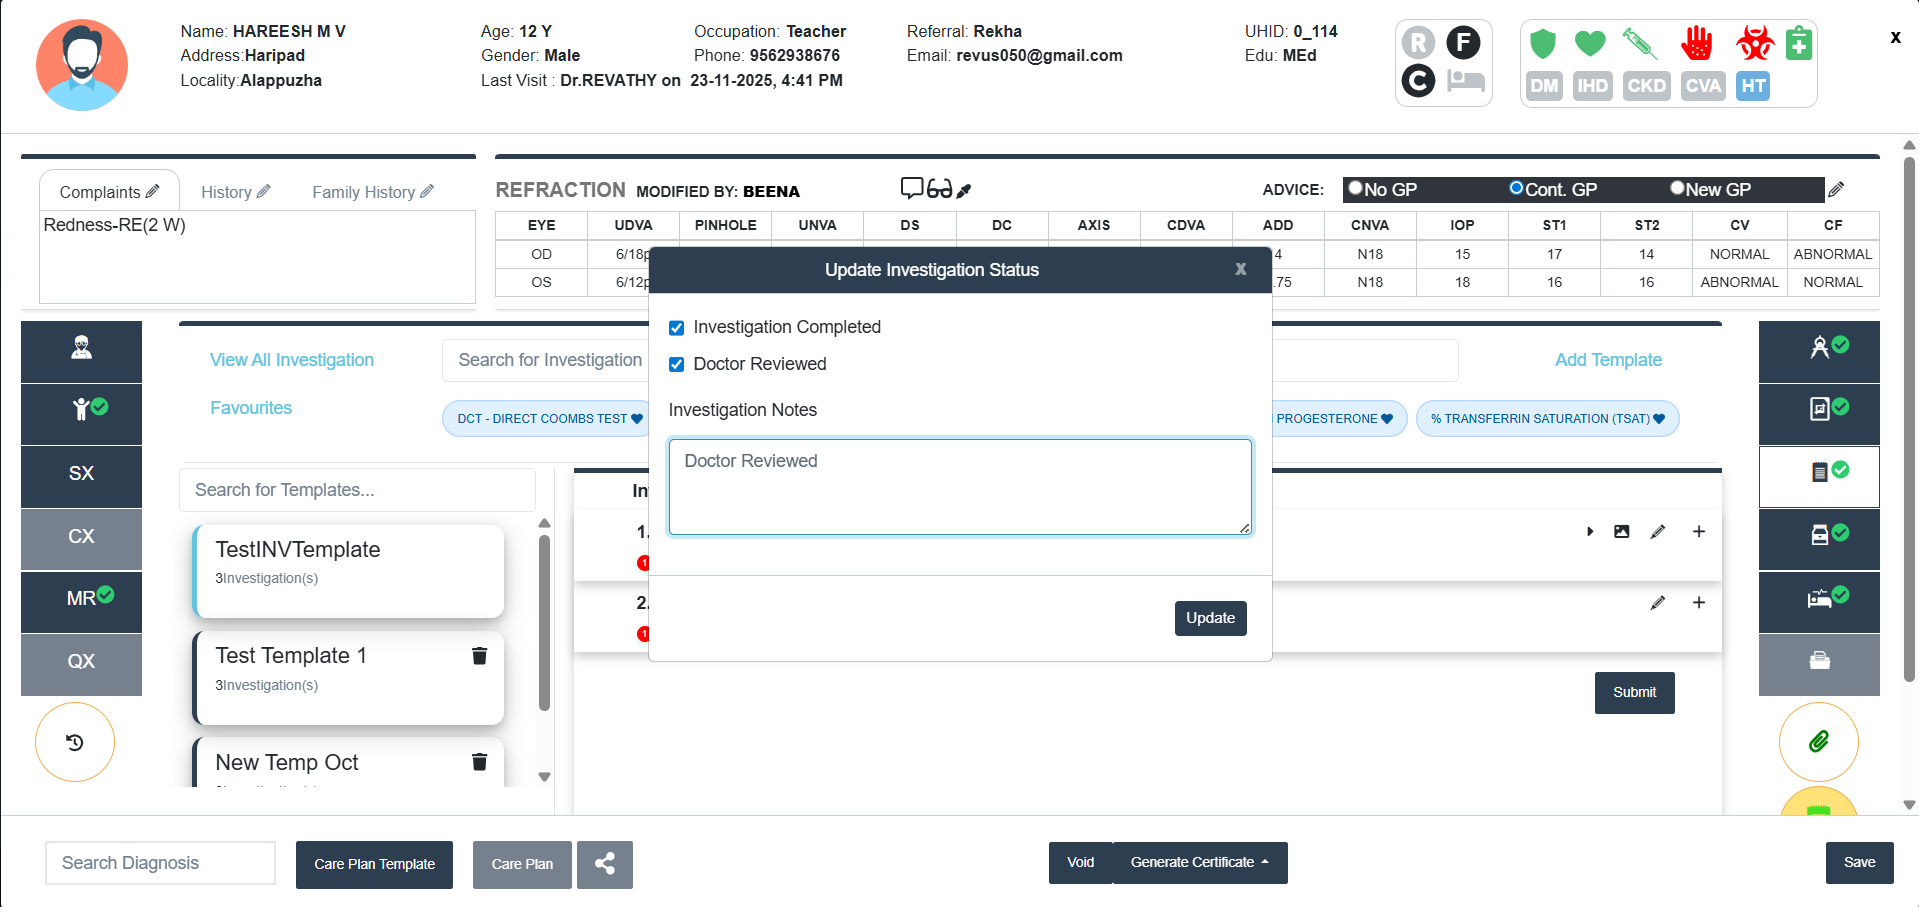
- Edit Details:
- Click ✎ (Pencil icon) to Update the Investigation Status.
- Tick the check boxes for Investigation Completed and Doctor Reviewed in the pop-up window if they are done.
- Add Investigation Notes if any.
- Click Update button to Update the Investigation Status.
- Search for Investigations: You can search any Investigations added from the search tab provided. To clear the search, click on the X button at the right corner of the search tab.
- Existing Investigation templates:
- Use the Search for Templates bar to filter investigation sets.
- The number of Investigations will be displayed in the Investigation Template
- Double Click a template name from the left list (Selected templates appers in Green colour)
- The right panel will display the list of Investigations in that Template.
- Click Submit to apply this investigation set to the patient.
- To Delete a Template, click the trash icon next to the Template name.
- Adding a New Investigation Template:
- Click Add Template (top right)
- Enter Template Name
- Add multiple investigations
- Save the Template
- Favorites:
- Favourites section added for investigation screens for doctor.
- It is auto populated based on the previous history.
- Click the favorites tab to select Investigation.
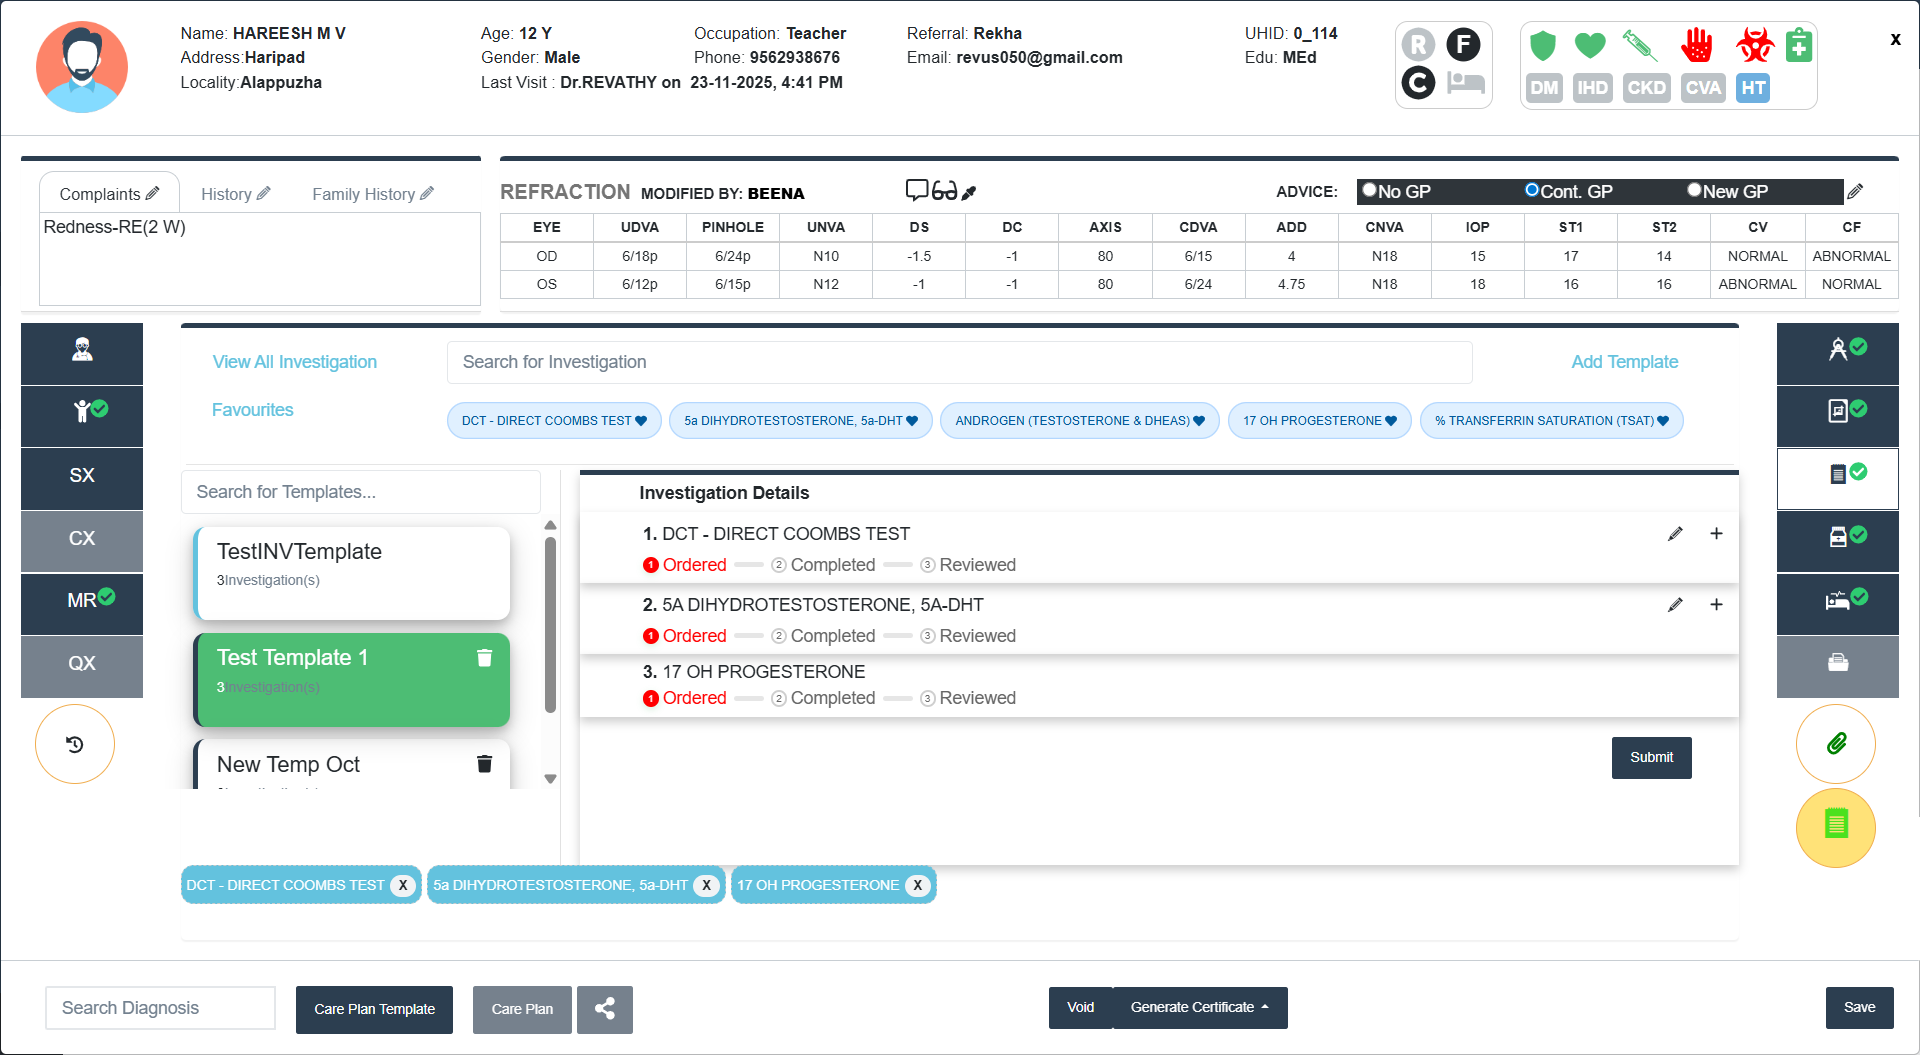
- Submit all the Investigations added.
- A toaster will appear as Investigation Prescription Details Added Successfully.
- Added templates will appear in a blue tab below the Investigation screen.
- To Delete the Investigation, click on the X button in the blue tab of Investigations.
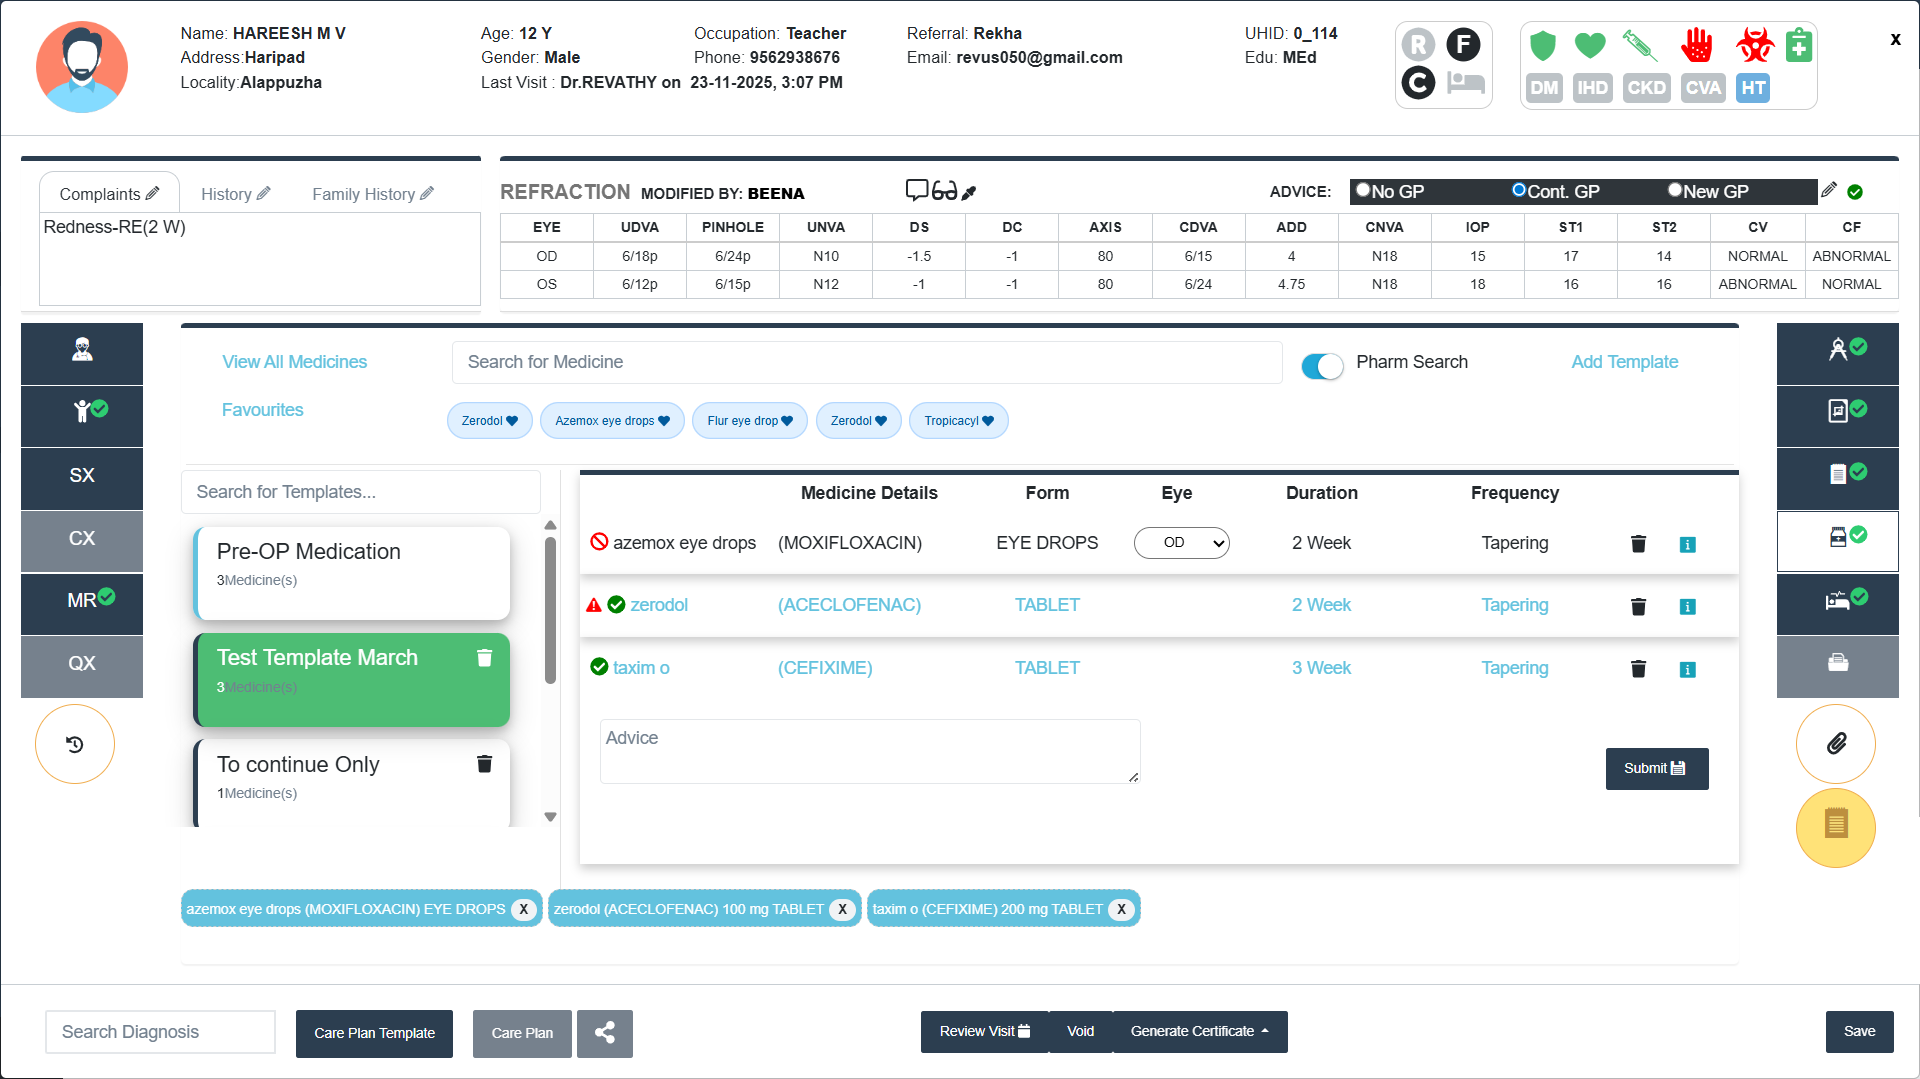
- Prescription
- View all Medicines (Brand name/Generic Name/Manufacturer/Form) by clicking the tab at the left top corner of the Prescription Screen. Click on the Add button to add a medicine to the list.
- Search for Medicines: You can search any Medicines added from the search tab provided.
- Pharm Search: You can search the medicines available in the Pharmacy. A pop-up appears with brand name, strength, generic name, and manufacturer.
- Select the Medicine from the pop-up and a Overlay panel appears. You can add duration/frequency/tapering (in weeks) there.
- Eye selection dropdown will appear first in the Add to List screen.
- Click Add to List to include this medicine in the main prescription table.
- For Eye drops/Eye Ointment there is an option to change the Eye (OD/OS/Both).
- There is a provision for writing the Advice if any.
- Existing Prescription templates:
- Use the Search for Templates bar to filter Prescription sets.
- The number of Medicines will be displayed in the Prescription Template.
- Double Click a template name from the left list (Selected templates appers in Green colour).
- The right panel will display the list of Medicines in that Template.
- Click Submit to apply this Medicine set to the patient.
- To Delete a Template, click the trash icon next to the Template name.
- Adding a New Prescription Template:
- Click Add Template (top right)
- Enter Template Name
- Add multiple Medicines
- Save the Template
- Favorites:
- Favourites section added for Prescription screens for doctor.
- It is auto populated based on the previous history.
- Click the favorites tab to select Prescription.
- Click Submit to save the Prescription.
- A toaster will appear as Drug Prescription Details Added Successfully.
- Added list will appear in a blue tab below the Investigation screen.
- When a doctor adds new medicines or makes changes in previous prescription, system highlights them in blue (similar to how it is displayed in the pharmacy). This feature is also applicable for the existing medicine with any change in Duration or Frequency.
- In cross referrals also, the new medicines will be highlighted separately to distinguish new prescriptions.
- In addition more information is available on click on the information “i” icon at the end of each medicine. This is also available for InPatient screens.
- To Delete the Prescription, click on the X button in the blue tab of Prescription.
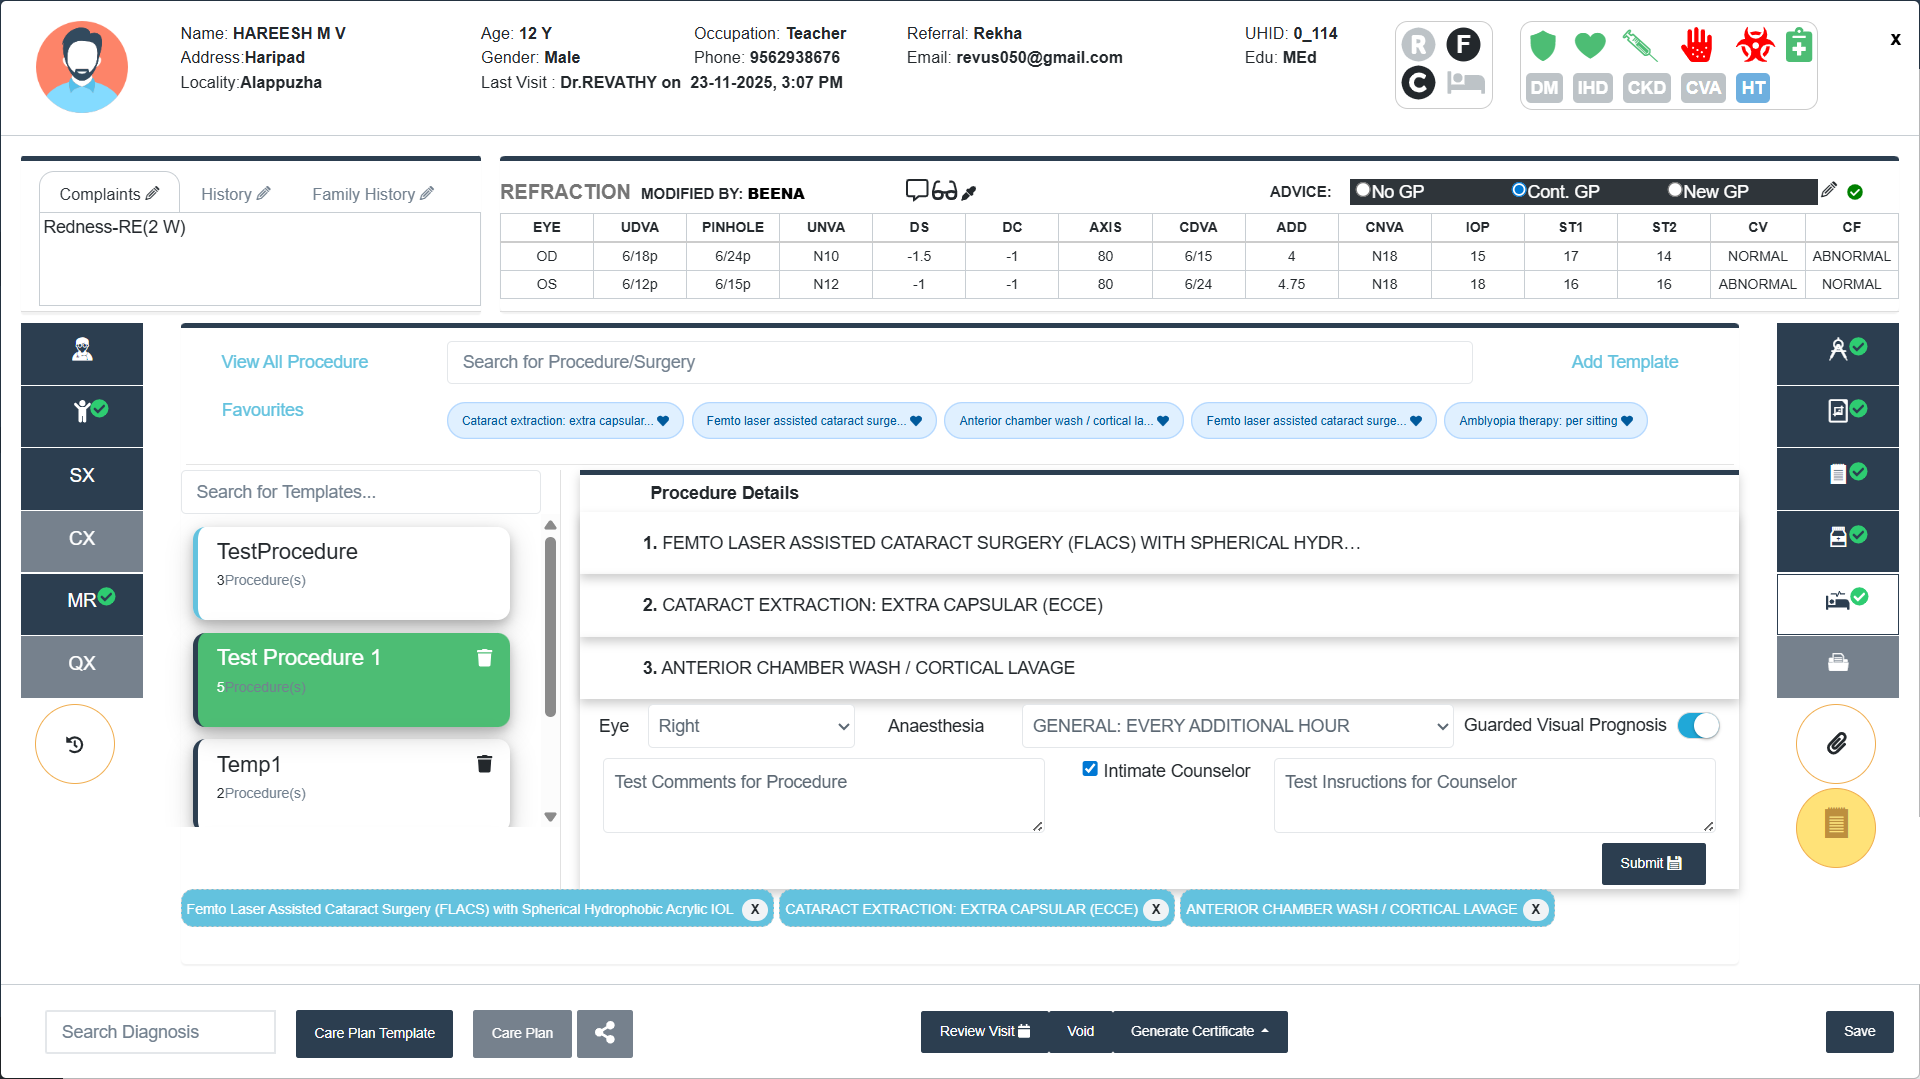
- Procedure/Surgery
- View all Procedures (Including Cost) by clicking the tab at the left top corner of the Procedure Screen. Click on the Add button to add a Procedure to the list.
- Search for Procedure/Surgery: You can search any Procedure/Surgery added from the search tab provided.
- Existing Procedure Templates:
- Use the Search for Templates bar to filter Procedure/Surgery sets.
- The number of Procedures will be displayed in the Investigation Template.
- Double Click a template name from the left list (Selected templates appers in Green colour).
- The right panel will display the list of Procedures in that Template.
- Click Submit to apply this Procedure set to the patient.
- To Delete a Template, click the trash icon next to the Template name.
- Adding a New Procedure Template:
- Click Add Template (top right)
- Enter Template Name
- Add multiple Procedure/Surgery
- Save the Template
- Select the Eye (Right/Left/Both) from drop-down.
- Select the Anaesthesia (General:Every additional hour/General/Local/Monitored Care (MAC)/ Sedation/Topical).
- Guarded Visual Prognosis Radio Button (On/Off)
- Add Comments if any
-
Intimate Counselor (Radio Button):
It allows the user to indicate whether a counselor needs to be informed or involved in the patient's case. If Selected this Option, the patient will move to Counseling Queue for more surgery proceedings. - Favorites:
- Favourites section added for Procedure screens for doctor.
- It is auto populated based on the previous history.
- Click the favorites tab to select Procedure.
- Click Submit to save the Procedure.
- A toaster will appear as Patient Procedures Added Successfully.
- Added list will appear in a blue tab below the Procedure screen.
- To Delete the Procedure/Surgery, click on the X button in the blue tab of Procedure.
Diagnosis Section
- Add the clinical diagnosis by using the Search Diagnosis bar at the bottom.
- Enter any key word (minimum 4 letters). A pop-up screen appears.
- Select Eye (radio button)-Right/Left/Bilateral
- Always double click to select a Diagnosis.
- View ICD Details Toggle: Click to view ICD detailed description.
- Click Add ICD Code/Diagnosis to add a new custom Diagnosis.
- Click Apply to add the Diagnosis.
- Use close, X icon to close the diagnosis panel.
Only after adding any of the Diagnosis, the Save Button will be Enabled.
Care Plan Template
- Search Template: Type keywords to filter and find specific care plan templates.
- Template List: Displays available care plan templates. Double Click on one to select.
- Eye Selection Options: Choose whether the plan applies to Right Eye/Left Eye/Both Eyes.
- The selected Diagnosis will appear at the bottom of the Clinical Examination Category Screen in a blue tab.
- To Delete the Diagnosis, click on the X button in the blue tab of Diagnosis.
- Favorites:
- Favourites section added for Diagnosis screens for doctor.
- It is auto populated based on the previous history.
- Click the favorites tab to select Diagnosis.
- Check Boxes: Check boxes for Quick Diagnosis (Normal Examination, Under Evaluation).
Add to Hold List/Cross - Referral (Left Side)
- Hold Patient:
- Click the Hold patient tab.
- Select Hold reason(s) (Dilatation/Investigation (Billing at Reception required)/ Investigation (Optom)/ Procedures).
- Select the Eye (Radio button: Right/Left/Both)
- Add comments if any.
- Click the Save icon.
- To close the Cross Referral panel, click the Close (X) button at the top right corner.
- The Patient will move to Hold queue.
- For Investigation (Billing at Reception required), the Receptionist need to generate the investigation first. Then only the Refractionist can pick the patient and then Dr pick will be enabled.
- Cross Referral:
Only available for patients picked by Dr. from the Waiting Queue.
- Click on the Cross Referral tab to open the referral panel.
- Select the Dr. From the drop-down menu under cross-referral.
- Choose the Referral Type:
- Do the needful: Select this if you want the referred doctor to take necessary action on the case.
- Opinion: Select this if you are seeking an expert opinion without transferring full responsibility.
- Click the Save icon.
- To close the Cross Referral panel, click the Close (X) button at the top right corner.
Attachments:
Can upload/View the attachments added by the Refractionist (both web and mobile app) and Dr.
Notes:
Refractionist/Dr can add notes. For adding to Day summary (MR), on the radio button for ‘Add to day Summary’ and save.
Void:
Can void Bill List (Search by Bill no.), Procedure List, Investigation List, Drug List, Refraction List and All PDF lists.
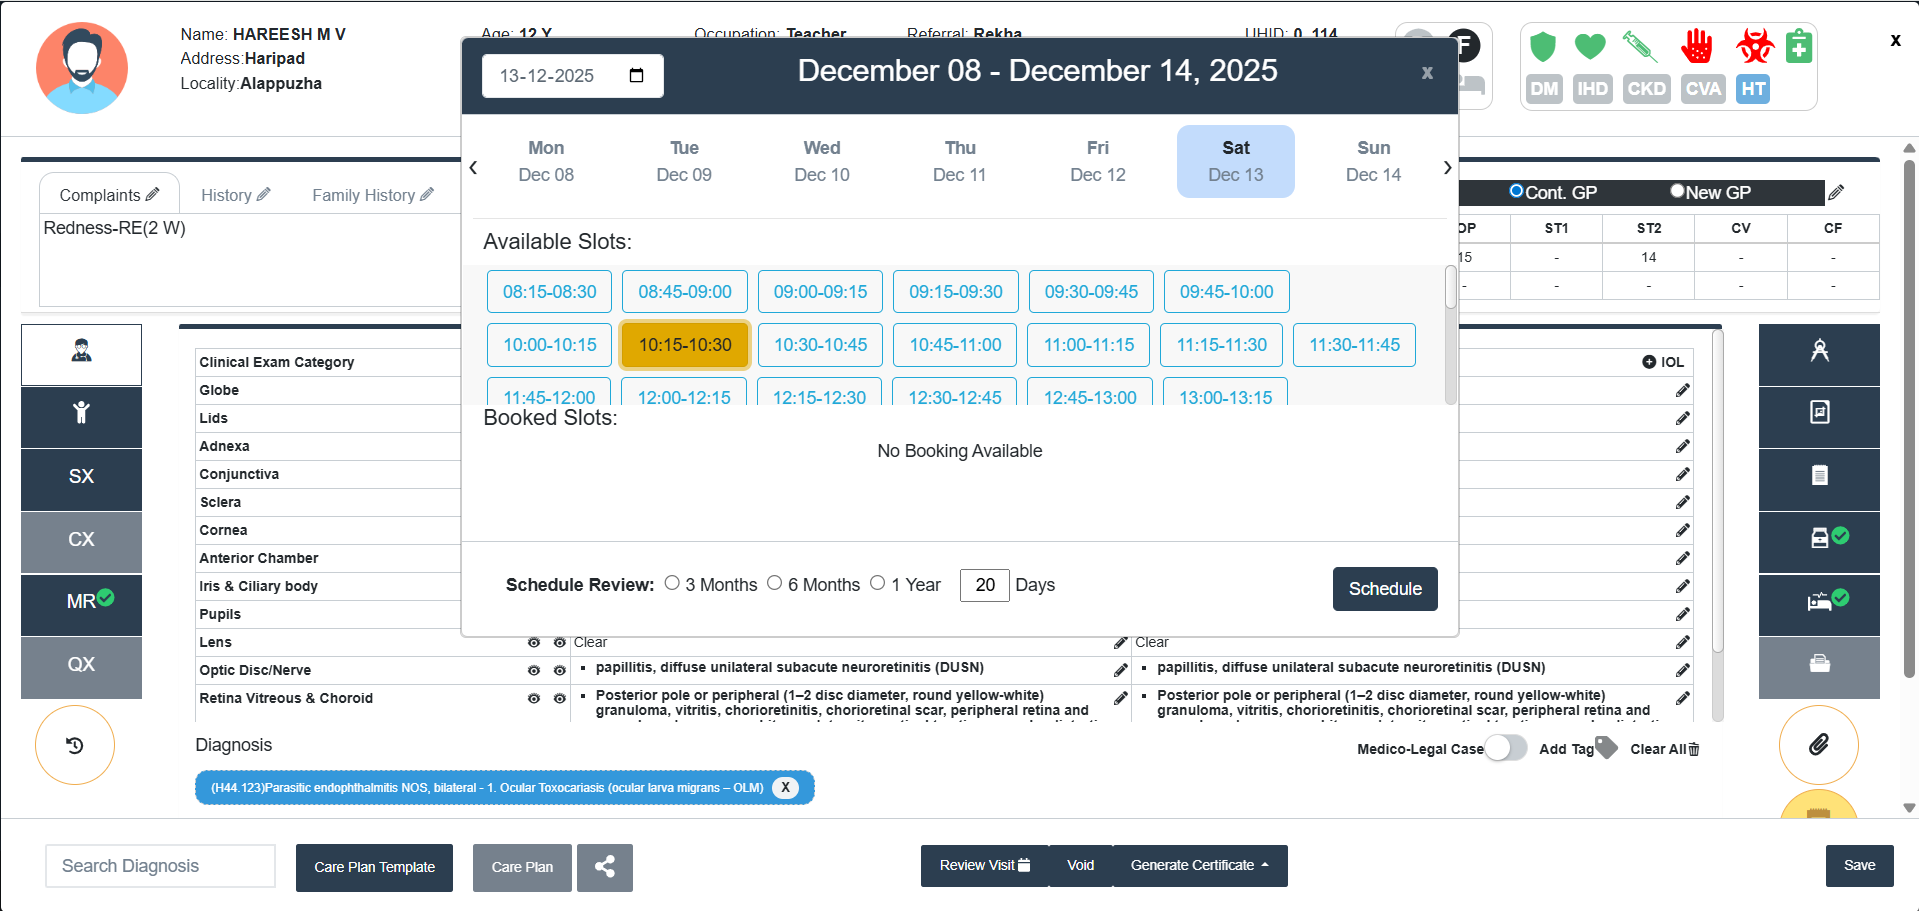
Review Visit:
- Dr can Schedule the Revisit date. (Not for Inpatient).
- The user can now select no of days to select an availability slot in addition to the current 3 months,6 months and 1 year options.
Generate Certificate:
Generate Medical/ Leave/ Visual Standards for Driving Certificates.
- Referral Letter:
- Referral:
- Click on Generate Certificate tab.
- Select Referral Letter.
- From that select Referral tab.
- Fill the essential details.
- Generate PDF
- To close the section, click Close tab.
- Clinic Sync:
- Click on Generate Certicate.
- Select Referral Letter.
- From that select Clinic Sync
- Add Clinic Details (Clinic Name/Phone no./Address)
- Add Dr Details (Optional)-Dr Name/Phone No./Registration No.
- Click Share tab to share the patient details to the clinic.
- Click Close tab to close the panel.
- Referral:
- Referral Response
- Contains latest Medical Records of the patient
- Follow the same steps of Referral Letter.
Care Plan
Generate/ Save & Print the care plan according to the diagnosis.
Print Prescriptions
- Print Investigation Prescrition/Drug Prescription/ All Prescriptions by clicking the ‘Print’ icon. There is an option to send these prescription to the Receptionist.
- Custom Print: Custom Print/ Preview is available for Patient details, Presenting complaints, Previous medical history, Refraction, Squint Eval, EOM, BSV Assessment, Clinical Exam, Drawings, Diagnosis, Investigation, Medicine, Prescription, Procedure/ Surgery, Advice.
- Check box: To select the particular item.
- + Button (right of the item): Preview
- Click View Preview to view the selected item
- To print the selected item, Click Generate PDF
- To go back to the previous page, click Back.
- Click Close tab to close the panel.
Medico-Legal Case Toggle:
Can edit the toggle that is enabled by the Receptionist/Dr.
Tag Patients:
Doctor's can add tags from the doctor screen by clicking on the tag icon just above the diagnosis.
Clear All:
To clear all the data entered, click Clear All tab with trash icon.
Close:
To close the Dr screen click Close tab.
1.Only after ‘Saving’ the data, Referral, Care Plan, Print Prescriptions are available.
2.You can close the Dr Screen by clicking the close 'X' button (with or without saving the data) at the top right corner of the screen.
3.Blue tick will appear in the side tabs (Left and Right) if data is available.
- Waiting Queue-View: View the patient details without picking the patient.
- Schedule List: Can View the scheduled patients for the day.
- Hold Queue: Can pick the patient from Hold Queue and update the details.
-
Surgery Queue:
Pick the patients for update inpatient details and discharge (Simple discharge flow).
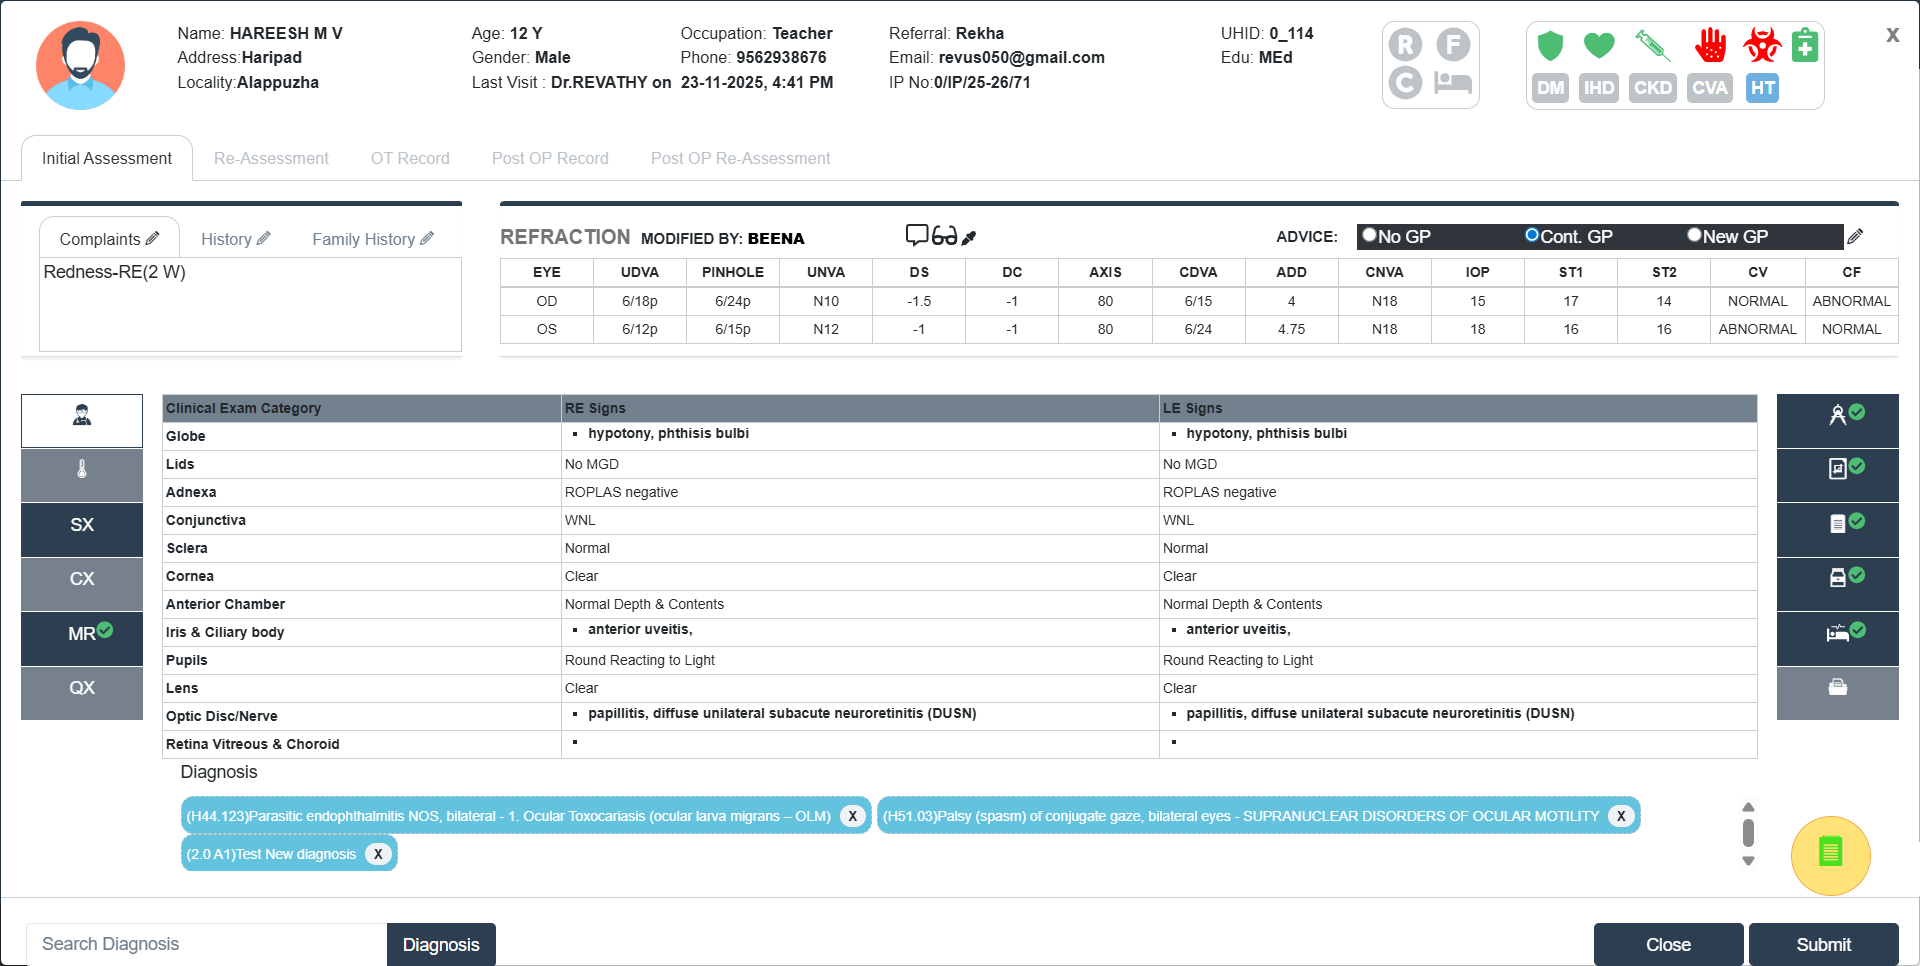
- This screen provides Patient Details and Admission Details with Patient Name, UHID, IP No., Procedure, Eye, Doctor Name, Scheduled Date, Reporting Time, Status (Patient is waiting/Last consulted by Dr, Last consulted by Nurse/ Anaesthesiologist etc.).
- Click View button to view the patient details (only View).
- Click Pick button to pick the patient from Surgery Queue.
- The Doctor screen will appear.
- This screen displays a detailed clinical profile of the patient, including past visits, clinical examination findings, and refraction data. It is primarily used during Initial Assessment, Re-Assessment, OT Record, and Post-Op visits.
- Edit details if needed and Click Submit button to save the Initial Assessment details.
- Select Re-Assessment tab to re-assess the patient before Surgery.
- Click Submit button to save the Re-Assessment details.
- Select OT Record tab. This screen documents surgical details including procedures performed, Surgical steps taken, Consumables used, and Intraoperative notes.
- 📌Patient & Surgery Overview
At the top of the screen, you’ll find the basic details:
- Surgeon: Displays the name of the operating surgeon.
- Reason for Admission: Auto filled.
- Eye: Indicates whether the surgery is on the left or right eye.
- Start Time / End Time: Surgery timing entries are to be filled in by the surgical team (select from date picker).
- Surgery Date: Displays the planned or actual date of surgery.
- Status: Shows the current status of the OT record (Pending or Completed).
- 📝Procedure Done: An input field is provided to enter the procedure name.
- 🧪Surgery Steps: Below the procedure field, a checklist allows selection of key steps that are part of the operation (If the Surgery steps added by the Super Admin).
- 💉Surgery Consumables:
- To the right, the section for entering consumables used during surgery is present. Users can:
- Search for consumables by brand name.
- Enter the batch number of the selected item.
- Specify the quantity used.
- Click Submit button to save the consumables added.
- If no consumables are added, the message “No Item Found” is shown.
- To the right, the section for entering consumables used during surgery is present. Users can:
- 📓OT Notes: A free-text field is available to write intra-operative notes.
- 🔍Diagnosis Section: Vie/Edit Diagnosis.
- 📌Patient & Surgery Overview
At the top of the screen, you’ll find the basic details:
- Click Submit button to save the OT Record.
- Select Post OP Record tab. This screen includes Surgeon Name, Reason for Admission, Eye, Date, Time and Status of the Surgery.
- Medication:
- Search and select medicine from the list.
- The Generic Name, manufacturer and form of the medicine will be displayed.
- Whether the selected medicine is available in Stock or not will be displayed in green colour next to the medicine name.
- Enter the Duration and Frequency of the medicine.
- Tick the check box (optional) if the medicine is for 4 week or 6 week tapering.
- Click Cancel button to cancel the medicine entry.
- Click Submit button in the Medicine adding pop-up screen to save the medicine.
- Drawings: Can draw clinical diagrams for left and right eye.
- Click Submit button to save the Post OP Record.
- Medication:
- Click Post OP Re-Assessment tab to re-assess all the Post OP parameters and Edit if needed.
- Click Submit button to save the Post OP Re-Assessment.
- Click Discharge button to discharge the patient.
If Admin has not enabled Simple Discharge flow, patient cannot be Discharged by the Doctor without Anaesthesia Notes.