Optical Manager
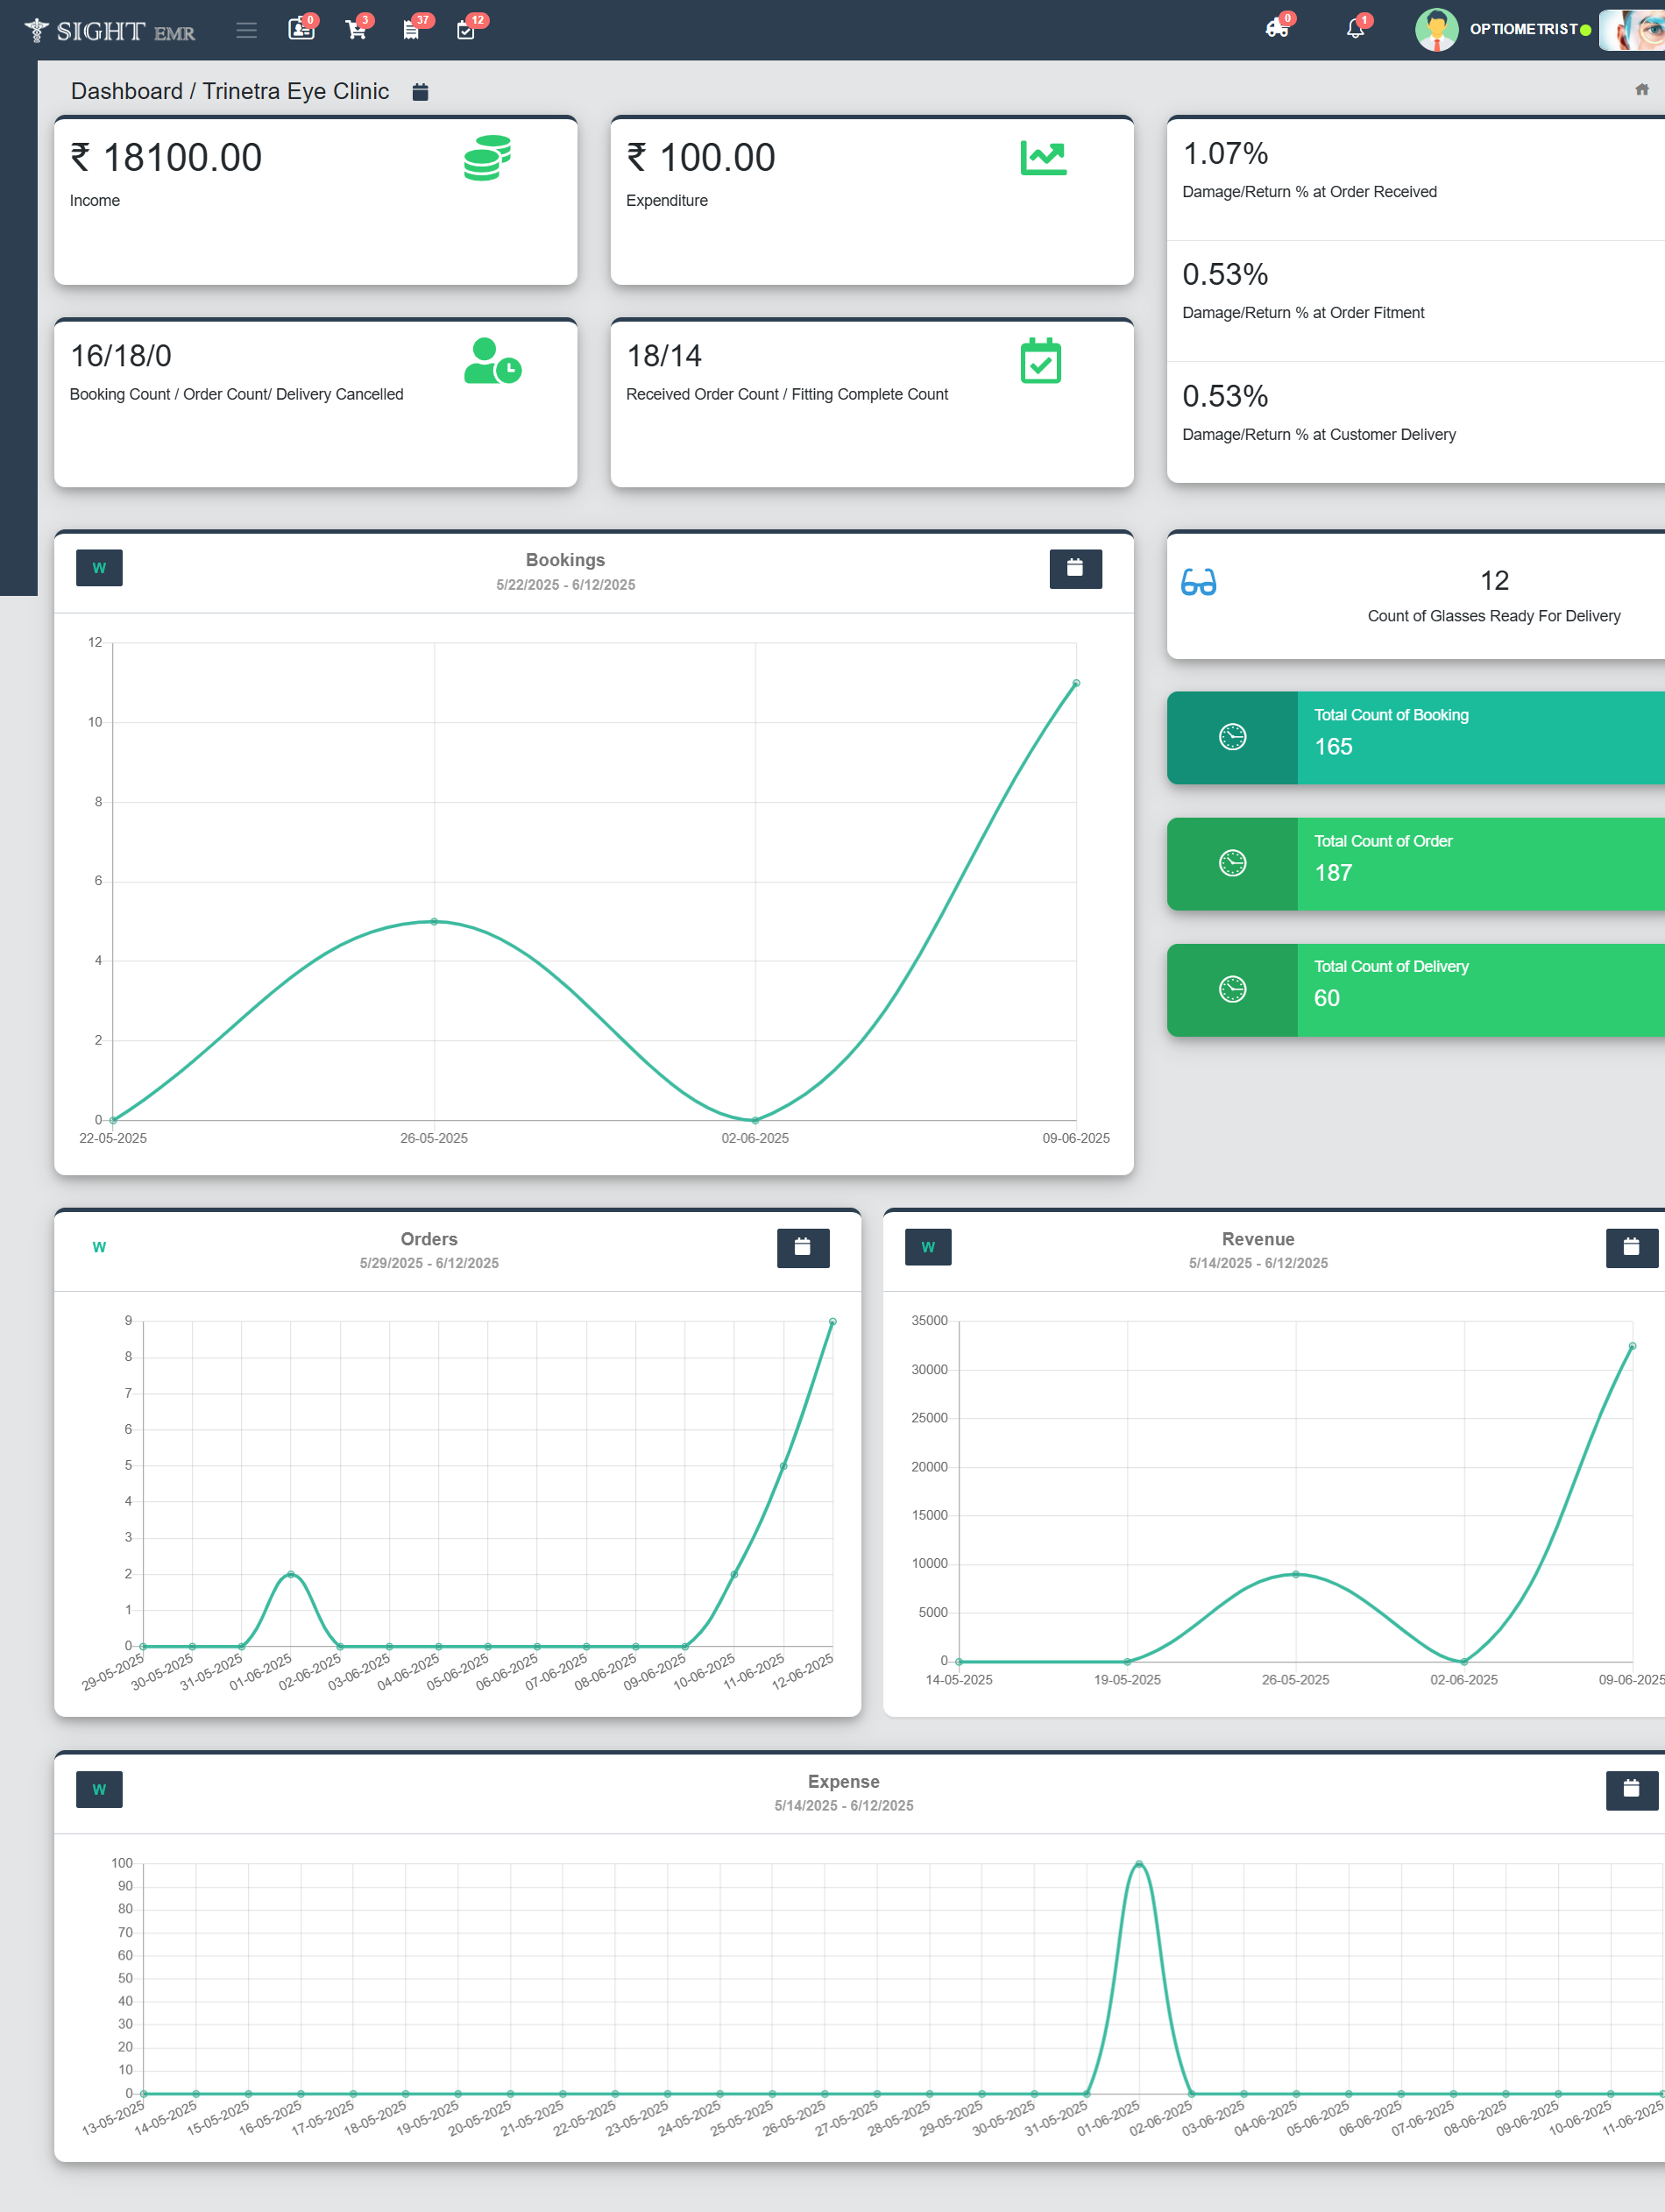
Dashboard Overview
-
View Income, Expenditure, Count (Booking/ Order/ Delivery Cancelled/ Received Order/Fitting Complete).
-
Statistics (Booking, Orders, Revenue, Expense Graphs).
Suppliers Module
Click on Suppliers (Side Nav) to Add a New Supplier and view the Supplier List.
- New Supplier
- Go to Suppliers (Side Nav)
- Select New Supplier.
- Fill the required supplier details such as Supplier name, Email, Pin code, Phone number, Address, Point of contact (with phone number and e-mail).
- Click Submit to register the supplier.
- Supplier list
- Go to Suppliers (Side Nav)
- Select Supplier List
- Search/View/Edit/Delete the Supplier details.
Products Module
From the left Navigation panel, click the Products icon (cart icon). A drop down menu appear with the following options such as New Product, Product List, Add Stock, Draft List.
New Product
This screen allows the user to create a new product entry in the system.
- Go to Products (Side Nav)
- Select New Product
- Add Product Information (Mandatory fields marked *)- Model Number, Product Name, Product Description, HSN Code, Product Manufacturer, Reorder level, Barcode ID, Warranty period (days).
- Select item type from the drop-down menu.
- For Frame: Add product specifications (optional) such as Height, Width, Shape, Dimension, Colour, Frame Type, material of the frame (Plastic/Steel/Titanium), Type of Rim (Full frame/ Half frame/ Rim less).
- Add Product Image (Optional).
- Click Submit to save the product.
Product List
- Go to Products (Side Nav)
- Select Product List
- View/Edit the Product Details.
- Product with Model no., Manufacturer, Barcode ID, Live Stock, Damaged Stock, Stock Purchased, Status and Stock Balance are listed.
- Stock Balance: Stock details are displaying with opening and closing balance
- Search by Model number, Product name, Barcode ID is available.
- Download Inventory Report: Can download the Optical Store Stock Report (Excel Report) by clicking the tab Download Inventory Report at the left bottom of the screen.
- Transfer/History tab: Transfer of any products and its status will be displayed.
- Click Transfer/History.
- View the Received/Transfered Products and see the status (Completed/Inprogress) by date wise.
- Click Transfer Now
- Enter and select the clinic name.
- Give Invoice number and Transfer date.
- Search and Select the product need to transfer. select the Quantity.
- The price fields are not editable.
- Click Add, + icon, to add extra product.
- To delete any product, Click Trash Icon at the left side of the row.
- Notes: Use this area to log any remarks or extra information about the transfer.
- Click Submit to tansfer the Product(s)to the branch clinic.
- The progress (Completed/Inprogress) will be shown in the Product List.
Only after accepting the transferred product by the branch clinic, the stocks will reduce from the main clinic. At the time of Transfer, there must be a minimum quantityu of stock.
Add Stock
- Go to Products (Side Nav)
- Select Add Stock
- Search Supplier Name
- Select the Supplier from the list.
- Add Invoice Number, Received date, Payment date, Payment Status, Payment method.
- To add the product, fill the required fields: Model number, Product Name, Item Type, Quantity, Product No., Expiry Date, MRP, Rate, Discount, GST (CGST, SGST, IGST).
- The total amount will be auto calculated based on rate, discount and GST.
- Click Add, + icon, to add extra product.
- To delete any product, Click Trash Icon at the left side of the row.
- Courier Charge: Enable checkbox if delivery/courier charges are applicable.
- Notes: Use this area to log any remarks or extra information about the transaction.
- Click Submit to finalize and add stock to inventory.
- Barcode can be generated and printed after submitting the data by clicking the Printer icon at the right side of the Model Number.
- Use Save as Draft to preserve the entry without updating inventory.
Draft List
- Edit the Product which is added as Save as Draft and Submit.
Stock Audit

- Go to Products.
- Select Stock Audit.
- A screen of Stock Audit List will be appeared with Audit Number, Created By, Created Date, Created Time, Audit Status (Completed/Pending).
- Filter: Date wise filter and Search by Audit Number is available.
- Action Buttons:
- New Stock Audit
- This screen is used for conducting physical audits of optical inventory.
- Barcode Search
- Search Field: Enter or scan barcodes to locate specific items in the inventory.
- Scanned Barcode will be displayed in a row (Blue colour).
- Barcode doesnot Exists Toaster will be appeared when entering an Invalid Barcode.
- Inventory Table Fields: Includes Barcode, Model Number, Product Name, Item Type, Product Number, Expiry Date, MRP, Physical Quantity, System Quantity (Live Count).
- Color Coding for Physical Qty
- Red Colour: Physical Quantity less than System Quantity.
- Orange Colour: Physical Quantity greater than System Quantity.
- Green Colour: Physical Quantity equals to System Quantity.
- New Stock Audit
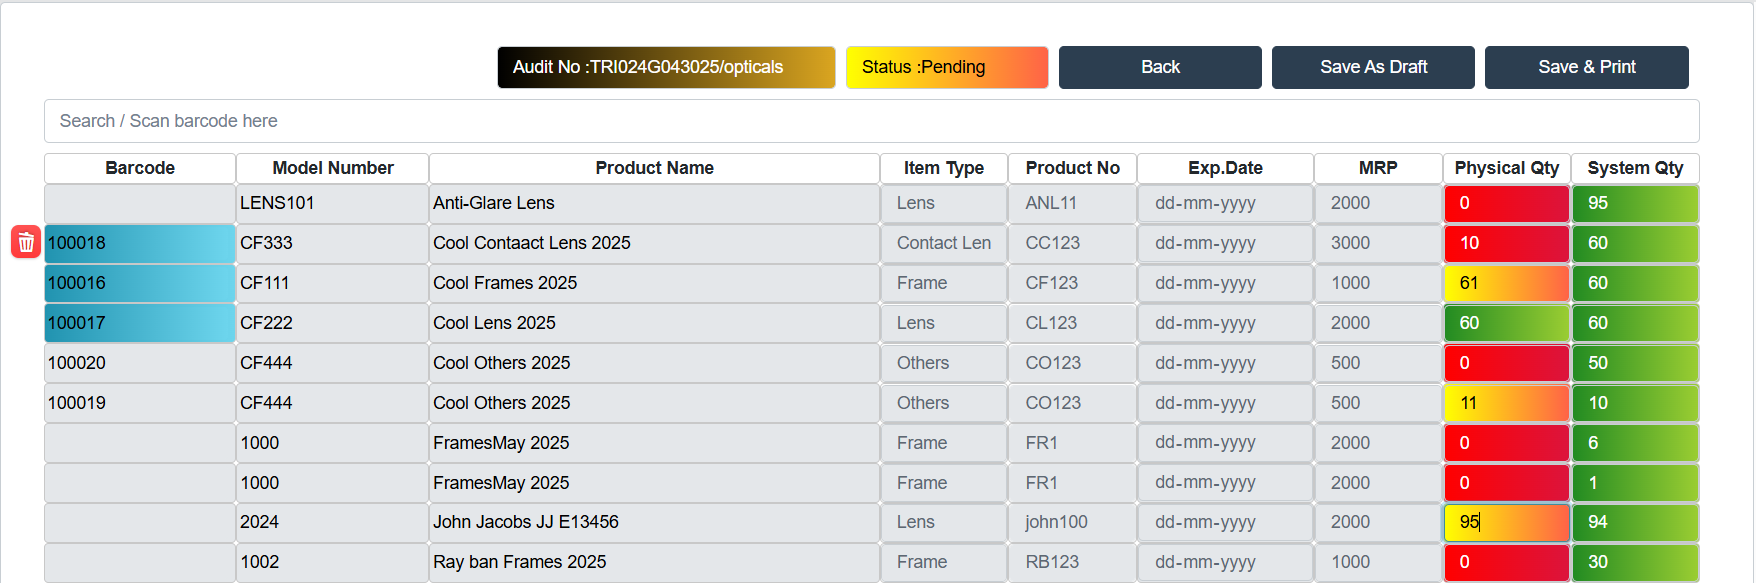
- Deleting an Entry: Click the red trash icon on the left to delete any incorrect entry.
- Common Actions
- Update Physical Qty: Click on the cell under Physical Qty and enter the audited count.
- Save Progress: Use Save as Draft if the audit is incomplete.
- Finalize Audit: Click Save & Print after confirming all entries.
- View Button: Can View and Print the scanned Barcode.
- Edit Button:
- This screen is used for conducting physical audits of optical inventory and comparing the physical count with the system count.
- Filter: Date wise filter and Search by Audit Number is available.
- Header Section
- Audit No: Displays the unique audit identifier.
- Status: Indicates the audit progress.
- For Edit Audit Stock, follow the steps same as that in New Stock Audit.
- Action Buttons:
- Back: Return to the previous screen.
- Save as Draft: Save the current state without submitting.
- Save & Print: Finalize the audit and generate a printable report.
- This screen is used for conducting physical audits of optical inventory and comparing the physical count with the system count.
- Added stock will be listed in Purchased History.
- Courier charge will be listed in Expense List.
Purchase History
- Go to Purchase History (Side Nav).
- Select Purchase History (Cart icon).
- Added Stocks with Details (Model No./ Product Name/ Purchase date/ Product no./ Quatity/ Expiry date/ Payment (Payment status and Payment method), Supplier name/ Supplier Phone No., return Status) are listed here.
- Search Stocks date wise by Model Number/Product name.
- Click View to see the Purchase History (Supplier details, Invoice details, Payment details).
- Barcode can be generated and printed from Purchase History by clicking the Printer icon at the right side of the Model Number. Fill the required count. Then click OK to print the barcode.
Purchase
-
Expense Invoice (New Expense)
- To add any Optical Store Expenses
- Go to Purchase.
- Select Expense Invoice.
- You can either search the Existing Supplier Name or add a New Supplier Name with Phone no. and Address.
- Select the Payment Status (Paid/Not Paid).
- Select Payment Method (Cash/ Card/ Online)
- Add Batch Number.
- Enter the Item details :Item No., Item Name, Item Type (Frame/Lens/Others), Quantity, Price, discount, GST (CGST,SGST,IGST).
- The Total Amount will be auto calculated based on rate, discount and GST.
- Fill the Required fields such as purchased On, Purchased By, Supplier GST Number, Invoice number, Total Amount Paid.
- Click Save to finalize and add to Expense.
- Use Save as Draft to preserve the entry without updating Expense.
- To add any Optical Store Expenses
-
Expense List
- All the Expenses and Stock Purchased List are listed here (Invoice Number, Supplier Name, Purchased On, Total Quantity, Invoice Status, Total amount, Paid amount, Pending amount).
- Click View to see the Expense details of each Expense with Supplier details, invoice details, Payment details.
- Barcode can be generated and printed from Purchase History by clicking the Printer icon at the right side of the Model Number. Fill the required count. Then click OK to print the barcode.
- Edit the Product which is added as Save as Draft and Save.
- Filter: Filter option is available ath the top right corner (Green Colour).
- Click Filter.
- Search according to Date Range, Invoice number, Invoice Status (Draft/Invoice/Both) and Supplier are available.
- Download the Expense list as Excel and PDF.
- Barcode Printing available from Add Stock/ Purchase History/Expense List.
- Once Barcode is genearted for an item, it will not be changed.
- **The barcode of an item generated from the head clinic will remain the same when it is transferred to the other branches.
- Barcode search is available in Invoice screen and Booking screen
-
Purchase Request List
- Accessing Purchase Request
- From the left side menu, click on the Purchase icon → Select Purchase Request List.
- Accessing Purchase Request
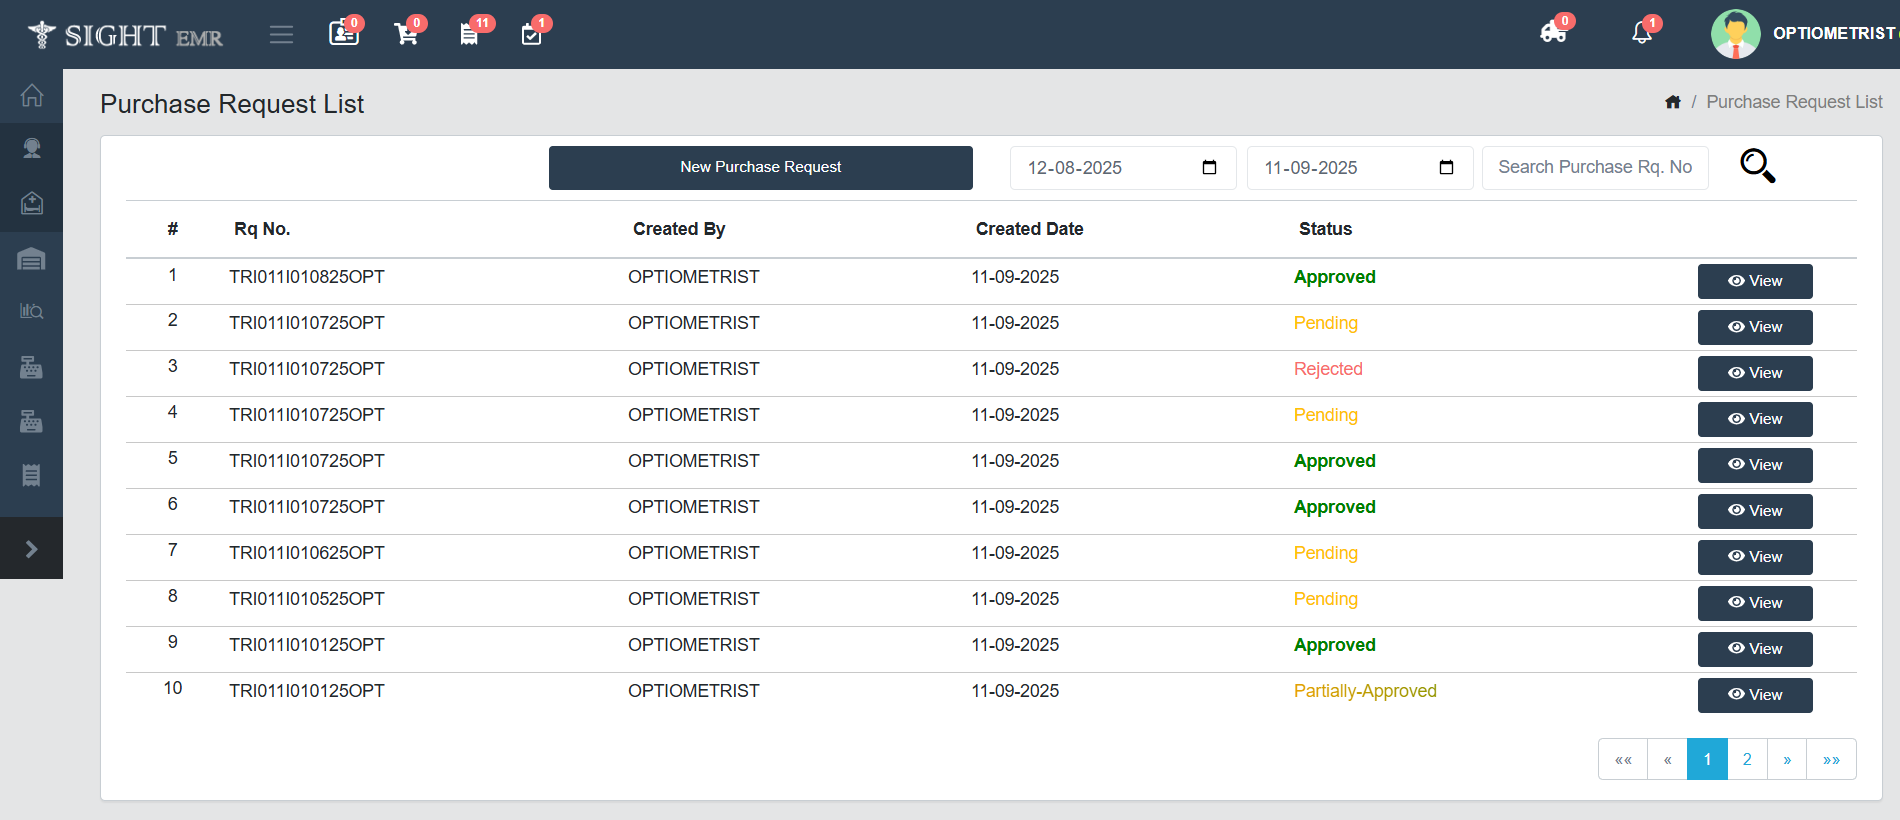
- You will see the Purchase Request List screen, which displays all requests with their Request Number, Creator, Created Date, and Current status.
- Status types include:
- Pending - Waiting for approval.
- Approved - Fully approved.
- Partially Approved - Some items approved, some pending.
- Search by Date and Purchase Request number is available.
- Creating a New Purchase Request
- On the Purchase Request List page, click the New Purchase Request button at the top of the page.
- The New Purchase Request form will open.
- Filling Out a New Purchase Request
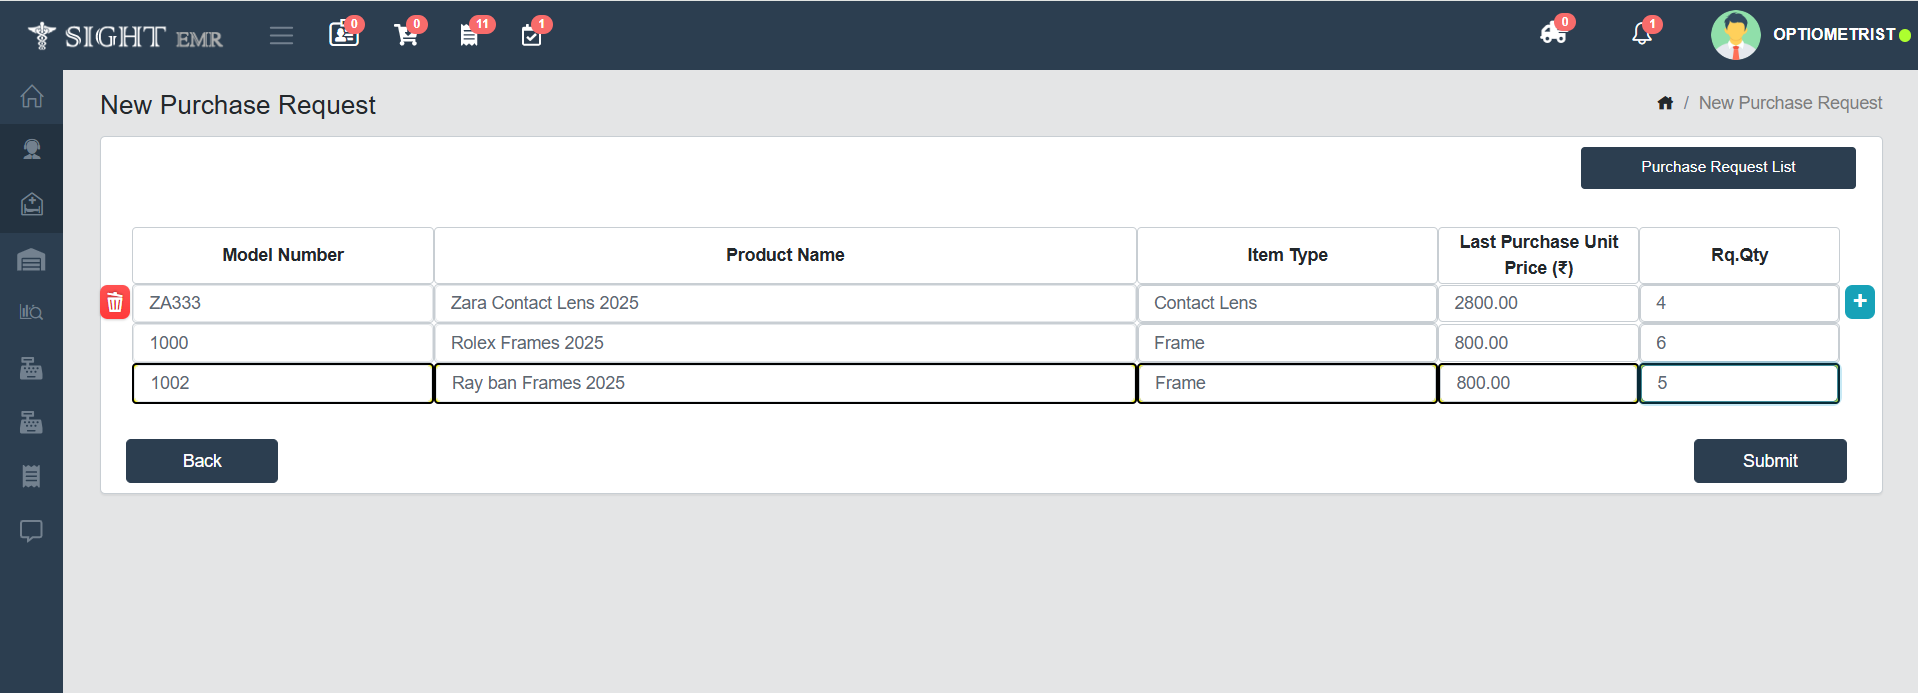
- Enter the Model Number of the product and select the item from the list.
- The Last Purchase Unit Price will be shown for reference.
- Product Name, Item type and Last Purchase unit Price will be autofilled and can be Edited.
- Enter the Requested Quantity (Rq.Qty) that you want to order.
- Submitting the Request
- After entering all details, click on the Submit button.
- The request will be saved and shown in the Purchase Request List with a unique request number.
- Back Button - Returns to the Purchase Request List without saving.
- You can track the request status as Pending, Approved, or Partially Approved.
- Viewing Purchase Requests
- In the Purchase Request List, each request has a View button.
- Click View to check the details of the selected purchase request.
- Navigation
- Date Filter - You can filter purchase requests by date.
- Search Option - Enter the Purchase Request Number to quickly find a request.
The Purchase Request List can Approve/Partially Approve/Reject only by Purchase Manager.
New Customer
- Add Customer
- To add a New Customer for Booking.
- Enter Customer details ( Name, Age, Gender, Phone number, Pincode, Address, Email and Refered Dr.).
- Add Optical Prescription
- Drop down is available for Refraction - OD & OS (Fields available for Refraction And Manifest - DS,DC,AXIS,CDVA, ADD, CNVA).
- To add an Existing Customer for Booking.
- Search Name/UHID/Phone No. and Select the Customer. The Details will be auto filled.
- Copy Refraction Data: You cannot add the Refraction data Manually. copy the Refraction data added by the Refractionist/Dr (Last added Data).
- Clear Customer Details: Clear all the details of the customer including Refraction.
-
Add Lens and Frames Details
- Lens:
- Search Lens details from the Stock and select "OR" eneter a New Lens details.
Option 1: For Lens added from Stock.
- Search for the lens and select one item. (Name, Model No., Remaining stock, Product No., ItemType, MRP, Barcode ID will be showed in the drop down list).
- Lens MRP, Lens Unit Price, CGST, SGST, Lens Price will be auto filled.
Option 2: For a New Lens (not in Stock).
- Enter all the Lens Details (Lens Model No., Lens Model Name*, Lens Type*: Drop down, Lens manufacturer, Lens shape, Lens Index, MRP, GST, Discount etc.).
- Select Lens Type: Progressive/ Single Vision/ KBF (Mandatory) from the Drop down list.
- Select Discount Type (Flat/Percentage), if any and enter the Lens Discount amount.
- Adjust Lens Price Radio Button: You can adjust the Lens Price by enabling the Adjust Lens Price radio button. But the Lens Discount field will be disabled (auto filled according to the Lens Price).
- Check Boxes: Check boxes available for Coating Options (BC, HMC, HC, NV).
- Frames:
- Search Frames details from the Stock and select "OR" enter a New Frame details.
Option 1: For Frames added from Stock.
- Search for the Frames and select one item. (Name, Model No., Remaining stock, Product No., Item Type, MRP, Barcode ID will be showed in the drop down list).
- Frame MRP, Frame Unit Price, CGST, SGST, Frame Price will be auto filled.
Option 2: For a New Frame (not in Stock).
- Enter all the Frame Details (Frame Model No., Frame Model Name, Frame Type, Frame Manufacturer, Frame shape, Discount etc.).
- MRP and Adjust Frame Price radio button fieldd will be disabled for this Option.
- Lens:
- Payment Details
- Total Amount, Discount and Pending Amount field will be auto filled according to the details entered in the Lens and Frames details.
- Add Paid Amount if the Customer needs to pay an Advance.
- Select Payment Mode from the drop-down. (Not Paid/Cash/Card/Online/Split Payment).
- For the patients having Wallet Balance, the balance amount in the wallet will be displayed in a Yellow Box at the bottom of the Payment Mode.
- Select the Expected Date.
- Add Special Instructionss if any.
- Click Submit.
- The Customer will move to Booking List.
- Click Print Prescription to generate the prescription if applicable.
- Advance Invoice: Generates an invoice based on the advance payment information.
- Close: Close the Current page.
- To add a New Customer for Booking.
- Lens Quantity, Lens Unit Price and Lens Price are non-editable
- Wallet is enabled only for Split Payment.
Glass Prescription List (1st Queue)
- This screen allows users to view, filter, and manage glass prescriptions recorded for patients prescribed by Refractionist/Dr. over a specific period.The lIst contains Patient Name, UHID, Created by (Refractionist/Dr.), Doctor Name, Patient Email/Phone No., Date of Prescription.
- Patients with New GP/CGP will be listed in the optical store only after the doctor reviews and saves the refraction data. Patients will not appear on the optical store list if Refractionist only has saved the refraction data.
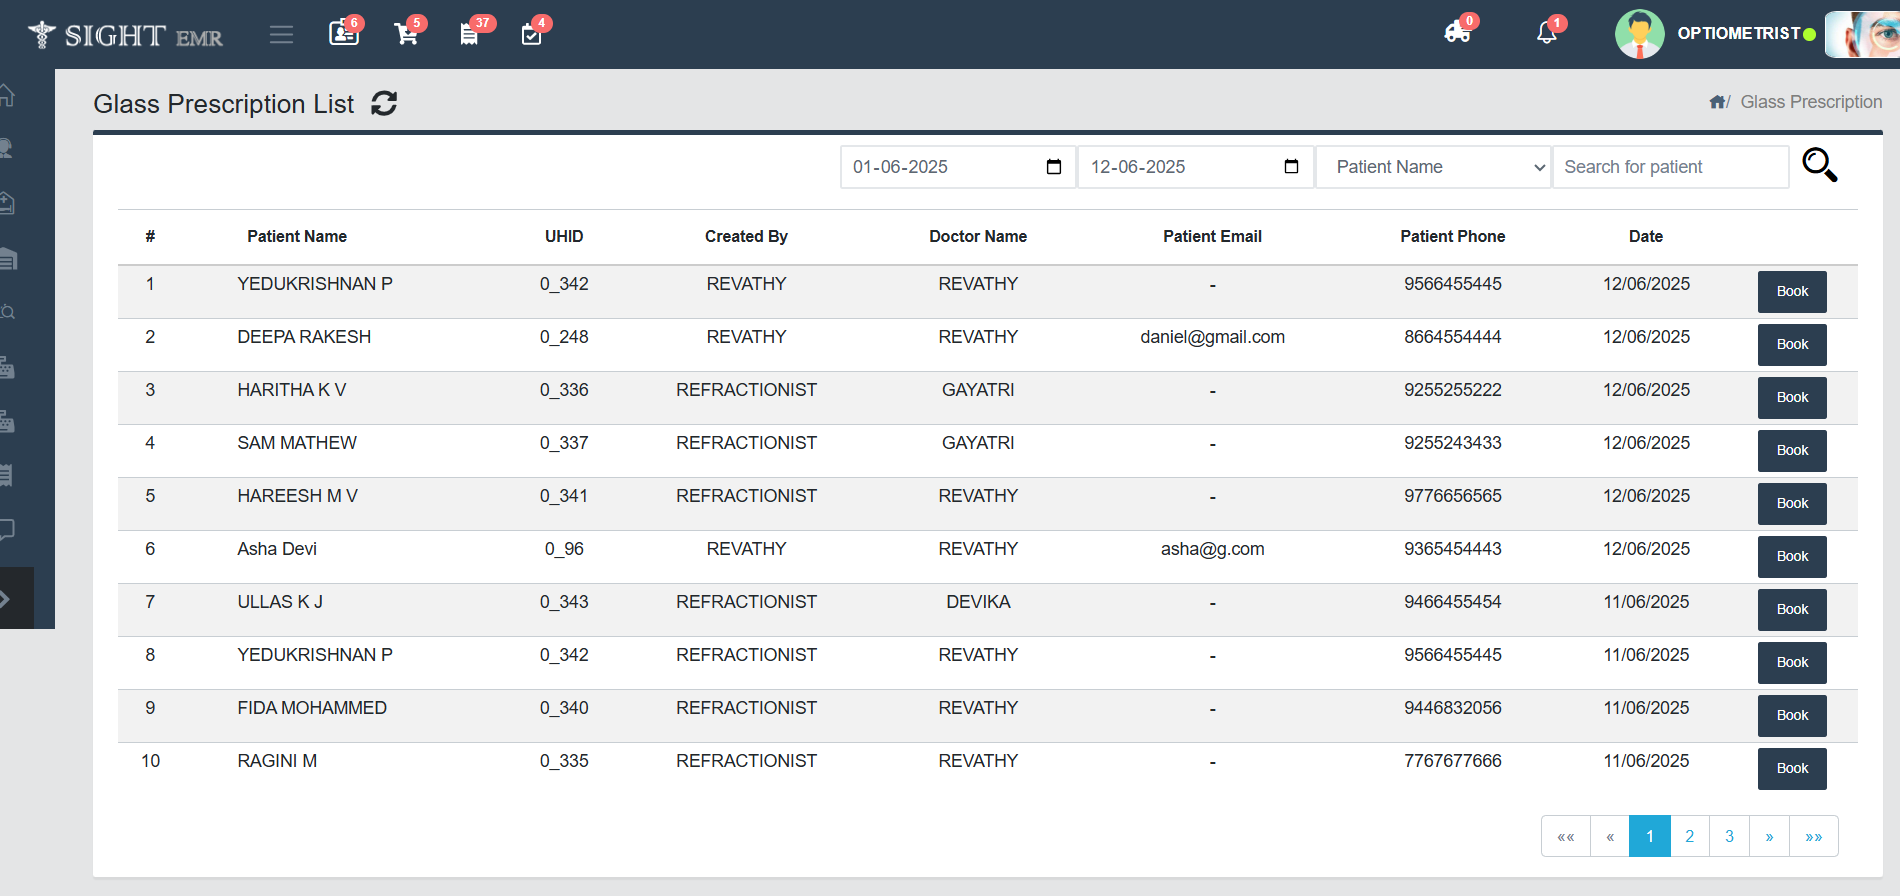
- Search Box: Enter full or partial patient name to search.
- Search Icon: Click this icon to apply the selected filters.
- Refresh Icon: Reloads the full list and clears filters.
- Book: Click Book tab for booking the Glass Prescription of the Patient.
- The Patient details, Optical Prescription and Instructions can see in the Booking screen.
- Add Lens & Frames Details.
- The Order will move to Booked List
- Cancel: To remove the customer prescription from the Glass Prescription list.
Booked List (2nd Queue)
- This screen displays all bookings made (with Patient Name, UHID, Booking Number, Booked Date,Expected Delivery Date) within a specified date range. It allows users to view, manage, and take action on patient orders.
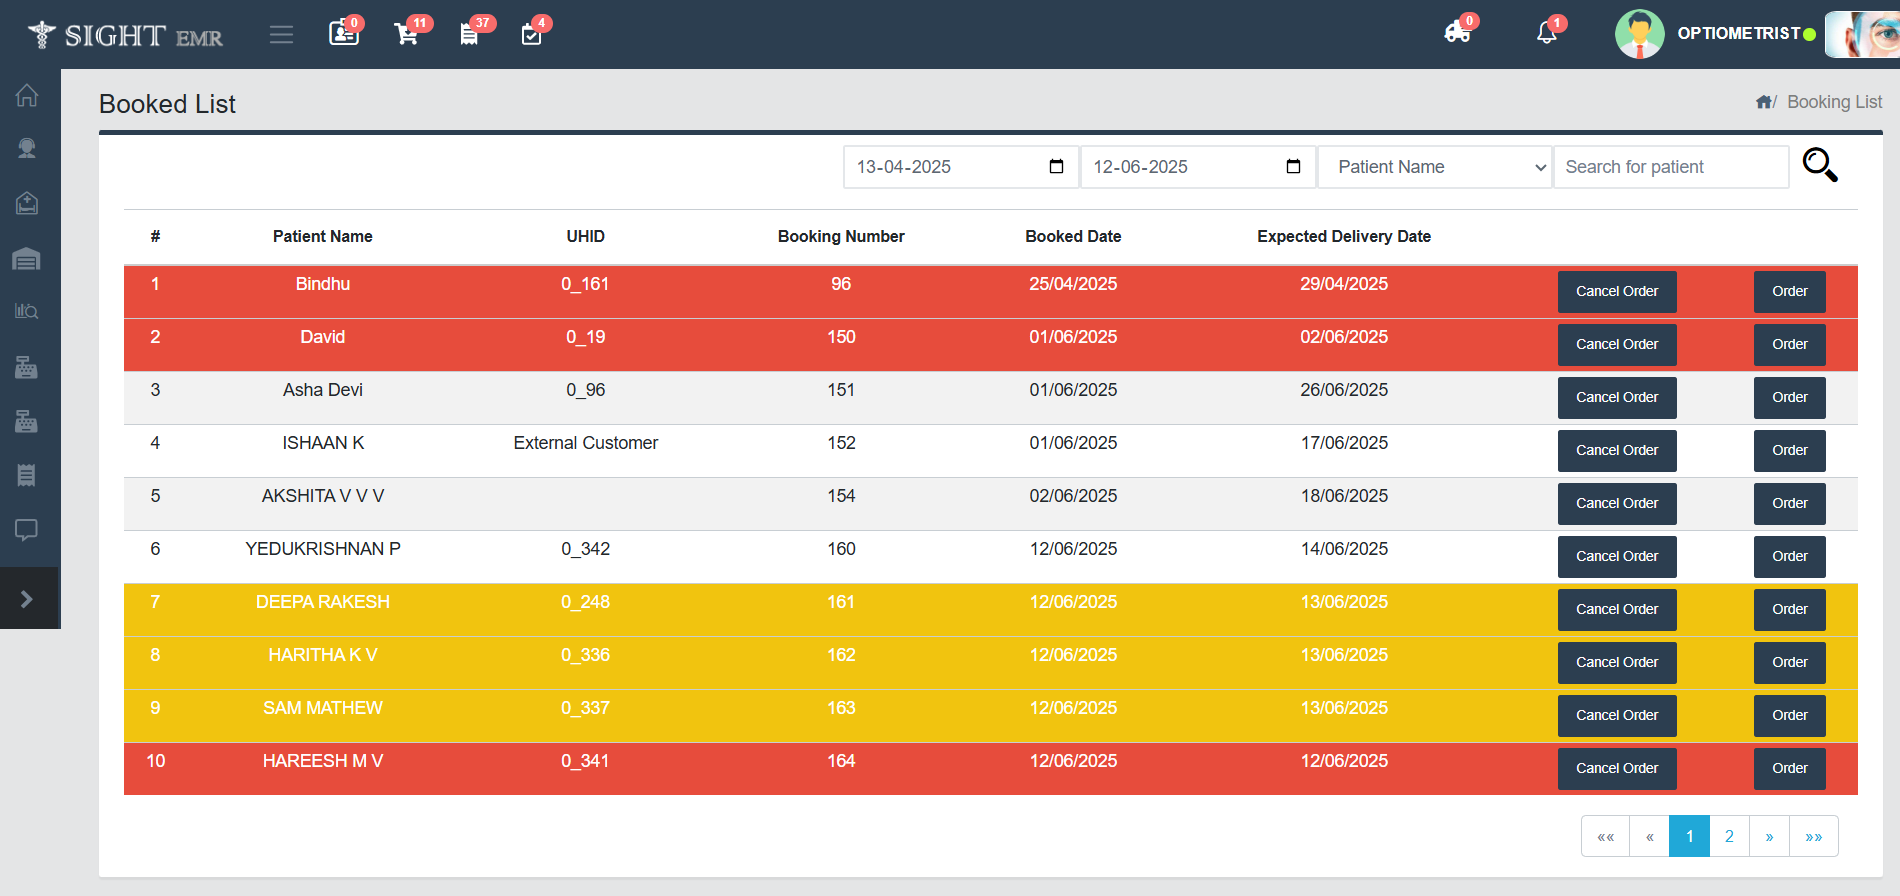
- Cancel Order Button: To cancel the respective Order.
- Order Button: Opens the Order Form.
- This screen is used to review, manage, and finalize the order details of a patient's eyeglasses, including:
- Prescription Details
- Frames and Lens Information
- Payment Details
- Supplier and Invoice tracking
- Select Supplier from the Drop-down list.
- Fill the required fields - Optional (Supplier Invoice Number, Attended By, Comments).
- Click Submit to confirm the Booking. The order will be reflected in Order List in the Invoice List.
- Order Form: Generate Order form containing the Patient deatils, Prescription details and booking details.
- Supplier Sheet: Generate Supplier Sheet containing Patient details, Supplier details, Refraction Details and Lens & Frames details.
- The order will move to Ordered List.
- This screen is used to review, manage, and finalize the order details of a patient's eyeglasses, including:
Ordered List (3rd Queue)
- This module provides a list view of all eyeglasses orders placed, filtered by date, patient, or order type. It helps staff track, update, or review individual orders efficiently.
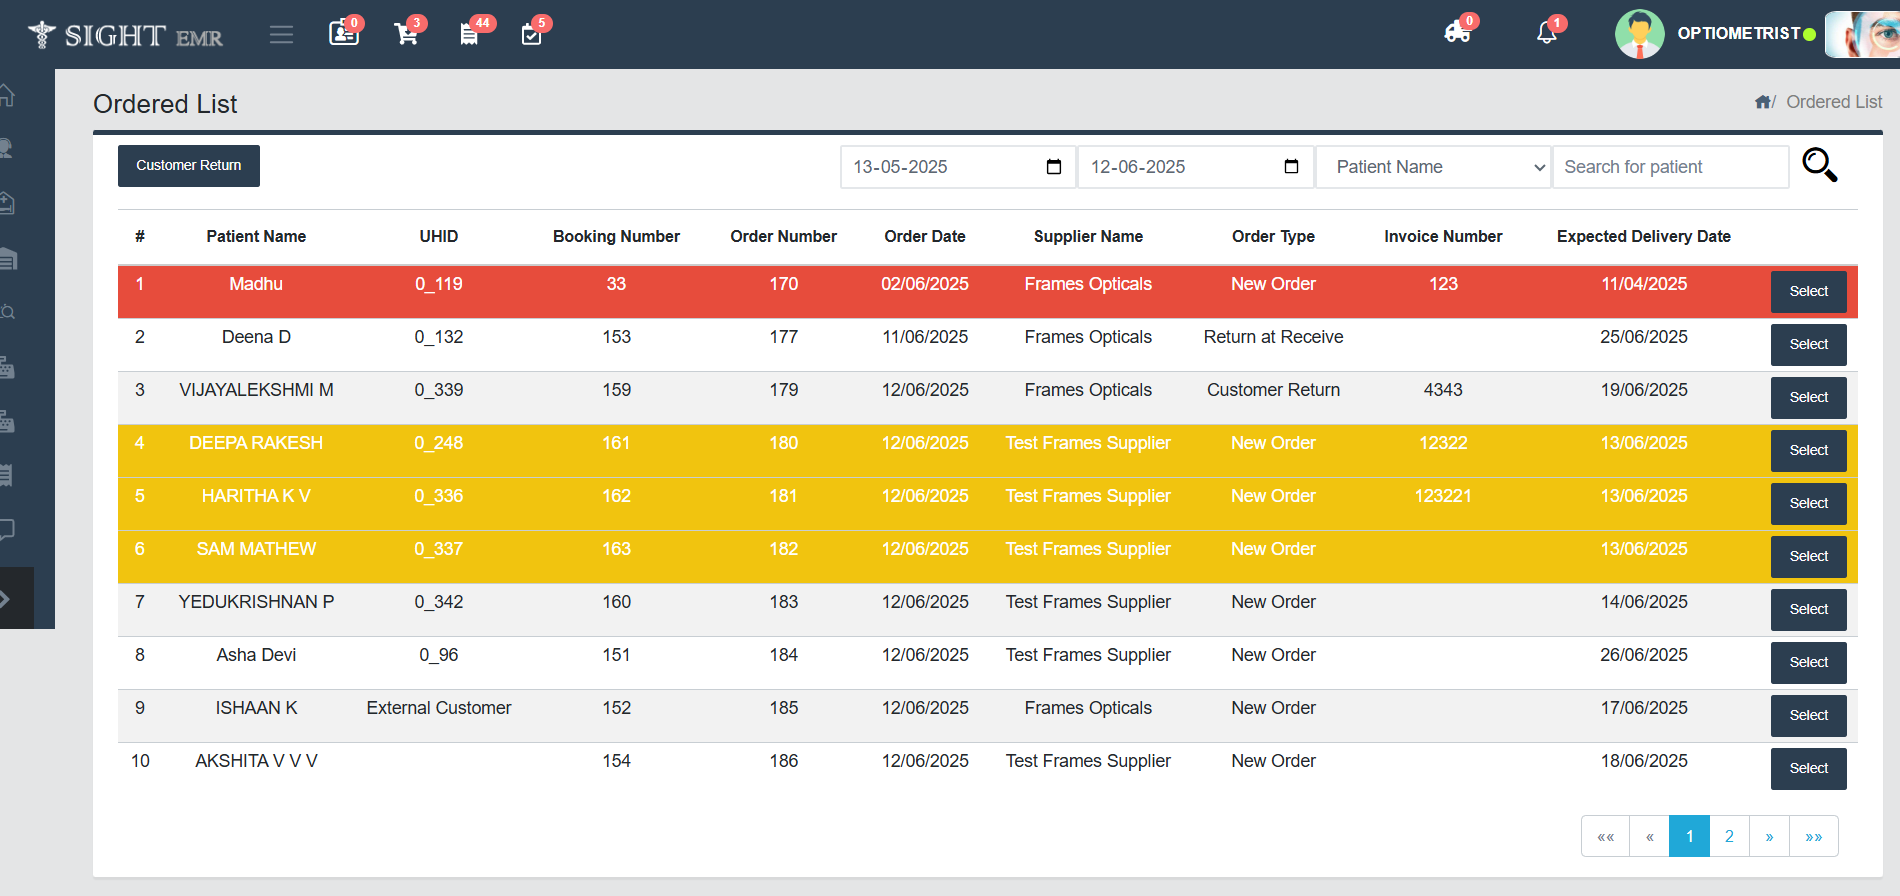
- Click Customer Return button at the top left corner to enable list of the Customer Returned Items.
- Click Select button to the correspondng patient to complete the order and fitting details.
-
Order Details Tab:
- Displays the Patient Details, Optical prescription, Lens & Frame Details, Payment Details and the Supplier Details already entered.
- Can edit the Supplier invoice numberand Order date
- Fill the required fields in Supplier & Booking Details- Optional (Payment mode: Cash/Card/Online, Supplier CGST & SGST Amount, Supplier Charge, Invoice Amount).
- The Supplier Charge/Invoie Amount will be reflected in the Expense List
- Quality Check:
- Check Boxes: Tick the check boxes for Received Status and Completed Quality Check if done.
- Fill the mandatory field Quality Check done By.
- Notes: Add additional notes if any.
- Click Submit to complete the Order Details.
-
Return:
- To Return Order at Receive, click Return button next to Submit button.
- Fill the required fields: Nature of the Complaint, Resolution, Attended By, Credit Note No. and Comments if any.
- Click Return button to complete the Return process and the order returns back to the Ordered List.
- The process will continue with different Supplier Invoice number.
-
Fitting Details tab:
- Click Fittings button aath the bottom right corner or click Fitting Details tab at the top next to Order Details tab.
- Displays the Patient Details, Optical prescription, Lens & Frame Details, Payment Details and the Supplier Details already entered.
- Fill the required details for Fitting Charges - Optional (Supplier, Supllier Invoice Number, Payment Mode, Fitting date, Fitting SGST/CGST Amount, Fitting Charge and Fitting Total Charge).
- After submitting the details, the fitting charges will be reflected in the Expense List.
- Quality Check & Fitting:
- Check Boxes: Tick the check boxes for:
- Completed Fitting: If fitting is Completed.
- Completed Quality Check: If Quality Checking is done.
- Intimate the Customer/ Move to Delivery List: After ticking the Check box, the Phone number of the Customer will displays and the order will move to Delivery List.
- Check Boxes: Tick the check boxes for:
- Fill the required fields (Fitting Done By, and Notes if any).
- Click Submit to complete the fitting details.
- After Completed Fitting and Completed the Quality Check, the order can be returned (if any damage after fitting is completed).
- Return: To Return Order at Fitting follow the same steps as done in Return Order at Receive.
Delivery List (4th Queue)
- This module shows the list of items (with Patient Name, UHID, Booking Number, Order Number, Order date, Received Date, Supplier Name, Expected Delivery date) to be Delivered.
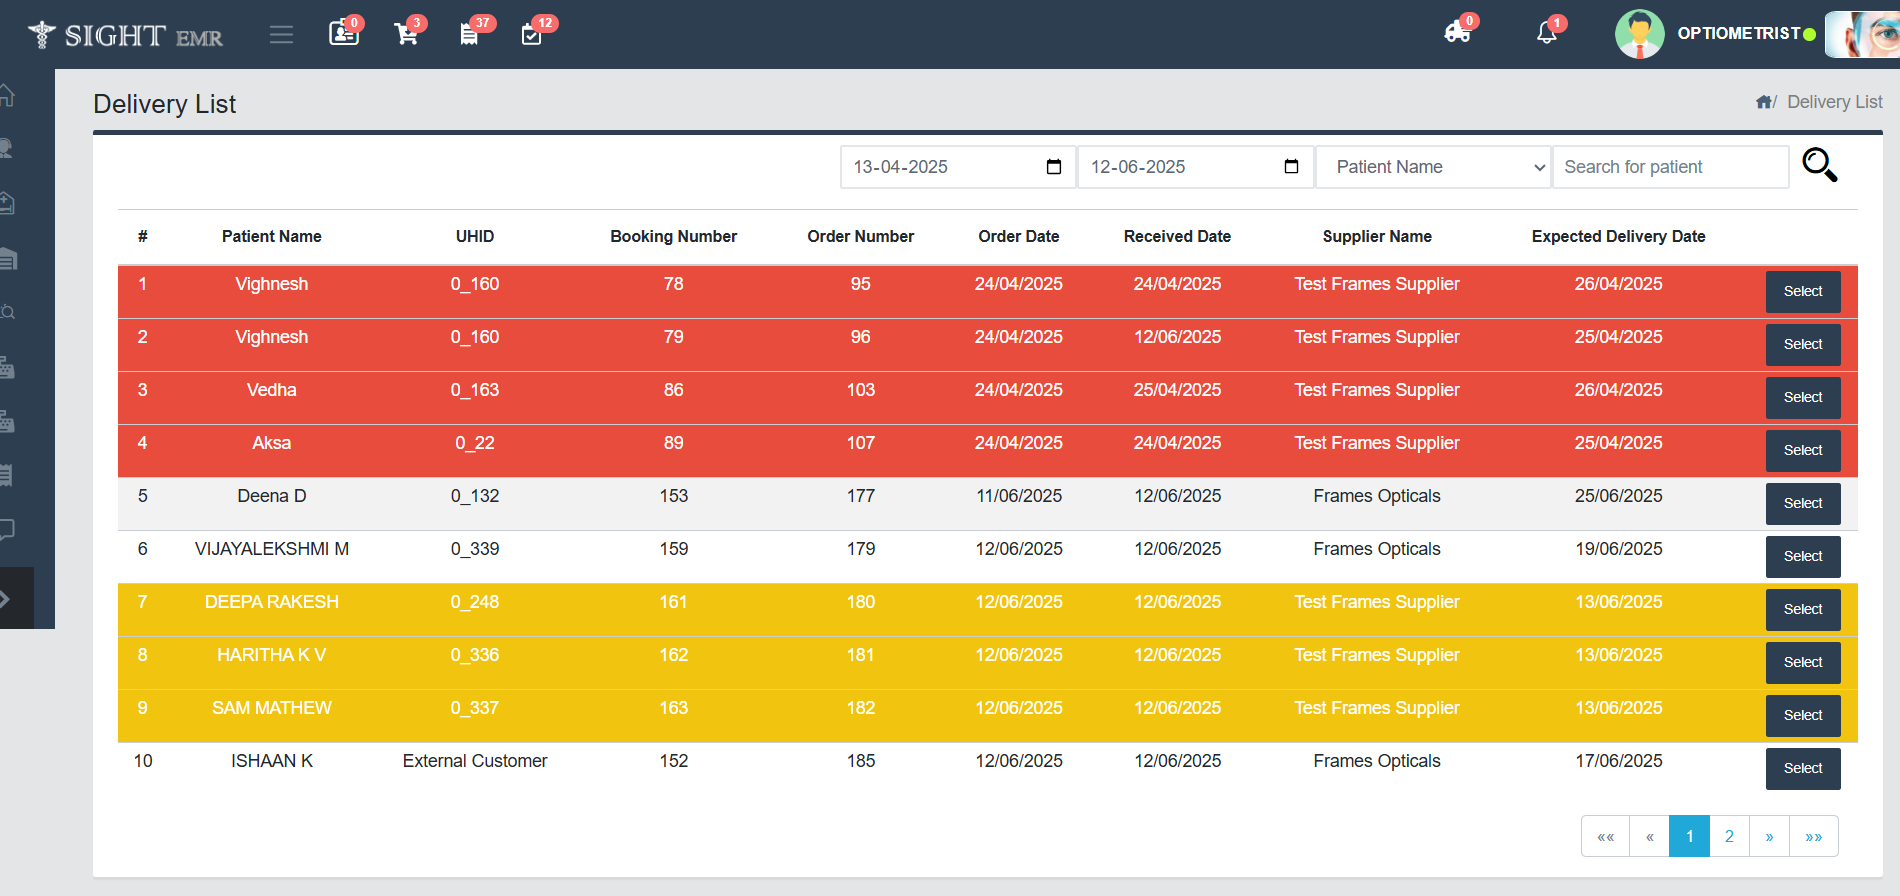
- You can search by using filters like Date/ Patient Name/ Booking number/UHID.
- Click Select to proceed to Opticals Delivery.
- This page shows Booking Details, Order Details, Patient Details, Optical Prescription, Instructions, Lens & Frames details, Payment Details already entered.
- Select Full Payment Mode drop-down list (Not Paid/ Cash/ Card/ Online/ Split).
- Click Cancel Delivery button and click OK on pop-up message to cancel the Delivery.
- The added frame and lens will move to the Stock by clicking the OK button on the pop-up message.
- Tick the check box for Full Payment Received accordingly.
- Change the Delivery Status radio button. (If Delivered-ON; If Not Delivered-OFF).
- Click Submit to complete the Delivery process.
- Click "Generate Invoice" to Generate the Final Bill ("New Invoice Screen")
- Enter the Patient details if needed.
- Select the Payment status and Payment Method accordingly.
- Edit the product details (if needed).
- Use +, ADD button at the right of the row to add a new product and **Trash icon at the left of the row to delete a product.
- Save As Draft: Use Save as Draft to preserve the entry without updating inventory. It moves to Invoice List.
- Generate Invoice: Click Generate Invoice button to Generate the Final Bill (PDF). Thee Generated Bills are listed in the Invoice List.
Invoice
-
New Invoice:
- Generate New Invoice for a New Customer/Existing Customer.
- The New Invoice screen allows users to create and generate invoices for customers by entering details of purchased items, applicable taxes, and payment status.
- Customer Details Section: Enter Customer Name/Search and Select Customer Name* from the List, Customer Phone Number*, Customer Address, Customer GSTIN.
- Payment Details Section*: Select Payment Status (Paid/Not Paid) and Payment Method (Cash/Card/Online/Split).
- Product Entry Section
- Model No.: Enter Model No./Search and Select Model Number from the List.
- Product Name: Enter Product Name/Search and Select Product Name from the List.
- Item Type: Select Item Type from the drop-down list (Frame/Lens/Contact Lens/Others).
- Quantity: Enter Quantity of the product.
- Price: Enter/Edit Price.
- Discount Type: Select Discount Type (Flat/%).
- Discount: Enter Discount Amount.
- CGST/SGST: Enter CGST and SGST in %.
- Total amount will be auto-filled according to the input.
- Can add extra products by Clicking Add button below the product adding table.
- Click Trash Icon at the left of the product table to delete the product.
- Billing Summary Panel: To the right of the Product entry section. It includes Gross Amount, Discount Amount, SGST and CGST amount, Net Amount, Paid Amount, Discount/Excess Amount and Grand Total.
- Use Save as Draft to preserve the entry without updating Invoice.It will then be edited and save from Invoice List.
- Click Generate Invoice to generate and print Bill.
-
Invoice List:
- It contains Invoice List and Order List.
-
Invoice List:
- It displays all the Invoice list and Draft list with Invoice No., Invoice Type (Optical Booking/Advance), Customer Name, BIlling date, Invoice Status, Total Amount, Payment Method and Paid Amount.
- It can be filtered by Date, Invoice No., Customer Name and Phone No. or direcltly using Search bar.
- Click View to view all the booking details (Bill) of a particular patient (View not available for Optical Advance)
- Click PDF icon at the right of the particular Bill to download the Optical Advance/Final Bill.
- Downloads (PDF) available for all Invoices, Voided Report and Sales Report.
-
Order List:
- It displays the list of Ordered items submitted from Ordered List with Order number, Order Type, Customer Name, Ordered date, Supplier Name, Invoice Number and Invoice Amount.
- Click View to view the order details (Lens & Frame Details).
- Download available for date wise Ordered lens Report.
-
- It contains Invoice List and Order List.
Colour Codes
● Expected Delivery date Today or Exceeded.
● Expected Delivery date tomorrow.
Booking Summary
- The Summary of all the Bookings (Booked, Ordered, Received, Delivered, Cancelled, Delivery Cancelled, Voided, Returned Items) in the Optical Store are listed here.
- Click View at the right side to the corresponding booking to view the detals of the booking. From that screen, you can download Advance Invoice, Final Bill, Print prescription, Return and Reorder.