Pharmacist
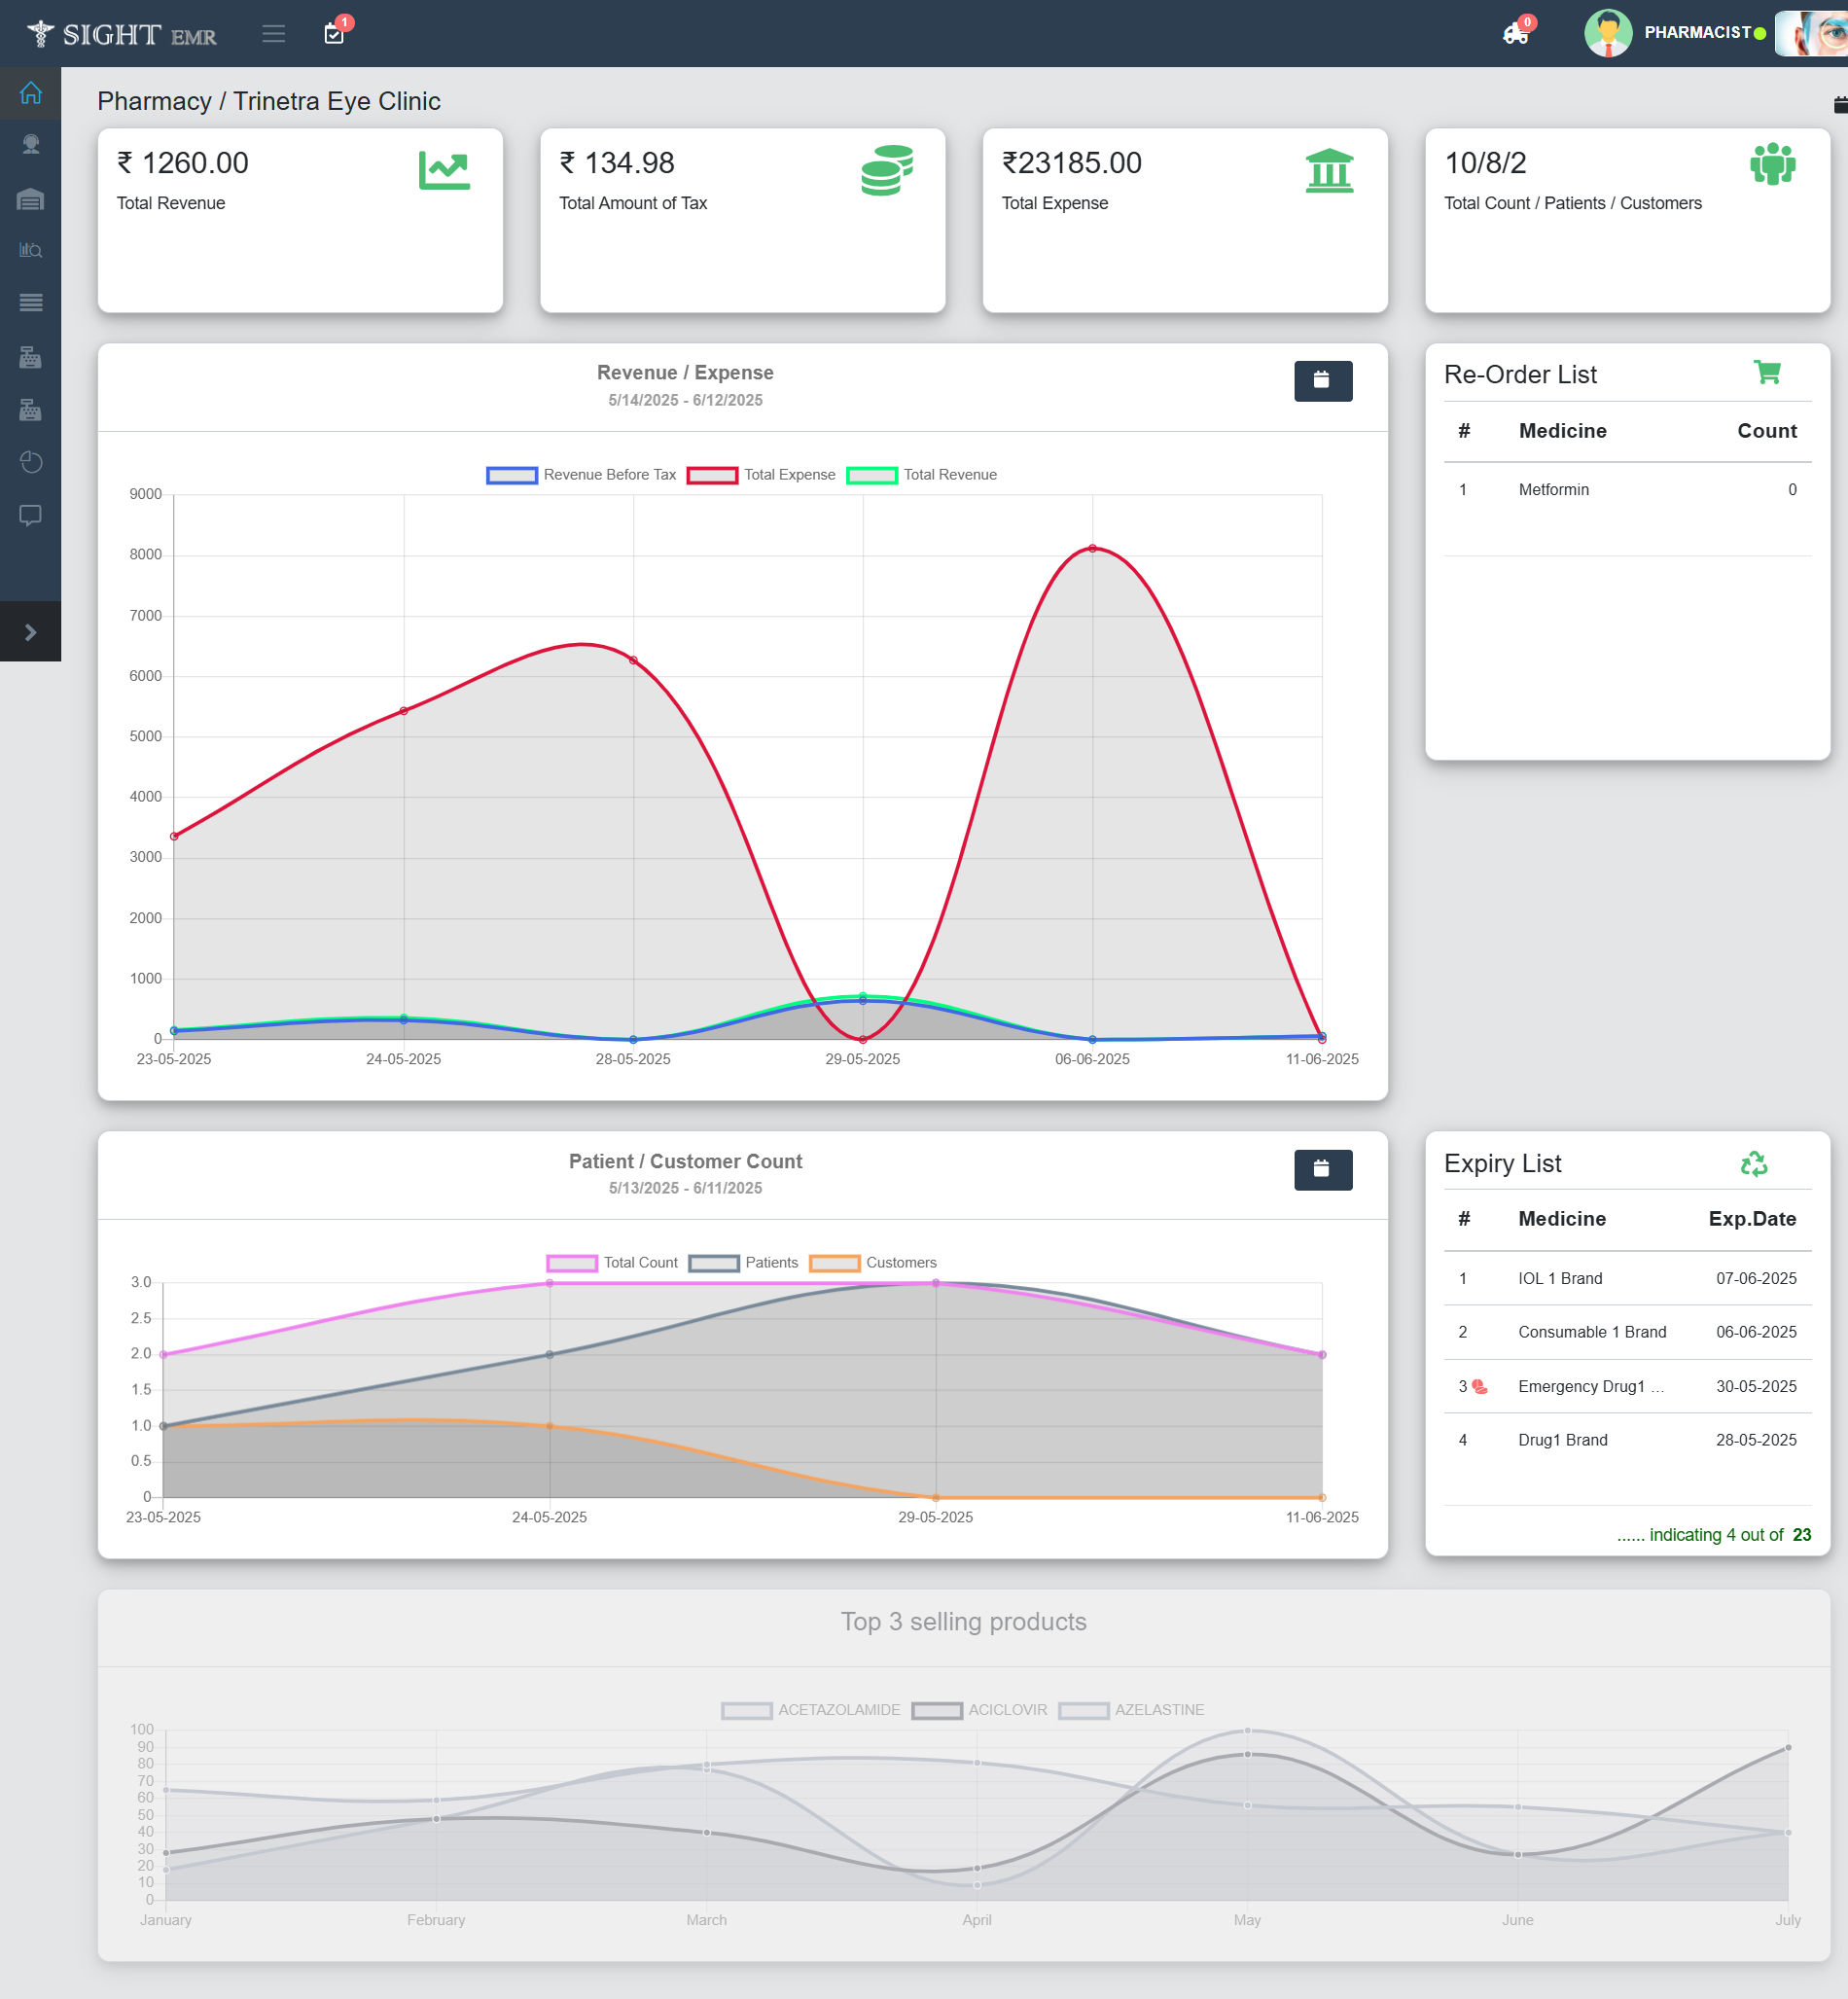
Dashboard Overview
-
View Total Revenue, Total Amount of Tax, Total Expense, Count (Total patients, Patients, Customers:External).
-
Statistics (Revenue/Expense, Patient/Customer Count Graphs).
-
Re-order List: Name of the Medicine with Live count is shown.
- Click Re-order List card to view the detailed list.
- Displays a detailed list (Product ID, Brand Name, Type, Generic Name, Manufacturer, Live Stock and Active status) of Drugs/Consumables/IOL Re-order items.
- Search by **Product ID and Brand Name is available.
- Add Button: Click Add button at the left side to Add Stock.
- Download: Excel Download is available for the Re-order List.
-
Expiry List: Expired and About to Expire Medicines are listed here in a card with Expiry Date.
- Click Expiry List card.
- Displays a detailed list (Product ID, Brand Name, Type, Generic Name, Batch No., Expiry Date, Live Stock, Active Status) of the Expired/About to Expire Medicines (Drugs/Consumables/IOL).
- The Expiry date of the Expired Medicines will be showed in Red colour.
- Return button: Click Return button to return the medicines if needed.
- View Purchase History of the Medicine.
- From that screen you can do Puchase Destroy and Purchase Return.
- Download: Download the Excel for Expiry List.
Supplier Module
Click on Suppliers (Side Nav) to Add a New Supplier and view the Supplier List.
- New Supplier
- Go to Suppliers (Side Nav)
- Select New Supplier.
- Fill the required supplier details such as Supplier name, Email, Pin code, Phone number, Address, GSTIN Point of contact (with phone number and e-mail).
- Click Submit to register the supplier.
- Supplier list
- Go to Suppliers (Side Nav)
- Select Supplier List
- Search/View/Edit/Delete the Supplier details.
Products Module
From the left Navigation panel, click the Products icon (cart icon). A drop down menu appear with the following options such as New Product, Product List, Add Stock, Draft List.
- Add New Medicine:
This screen allows the user to create a new product entry in the system.
- Go to Products (Side Nav)
- Select Add New Medicine
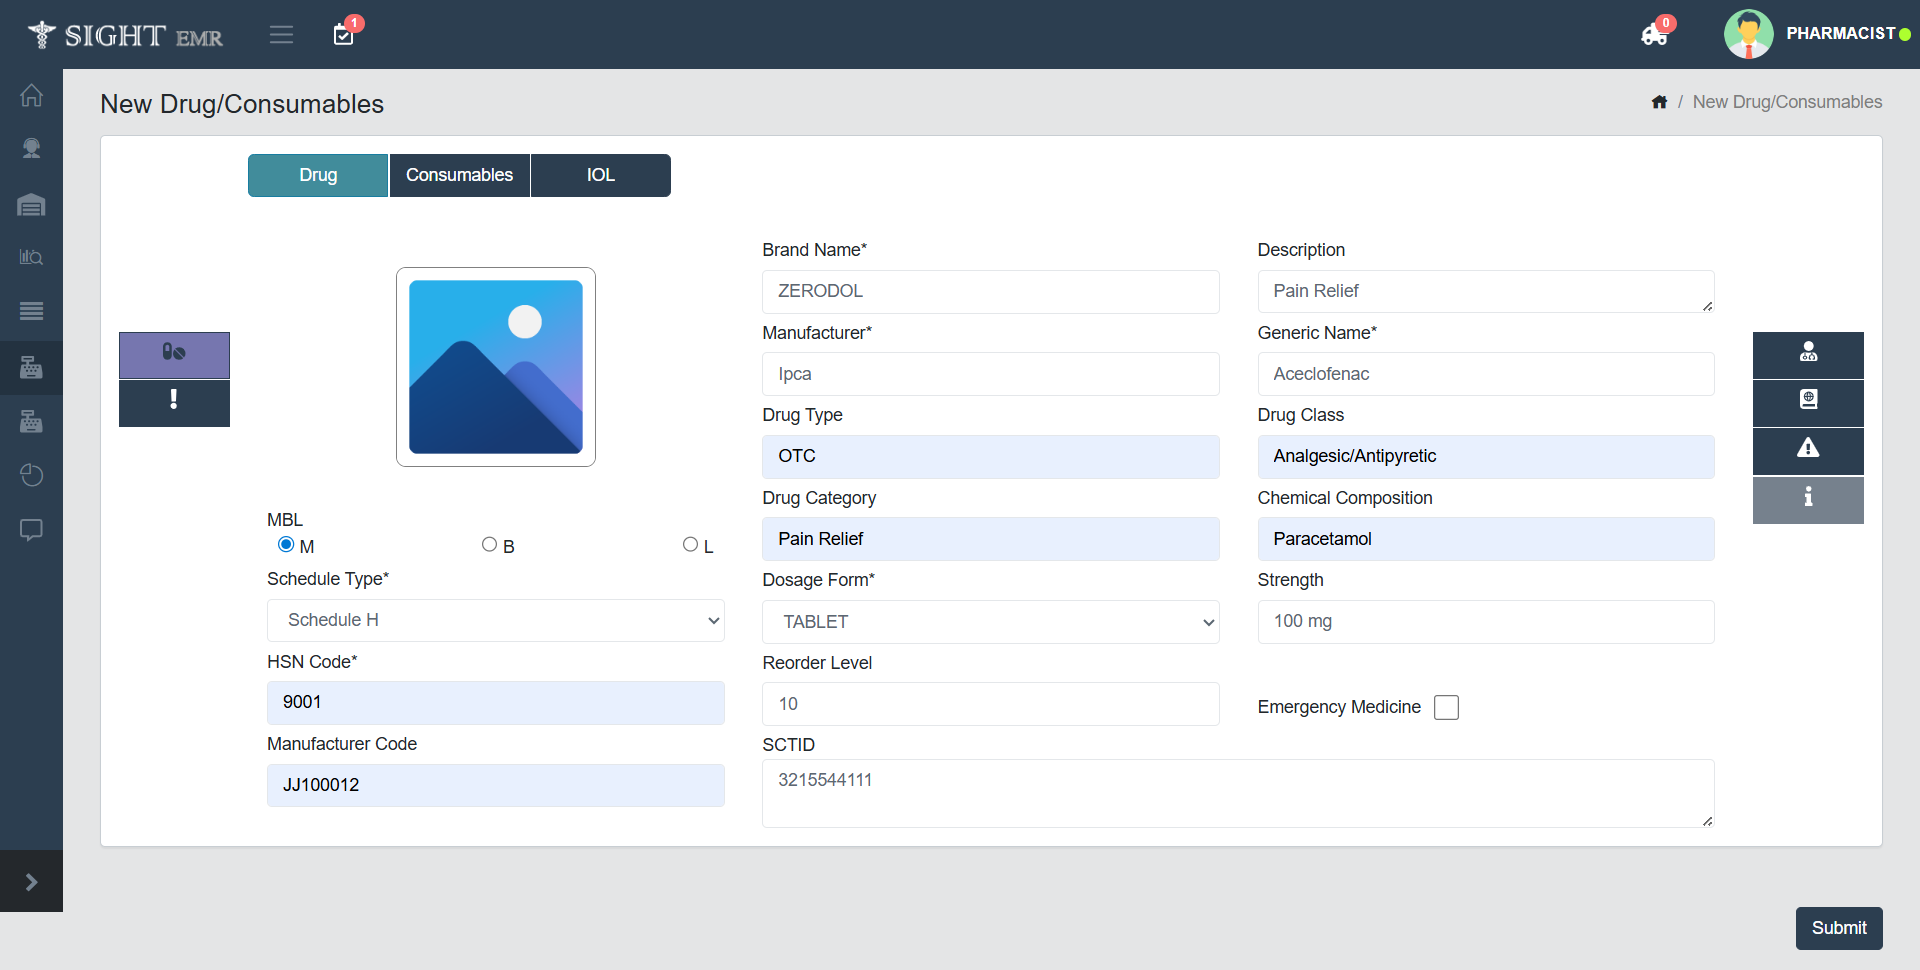
- Drug Details
- Select the Modules (Tabs): Drugs(Add pharmaceutical drugs), Consumables (Add medical or surgical consumables), IOL (Add intraocular lens items).
- Drug
- Click Drug tab at the top left of the screen.
- Insert picture of the Drug if needed by clicking on the Image icon provided at the left side of the screen.
- Select one of the Radio buttons (M, B, L) for MBL.
- Fill the Mandatory Fields*
- Select Schedule Type from drop-down list (Schedule G/H/H1/X,J,K).
- Enter HSN Code.
- Enter Brand Name.
- Enter Manufacturer.
- Select Dosage Form (Eye Drops/ Tablet/Syrup/Eye Ointment/Capsule/Injection).
- Enter Generic Name.
- Fill other fields (Optional): Manufacturer Code, Drug Type, Drug Category, Reorder Level, SCTID, Description, Drug Class, Chemical Composition, Strength.
- Tick the check box for Emergency Medicine, if needed. Emergency Medicine will have a red colour indication in Drug List.
- Click Submit to save the Drug.
- It will be listed in Medicine List.
- Consumables
- Click Consumables tab at the top left of the screen (next to Drug).
- Insert picture of the Consumables if needed by clicking on the Image icon provided at the left side of the screen.
- Fill the Mandatory fields such as Braand Name, Manufacturer, HSN Code.
- Enter Description, Manufacturer Code, Reorder Level.
- Click Submit to save the Drug.
- It will be listed in Medicine List.
- IOL
- Click IOL tab at the top left of the screen (next to Consumables).
- Insert picture of the IOL if needed by clicking on the Image icon provided at the left side of the screen.
- Fill the mandatory fields such as Brand Name, Manufacturer, HSN Code.
- Enter other Optional details such as IOL Model, IOL Serial Number, Optic Design, IOL Power, IOL Type, Haptic Design, Description, Manufacturer code, Reorder Level, A-Constant, Material, Toric Axis Orientation.
- Click Submit to save the Drug.
- It will be listed in Medicine List.
- Drug
- Select the Modules (Tabs): Drugs(Add pharmaceutical drugs), Consumables (Add medical or surgical consumables), IOL (Add intraocular lens items).
- Warnings and Precautions
- Enter Title, Warnings."
- Click + icon at the bottomof the box to add more Warnings.
- Click Trash Icon at the right of the box to delete the entered data.
- Click Add to List to add these warnings and precautions to the Medicine List.
- Interactions (Tell your Doctor if you are taking)
- The doctor needs to know to avoid drug interactions.
- Some medicines may affect the treatment plan or cause side effects if combined.
- Enter Title, Warnings."
- Click + icon at the bottomof the box to add more Warnings.
- Click Trash Icon at the right of the box to delete the entered data.
- Click Add to List to add these warnings and precautions to the Medicine List.
- Directions to Use
- This section provides the directions for using the Medicine.
- Click + icon at the bottomof the box to add more Warnings.
- Click Trash Icon at the right of the box to delete the entered data.
- Click Add to List to add these warnings and precautions to the Medicine List.
- Side Effects
- Option to add Side effects of the medicine. It will help the Doctor at the time of prescribing the Medicine.
If the same brand name exists, list will appear. System will not allow to submit the medicine with same brand name. A toaster will be appear as "Medicine Already Exists".
- Medicine List This screen provides a comprehensive overview of all drugs, consumables, and IOL (Intraocular Lens) items available in the inventory. It allows users to view, edit, and monitor the stock and status of each item.
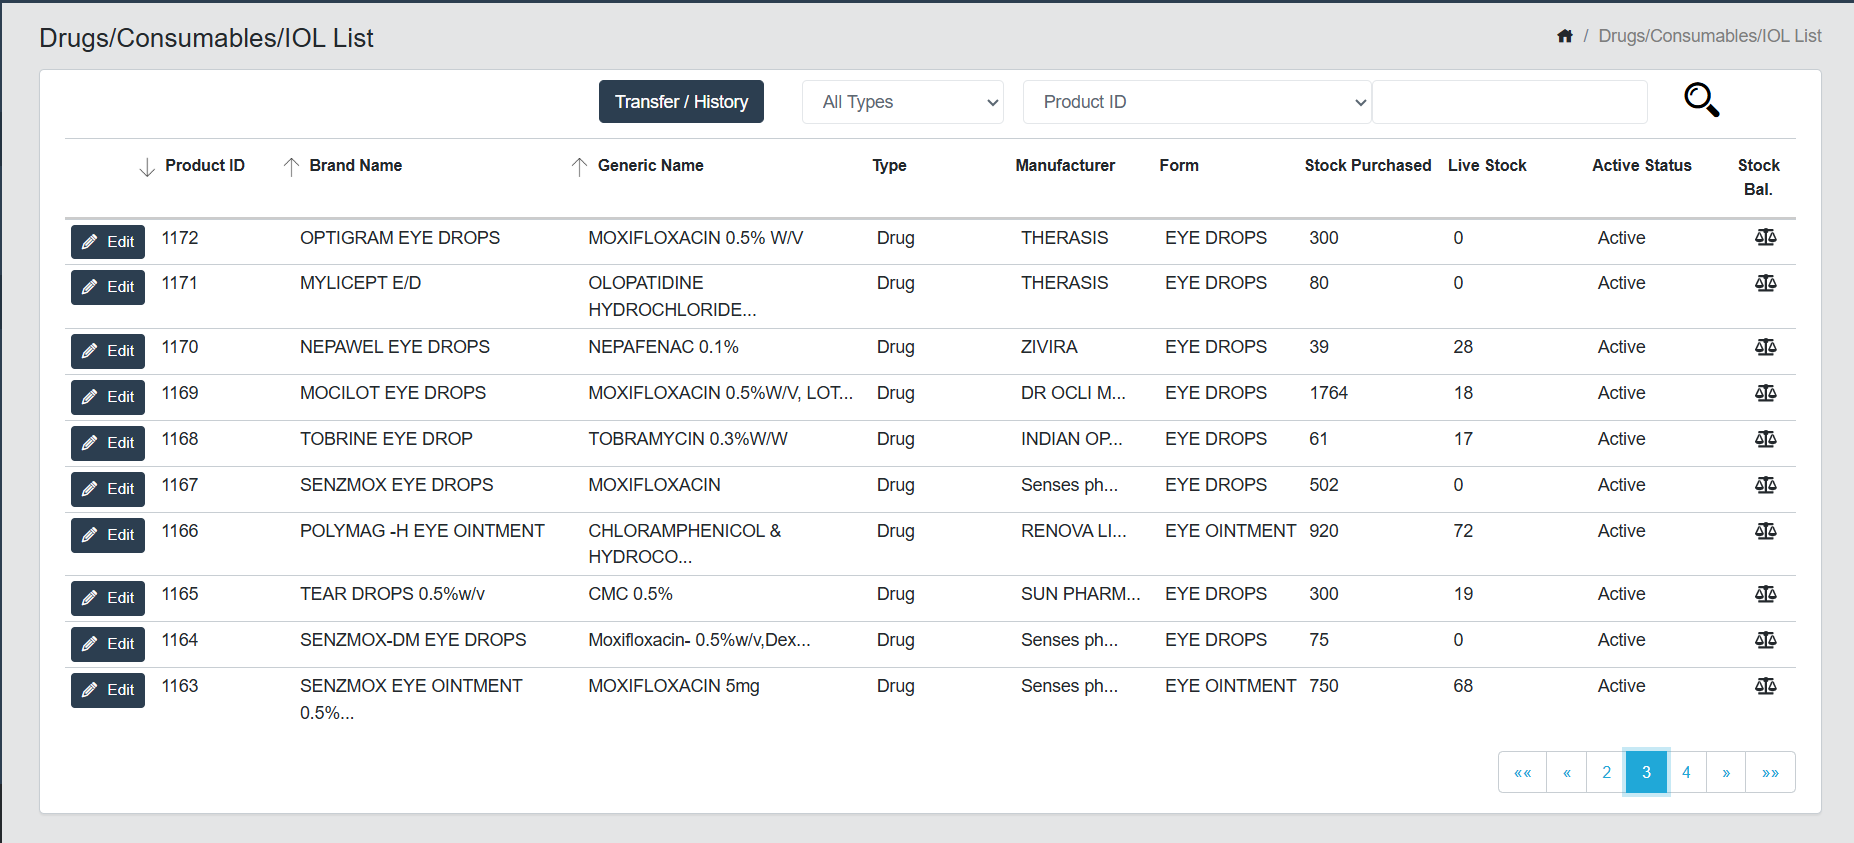
- Go to Products.
- Select Medicine List.
- This page provides list of products added with Product ID, Brand Name, Generic Name, Type (Drug, Consumables, IOL), Manufacturer, Form (Tablet, Eye Drops etc), Stock Purchased, Live Stock, Active Status (Active/Inactive) and Stock Balance.
- Edit Button: Clicking the Edit button allows you to update the details of the selected item (drug, consumable, or IOL) except Brand Name, Manufacturer, Dosage Form and Generic Name.
- Select Disable Product Toggle to inactivate the product. It will be reflected as Inactive : Status in the Medicine list screen.
- Stock Balance Icon: The Stock Balance window provides a detailed view of the current stock status, sales information for a selected item on a particular date.
- Section-wise Description
- Date: The selected date for which the stock balance is being reviewed.
- Day Sale: Displays the total sales amount for the selected day. If no sales occurred, the value remains ₹0.
- Opening Stock: Indicates the stock quantity available at the start of the day.
- Closing Stock: Shows the stock quantity at the end of the day, after deducting any sales or adjustments.
- Purchase Details (Batch-wise)
- Each batch of the item is listed separately with full details: Supplier, Btach Number, Purchase Date, Expiry Date, MRP, Purchased Price, Purchased Stock, Payment status.
- Purchase Graph
- This graph displays the purchase history over a selected date range.
- Action Buttons
- Close: Closes the Stock Balance window without saving changes.
- Submit: Confirms and saves any updates or validations made during stock checking.
- Section-wise Description
- Other Features on the Screen
- Transfer / History Button
- Click Transfer / History Button to open Product transfer history screen.
- The Product Transfer History screen provides a log of all product movements between branches.
- View the Received/Transfered Products and see the status (Completed/Inprogress) by date wise.
- Click Transfer Now
- Enter and select the clinic name.
- Give Invoice number and Transfer date.
- Search and Select the product need to transfer. select the Quantity.
- The price fields are not editable.
- Click Add, + icon, to add extra product.
- To delete any product, Click Trash Icon at the left side of the row.
- Notes: Use this area to log any remarks or extra information about the transfer.
- Click Submit to tansfer the Product(s)to the branch clinic.
- The progress (Completed/Inprogress) will be shown in the Product List.
- Transfer / History Button
Only after accepting the transferred product by the branch clinic, the stocks will reduce from the main clinic. At the time of Transfer, there must be a minimum quantityu of stock.
- Add Stock:
- Go to Products (Side Nav)
- Select Add Stock
- Search Supplier Name (Supplier Name)
- Select the Supplier from the list.
- Add Invoice Number, Received date, Payment date, Payment Status, Payment method.
- To add the product, fill the required fields: Product number, Product Name, Quantity, Free Units, Batch No., Expiry Date, MRP, Rate, Discount, GST (CGST, SGST, IGST).
- The total amount will be auto calculated based on rate, discount and GST.
- Click Add, + icon, to add extra product.
- To delete any product, Click Trash Icon at the left side of the row.
- Courier Charge: Enable checkbox if delivery/courier charges are applicable.
- Notes: Use this area to log any remarks or extra information about the transaction.
- Click Submit to finalize and add stock to inventory.
- Use Save as Draft to preserve the entry without updating inventory.
- Draft List
- Edit the Product which is added as Save as Draft and Submit.
Purchase Module
-
Purchase History
- Go to Purchase.
- Select Purchase History to view the purchased stock details with Product ID, Brand Name, Type (Drug/Consumables/IOL), Purchased Date, Batch No., Quantity, Expiry Date, Payment, Supplier Phone, Return Status.
- Filter by Date, Product ID and Brand Name.
- Click View button at the left side of the corresponding stock to view the selected stock's Purchase History with Supplier Details, invoice Details, Payment Details, Product Purchase Details.
- Purchase Destroy
- Click Purchase Destroy to destroy the stock.
- This screen displays the supplier details and stock details at the top portion and Live Total Stock.
- Select one of the radio buttons: Damaged/Expired.
- Enter Destroy Quantity.
- Tick check box Destroy All to destroy all the existing stock.
- Enter Reason to Destroy.
- Click Submit button to save the changes.
- It will be reduced from the Total Live Stock.
- Click Close to close the screen without saving the changes.
- Purchase Return
- Click Purchase Return to destroy the stock.
- This screen displays the supplier details and stock details at the top portion and Live Total Stock.
- Select one of the radio buttons: Good/Damaged/Expired.
- Enter Return Quantity.
- Tick check box Return All to destroy all the existing stock.
- Enter Reason to Return.
- Click Submit button to save the changes.
- It will be reduced from the Total Live Stock.
- Click Close to close the screen without saving the changes.
- Purchase Destroy
-
Returned History
- This screen displays Return/ Destroy History of the stock with Product ID, Invoice No., Generic Name, Brand Name, Batch No., Returned Date, Returned number of stock, Destroyed number of stock, Returned Stock's Amount, Type (Supplier/ Surgery/ Customer/ Patient).
- Filtering Options
- Type: Supplier/ Surgery/ Customer/ Patient
- Returned/Destroyed
- Good/Expired/Damaged
- Date Filter
- Product/Brand Name
- Search by Keyword using search icon
For Supplier Type, Search by Supplier name is available.
-
Download: Download Returned/Destroyed History As Excel/PDF.
-
Purchase Request List
- Accessing Purchase Request
- From the left side menu, click on the Purchase icon → Select Purchase Request List.
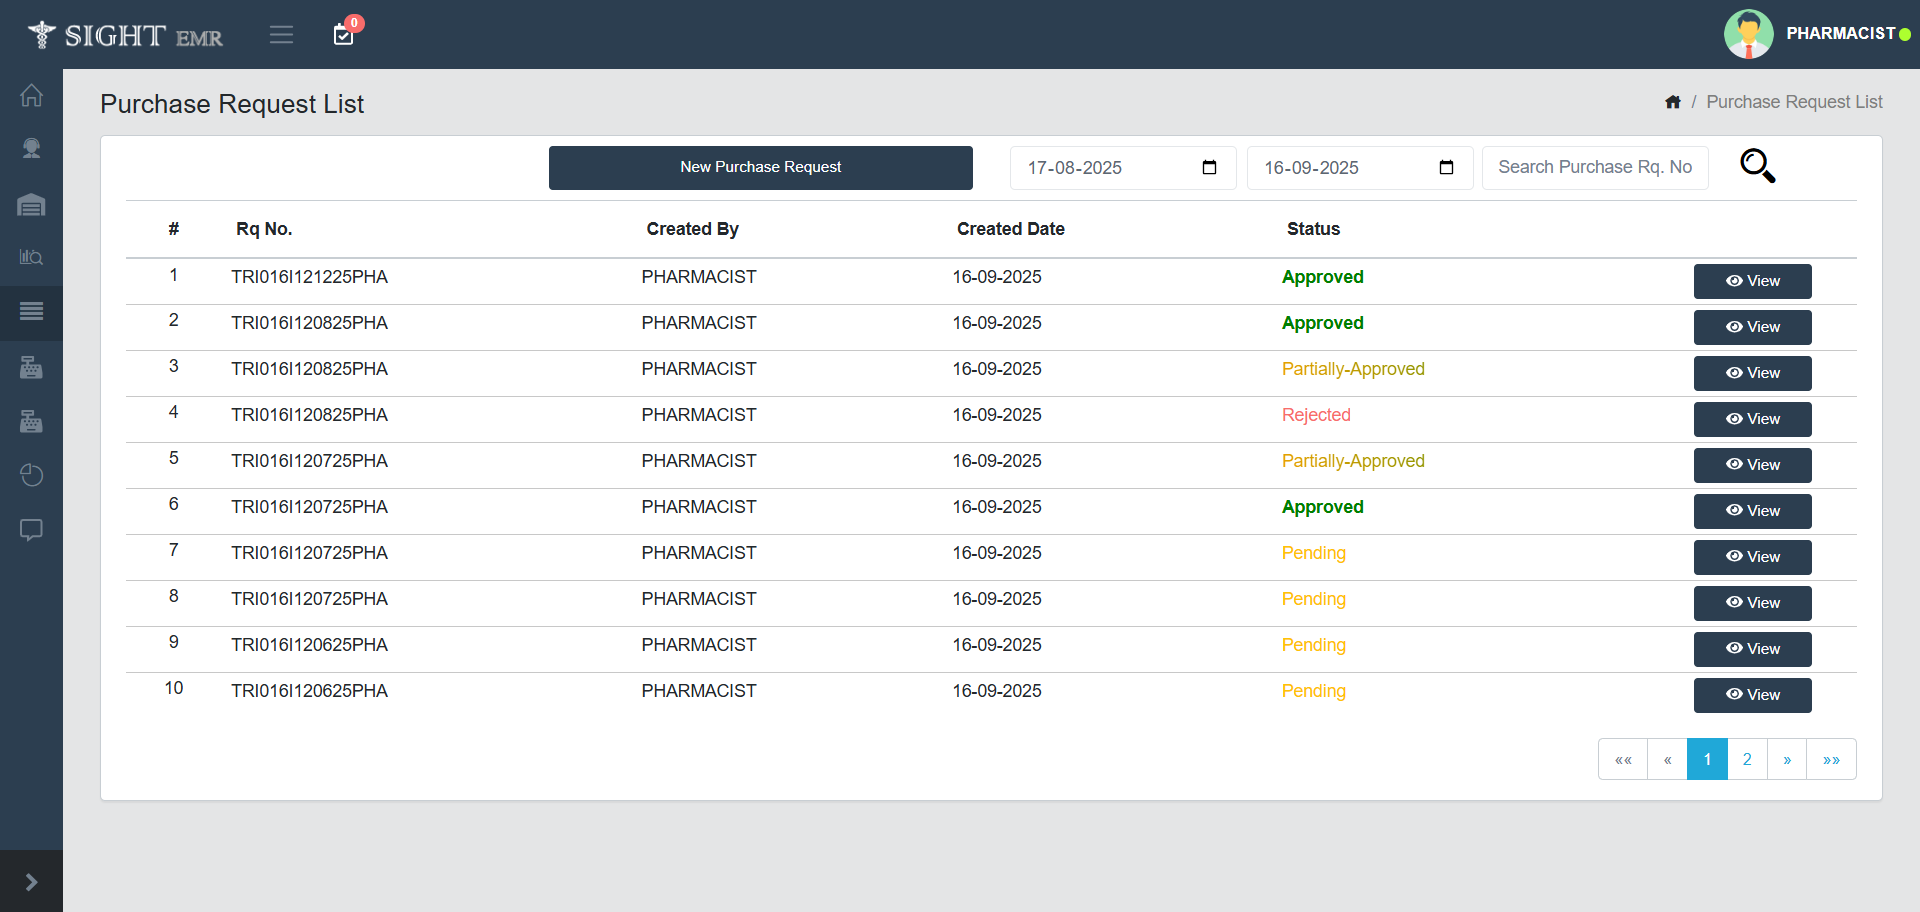
- You will see the Purchase Request List screen, which displays all requests with their Request Number, Creator, Created Date, and Current status.
- Status types include:
- Pending - Waiting for approval.
- Approved - Fully approved.
- Partially Approved - Some items approved, some pending.
- Search by Date and Purchase Request number is available.
- Creating a New Purchase Request
- On the Purchase Request List page, click the New Purchase Request button at the top of the page.
- The New Purchase Request form will open.
- Filling Out a New Purchase Request
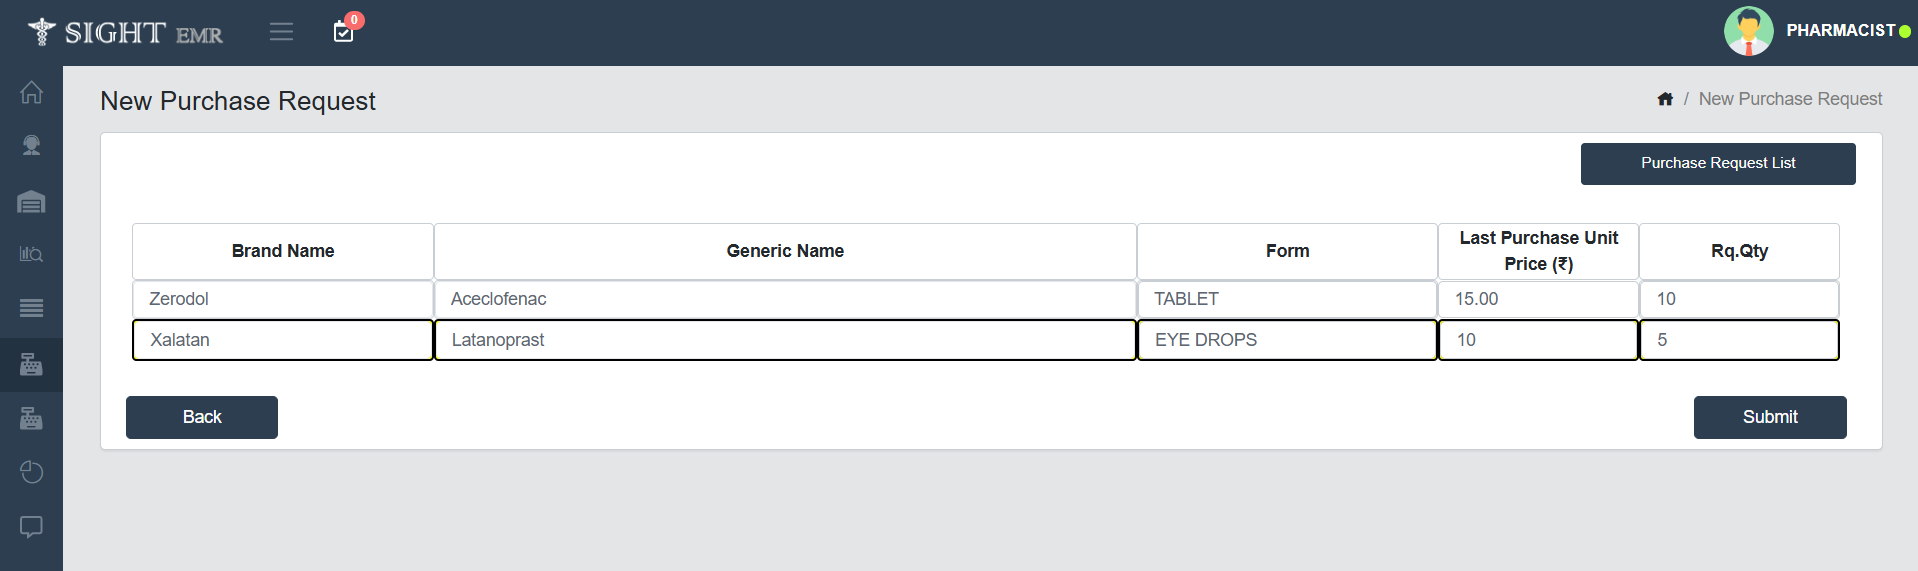
- Enter the Brand Name and select the item from the list.
- The Last Purchase Unit Price will be shown for reference.
- Generic Name, Form and Last Purchase unit Price will be autofilled and can be Edited.
- Enter the Requested Quantity (Rq.Qty) that you want to order.
- Submitting the Request
- After entering all details, click on the Submit button.
- The request will be saved and shown in the Purchase Request List with a unique request number.
- Back Button - Returns to the Purchase Request List without saving.
- You can track the request status as Pending, Approved, or Partially Approved.
- Viewing Purchase Requests
- In the Purchase Request List, each request has a View button.
- Click View to check the details of the selected purchase request.
- Navigation
- Date Filter - You can filter purchase requests by date.
- Search Option - Enter the Purchase Request Number to quickly find a request.
- Accessing Purchase Request
The Purchase Request List can Approve/Partially Approve/Reject only by Purchase Manager.
Expense Module
-
Expense Invoice (New Expense)
- To add any Pharmacy Expenses
- Go to Expense.
- Select Expense Invoice.
- You can either search the Existing Supplier Name or add a New Supplier Name with Phone no. and Address.
- Select the Payment Status (Paid/Not Paid).
- Select Payment Method (Cash/ Card/ Online)
- Add Batch Number.
- Enter the Item details :Item No., Item Name, Item Type (Frame/Lens/Others), Quantity, Price, discount, GST (CGST,SGST,IGST).
- The Total Amount will be auto calculated based on rate, discount and GST.
- Fill the Required fields such as Purchased On, Purchased By, Supplier GST Number, Invoice number, Total Amount Paid.
- Click Save to finalize and add to Expense.
- Use Save as Draft to preserve the entry without updating Expense.
- To add any Pharmacy Expenses
-
Expense List
- All the Expenses and Stock Purchased List are listed here (Invoice Number, Supplier Name, Purchased On, Total Quantity, Invoice Status, Total amount, Paid amount, Pending amount).
- Click View to see the Expense details of each Expense with Supplier details, Invoice details, Payment details
- Edit the Product which is added as Save as Draft and Save.
- Filter: Filter option is available at the top right corner (Green Colour).
- Click Filter.
- Search according to Date Range, Invoice number, Invoice Status (Draft/Invoice/Both) and Supplier are available.
- Download the Expense list as Excel and PDF
Invoice Module
-
Invoice
-
New Invoice:
- Generate New Invoice for a New Customer/Existing Customer.
- For Existing Customer Search by Name/UHID/Phone Number.
- The New Invoice screen allows users to create and generate invoices for customers by entering details of purchased items, applicable taxes, and payment status.
- Customer Details Section: Enter Customer Name/Search and Select Customer Name* from the List, Customer Phone Number*, Customer Address.
- Doctor Details: Enter Doctor Name, Doctor Phone Number, Doctor Registration Number.
- Payment Details Section*: Select Payment Status (Paid/Not Paid) and Payment Method and its comments (Cash: Comment/ Card: Card No./Online: UPI IDor Tran No/ Split).
- Product Entry Section
- Product ID: Enter Product ID/Search and Select Product ID from the List.
- Product Name: Enter Product Name/Search and Select Product Name from the List.
- Batch No.: Enter Batch No.
- Quantity: Enter Quantity of the product.
- Price: Enter/Edit Price.
- Discount: Enter Discount Amount.
- CGST/SGST: Enter CGST and SGST in %.
- Total amount will be auto-filled according to the input.
- Can add extra products by Clicking Add button below the product adding table.
- Click Trash Icon at the left of the product table to delete the product.
- Billing Summary Panel: To the right of the Product entry section. It includes Gross Amount, Discount Amount, SGST and CGST amount, Net Amount, Paid Amount, Discount/Excess Amount and Grand Total.
- Add to Surgery Stock: Select Add to Surgery Stock Toggle to add the product to the Surgery Stock. It will move to Surgery Stock List. While selecting this, Customer details will be auto-filled.
- Add to OP Stock: Select Add to OP Stock Toggle to add the product to the Surgery Stock. It will move to OP Stock List. While selecting this, Customer details will be auto-filled.
- Use Save as Draft to preserve the entry without updating Invoice.It will then be edited and save from Invoice List.
- Click Generate Invoice to generate and print Bill.
-
Invoice List:
- The Invoice List screen allows Pharmacists or billing staff to view, filter, manage, and download invoice records efficiently.
- It displays all the Invoice list and Draft list with Invoice Number, Customer Name, Customer Phone Number, Doctor Name, Billing Date, Invoice Status, Total Amount, Payment Status/Mode.
- Invoice List can be filtered by Date, Payment Status (Paid/Not-Paid), Invoice Number and Customer Name.
- Click View button at the left side to view the Invoice with Customer Details, Invoice Details and Payment Details.
- Click Draft button at the left side to edit the drafted invoice. The Draft can be deleted by clicking the Delete (Trash Icon) at the right side of the corresponding entry.
- Click Refund button at the left to refund the amount to the customer/patient.
- Click Return Icon at the right side of the corresponding entry to return the medicine by the customer.
- The Customer Return screen will displays the Patient name, Patient UHID, Patient Phone nUmber, Doctor Name, Payment Status, Billing Date.
- The Medicine List will be displayed in a table below the patient details with Generic Name, Brand Name, Type, Batch Number, Expiry Date, Quantity, Unit Price, Discount, Total Amount.
- Tick the check box at the left side of the corresonding medicine to return.
- Enter the Return Quantity in the same table (Right end).
- Select any of the Radio buttons Good/Damaged/Expired.
- Return List will be displayed at the bottom.
- Click Submit button to save the entered details.
- Click Close button to close the screen.
- Once Medicine Returned successfully, the Return icon will be disabled and will be in green colour.
- Can Download Invoice (PDF) by clicking the Download icon at the right side of the corresponding entry.
- Action Buttons:
- Download: Can Download all the Invoices according to the date range.
- Voided Report: Can download all the voided report if any according to the date range.
- Sales Report: Can download Sales Report according to the date range.
Other-Stocks
-
Surgery Stock List
- This page provides list of Products added to the Surgry Stock with product ID, Brand Name, Type, Stock Purchased, Used Quantity, Total Live Stock.
- Search bar is available to search a product using its Brand Name.
- Return Icon
- Click Return Icon at the right of the corresponding stock.
- Surgery Stock Return Page will appear with Medicine List (Generic Name, Brand Name, Batch No., Expiry Date, Purchase Quantity, Returned Quantity, Live Count, Unit Price and Total).
- Tick required Medicines to be returned.
- Enter **Return quantity in the same row.
- Select one of the radio buttons: Good/Damaged/Expired
- The Return List will appear with the selected medicine details (Brand Name, Count, Unit Price, Discount, CGST and SGST, Return amount).
- Total Amount will be displayed ath the bottom of the list (table).
- Action Buttons:
- Update Used Quantity: Click the button provided for Update Used Quantity. A pop-up screen appear to provide count. Enter count of Used Quantity and click OK to update.
- Close: Click Close button to close the Surgery Stock Return screen.
- Submit: Click Submit button to save the entered data.
- History button
- Click History Button to view the Surgery Stock Transfer Details with Created On, Created By, Category, Total MRP, Total Purchase Rate.
- Click View button at the left of the corresponding transfer to view the Stock Transfer Details (Customer details, Invoice Details, Payment Details, Transfered product details with Product ID, Product Name, Batch No., Type, Purchased Quantity, Price, discount, CGST, SGST, Total MRP and Notes added) of the selected Transfer.
- Click Back button to g back to the previous page.
-
OP Stock List
- This page covers the list of Stock added to OP with Created On date, Created By, Category, Total MRP and Total Purchase Rate.
- Filter by date is available.
- Click View button at the left of corresponding transfer to view Stock Transfer Details.
- It includes customer Details, Invoice Details, Payment details, Product Details with Product ID, Product Name, Batch No., Type, Purchased Quantity, Price, Discount, CGST, SGST, Total MRP.
- Click Back button to g back to the previous page.
Drug Prescription List (Top)
The Drug Prescription List screen provides a consolidated view of drug prescriptions recorded for patients within a specific date range.
- Filter & Search Controls
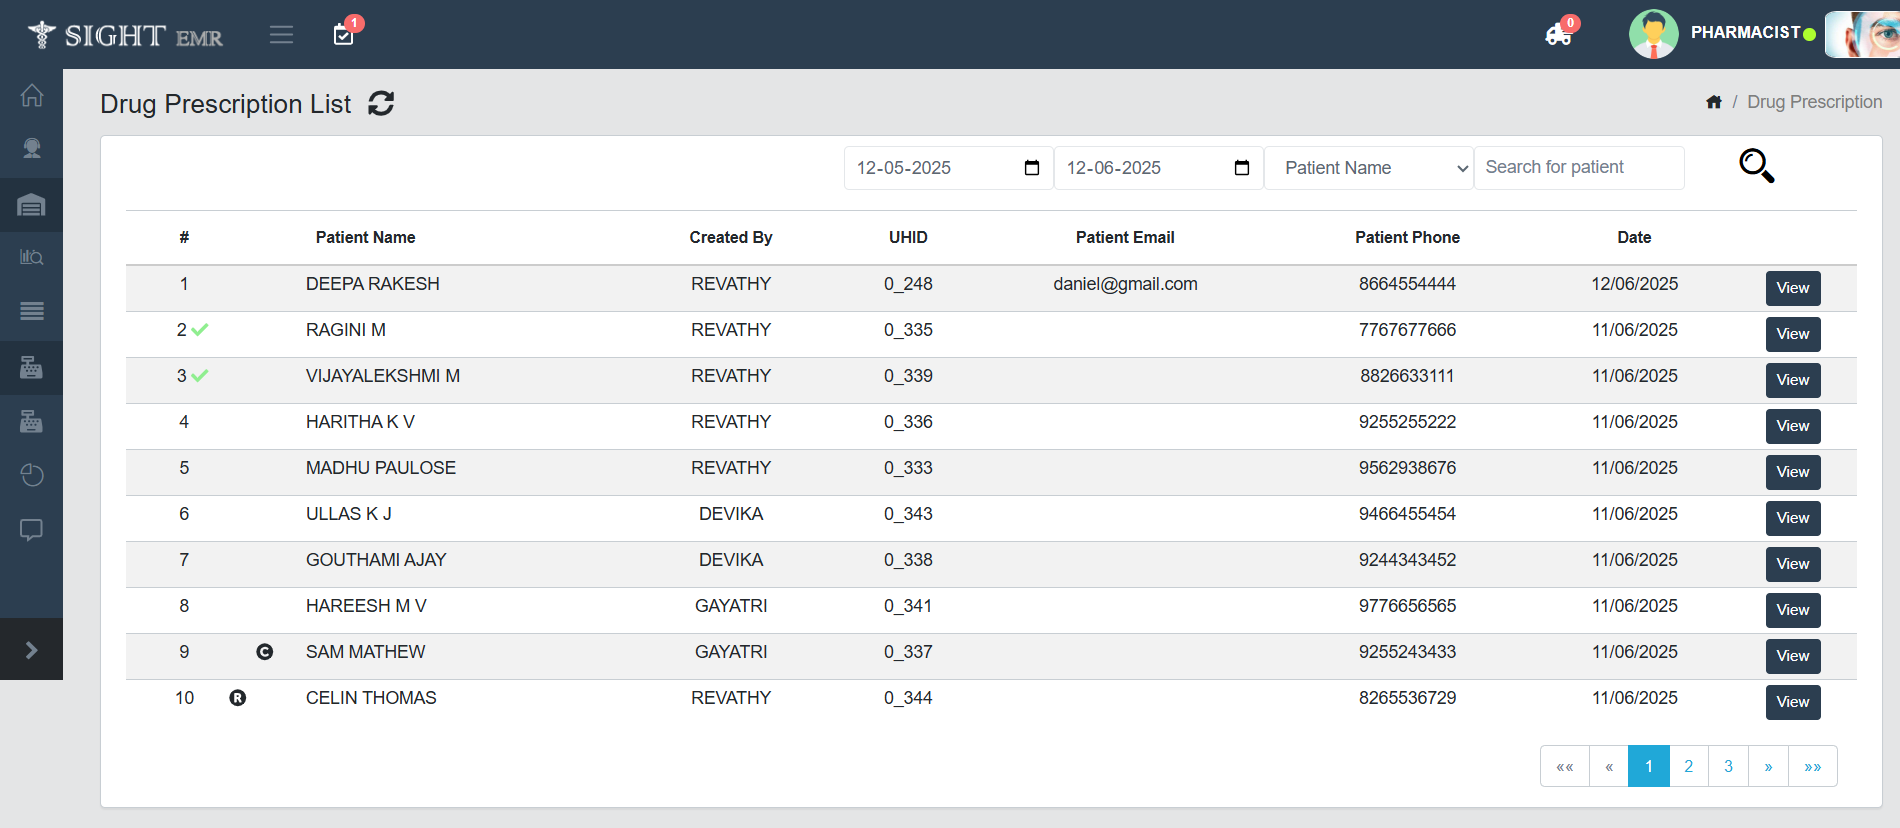
- Located at the top of the screen. Select the From and To dates to filter prescriptions within a specific date range.
- Dropdown & Search Field
- Use the dropdown to filter by Patient Name/ UHID/ Phone Number/ Email and search.
- Refresh Icon
- Click to refresh the list and reload the latest data.
- Each row contains the following details such as Patient Name, Created By, Patient Email, Patient Phone, Date.
- Click View button at the right of the particular prescription.
- Opens up a Drug Prescription page with following Details:
- Patient Details: Name, Phone Number, Address, Age, UHID, Email, IP No.
- Doctor Details: Name of the Doctor, Registration Number, Phone Number, Email.
- Notes: Notes added by Dr.
- Advice: Advice added by Doctor.
- Drug Prescriptions: Displays Prescribed Medicine with Name with description/Instructions, Frequency and Duration.
1. For New Patients/ Existing Patients with new medicines, the name, frequency and duration will appear in Blue Colour with a blinking Icon (New).
2. If any Change in frequency and duration, that particular change will appear in Blue Colour.
- Action Buttons
- Invoice: Click invoice button to generate the Bill.
- The Drug Prescription will be displayed in th Invoice Screen.
- Can add extra products by Clicking Add button below the product adding table.
- Click Trash Icon at the left of the product table to delete the product.
- Customer Details Section: Enter Customer Name/Search and Select Customer Name* from the List, Customer Phone Number*, Customer Address.
- Doctor Details: Enter Doctor Name, Doctor Phone Number, Doctor Registration Number.
- Payment Details Section*: Select Payment Status (Paid/Not Paid) and Payment Method (Cash/ Card/Online: UPI IDor Tran No/ Split).
- Product Entry Section
- Product ID: Enter Product ID/Search and Select Product ID from the List.
- Product Name: Enter Product Name/Search and Select Product Name from the List.
- Batch No.: Enter Batch No.
- Quantity: Enter Quantity of the product.
- Price: Enter/Edit Price.
- Discount: Enter Discount Amount.
- CGST/SGST: Enter CGST and SGST in %.
- Total amount will be auto-filled according to the input.
- Billing Summary Panel: To the right of the Product entry section. It includes Gross Amount, Discount Amount, SGST and CGST amount, Net Amount, Paid Amount, Discount/Excess Amount and Grand Total.
- Notes: Enter additional Notes if any.
- Use Save as Draft to preserve the entry without updating Invoice.It will then be edited and save from Invoice List.
- Click Generate Invoice to generate and print Bill.
- Cancel: Click Cancel button to delete the Prescription.
- Back: Click Back button to go back to the Drug Prescription List.
- Invoice: Click invoice button to generate the Bill.
Data Download
- Downloads available for the followinh Pharmacy Reports:
- Day Close Report
- Pharmacy Statement
- Schedule Drug Report
- Emergency Drug Report
- Stock Report
- Surgery Stock Report